User Manual

C# Adding a Data Source User Guide

23/9/26
C# Adding a Data Source User Guide

What is C#?

When developing applications on the Kuika platform, you can use various data sources and create Custom Actions. One of these processes can be performed using the C# language. C# is a programming language widely used in modern application development and can serve as a powerful data source integration tool on the Kuika platform. Kuika runs C# functions using .NET 10 and C# 14. In this training content, you will learn how to connect to databases using C#, apply object-oriented programming principles, and develop performance-focused applications.
‍

Create Data Source Connection and Custom Action with C#

  1. Log in to the Kuika platform and open the project you’ll be working on from the Apps screen.
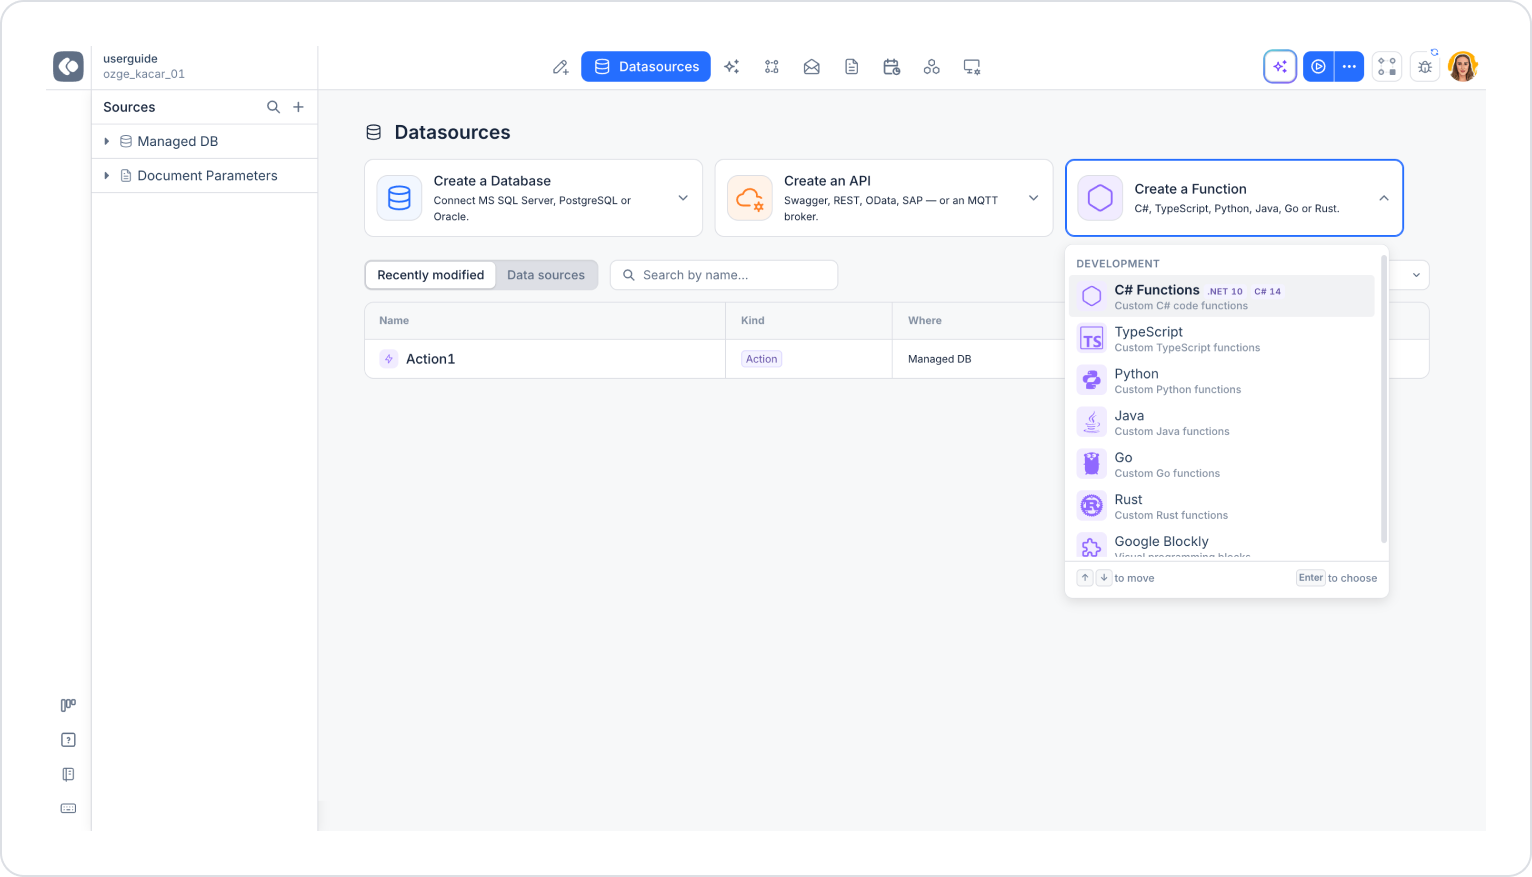
  2. Click the Datasources icon on the top navigation bar.
  3. On the Datasources main screen, click the Create a Function card and select the C# Functions option from the list that opens. You can also access this list via the + icon next to the Sources heading in the left panel.
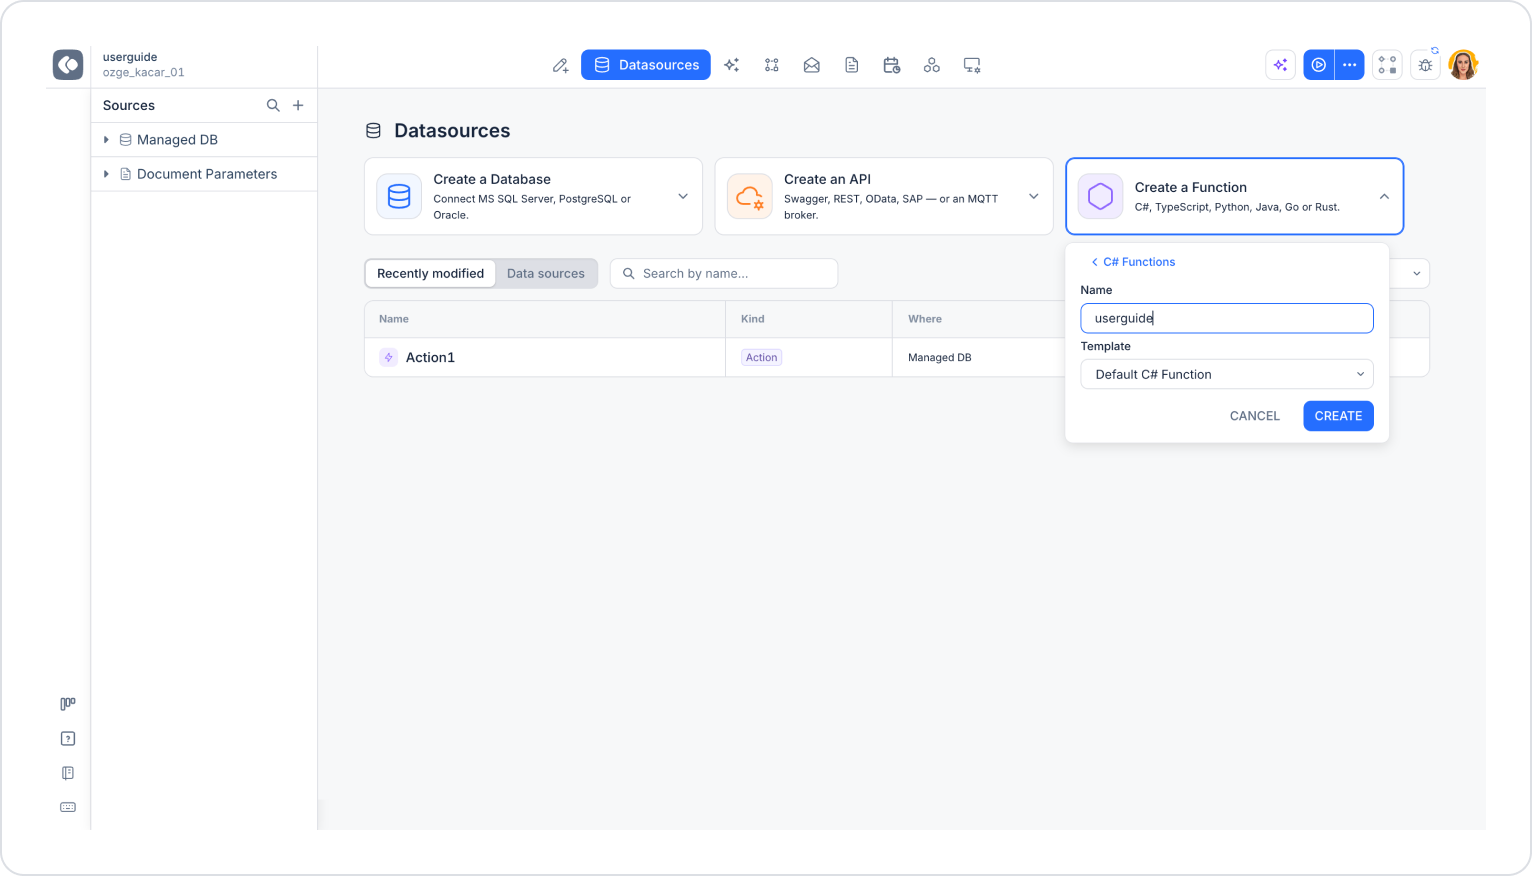
  1. In the form that opens:
    • Name: Enter a name for the data source.
    • Template: Select the template you want to use. By default, Default C# Function is selected. (For other templates, see sections 4–9.)
  2. Click the CREATE button to create the data source.

Anatomy of a C# Module

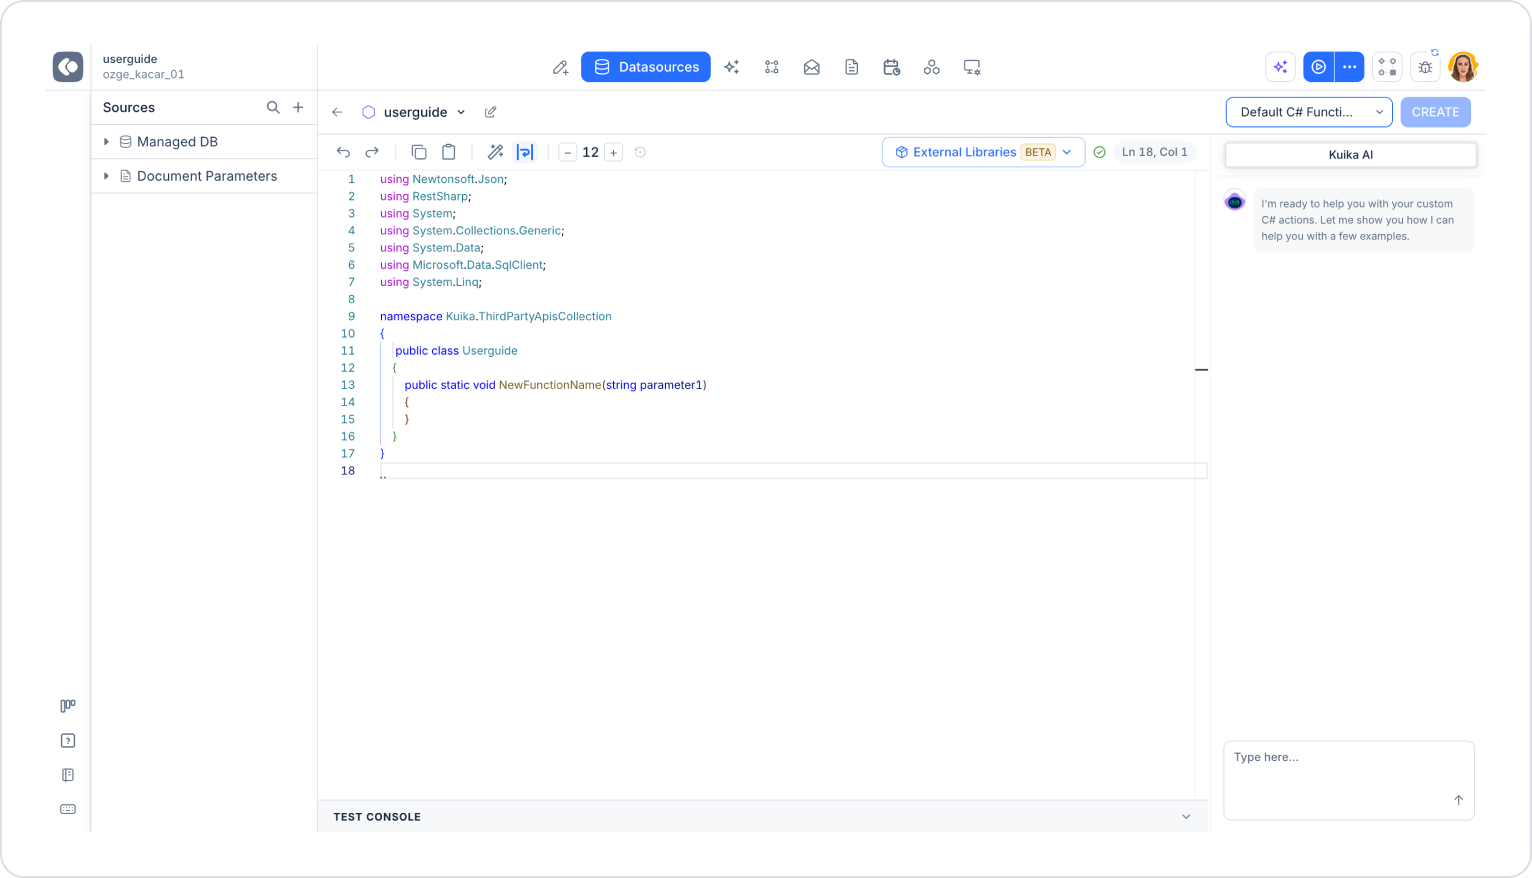
Action naming field: The name of the data source appears in the top-left corner. You can update the name using the pencil icon next to it. You can use English characters as well as the special characters “-” or “_” in the name.

Template area: You can switch between predefined templates using the drop-down list in the top-right corner:
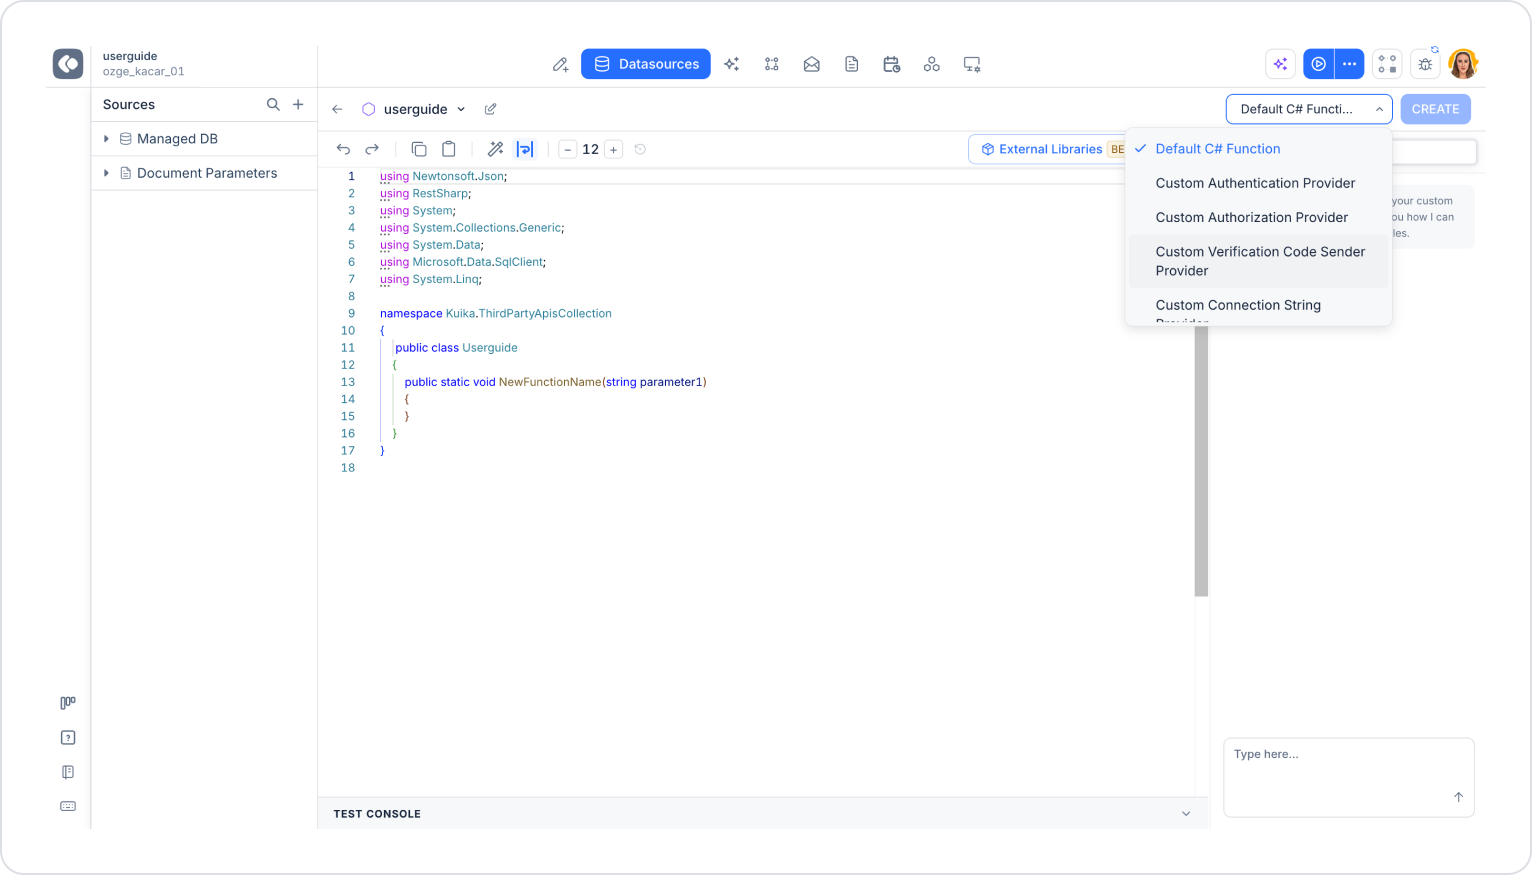
  • Default C# Function
  • Custom Authentication Provider
  • Custom Authorization Provider
  • Custom Verification Code Sender Provider
  • Custom Connection String Provider
  • Custom External Token Validator Provider
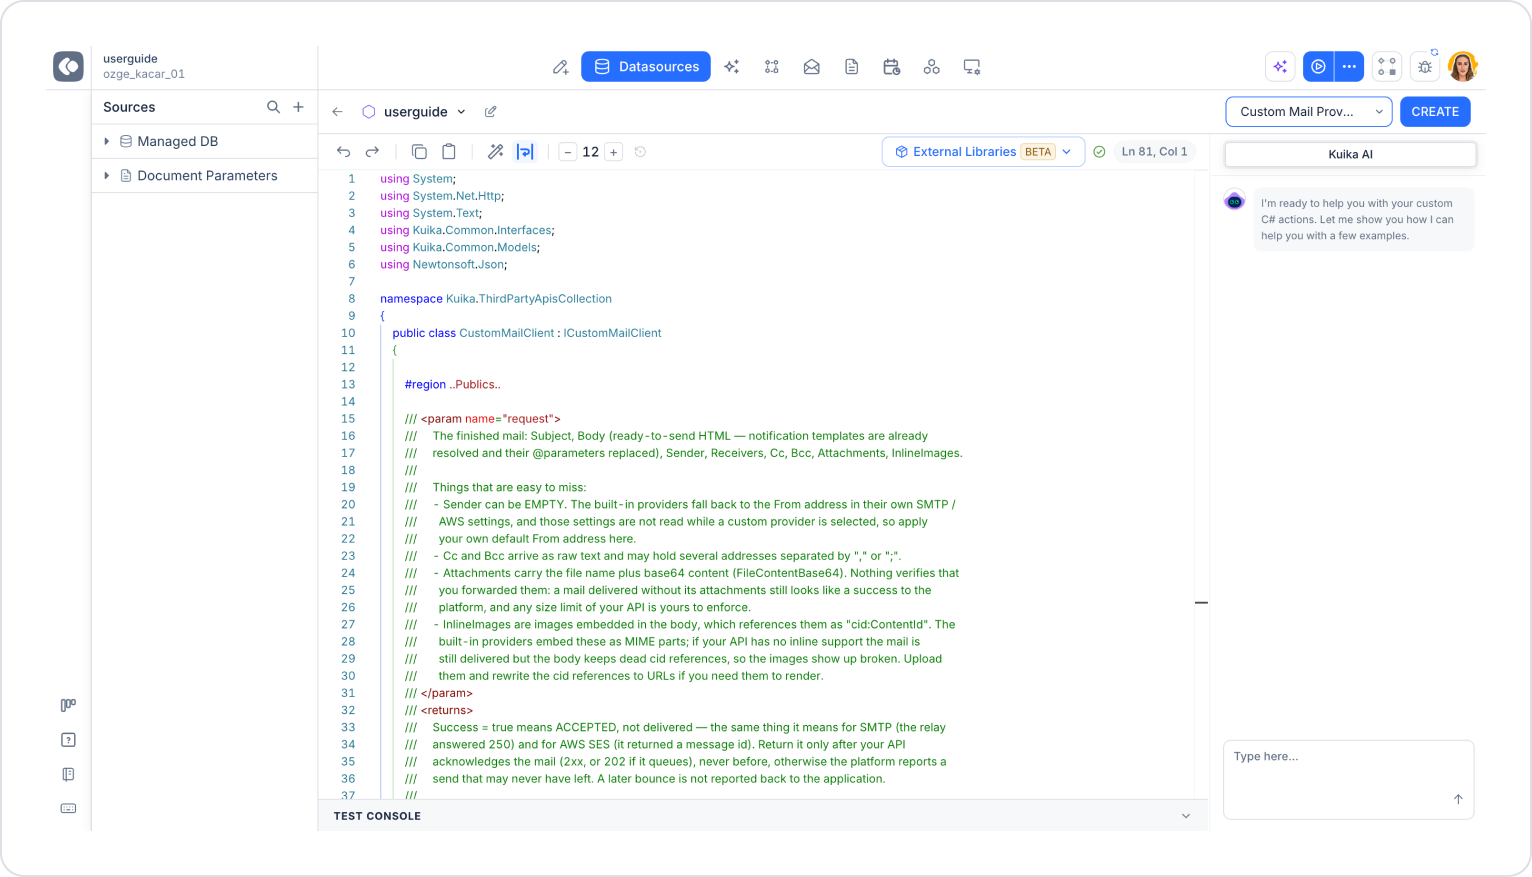
  • Custom Mail Provider
When you change the template, the code in the editor is replaced with the code for the template you selected. Any code you wrote previously is deleted.

Editor toolbar: Includes options for undo/redo, copy/paste, code formatting (Tidy Up), line wrapping, and font size adjustment. On the right side, a checkmark indicating whether the code is valid and the cursor’s position (e.g., “Ln 18, Col 1”) are displayed.

Tidy Up: You can automatically align and format your code by clicking the formatting button on the toolbar. This improves the code’s readability.

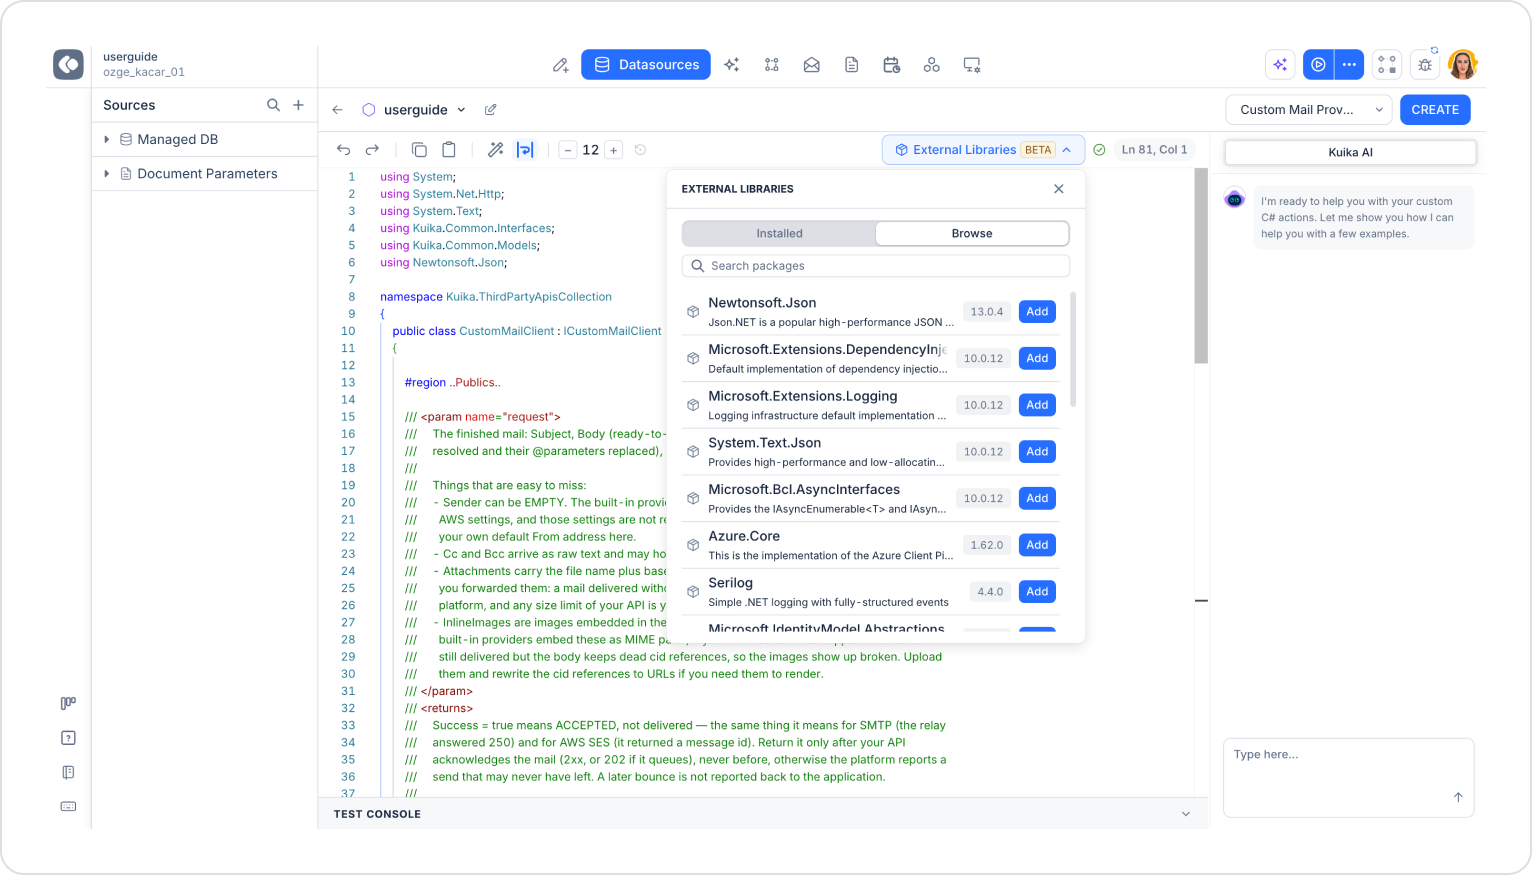
External Libraries (BETA): You can add the NuGet packages you want to use in your action from this section. Clicking the button opens a two-tabbed panel:
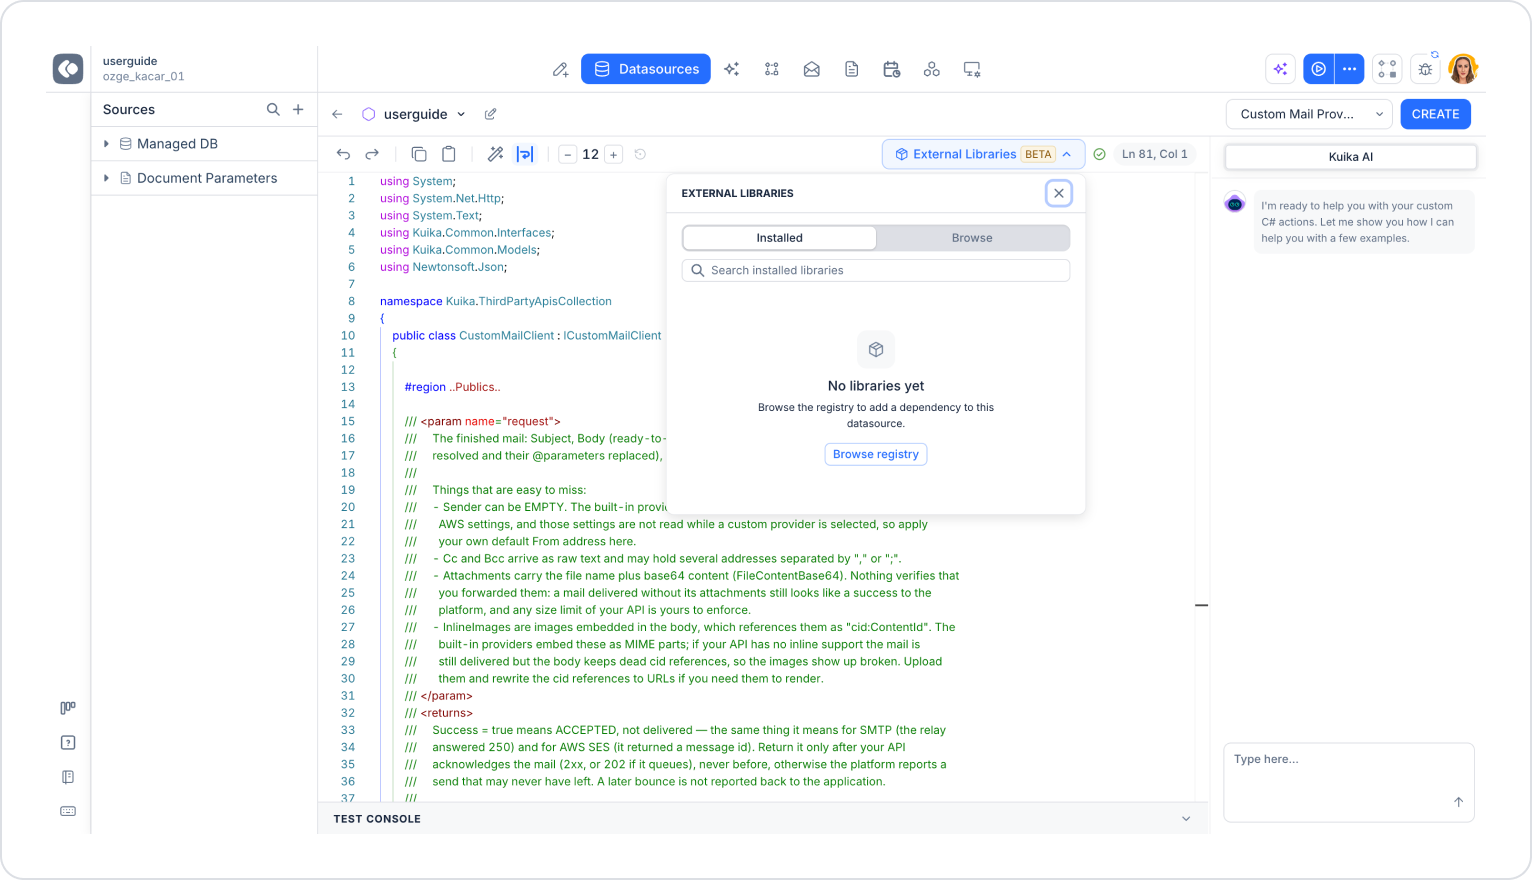
  • Installed: Lists the libraries added to the data source. If no libraries have been added yet, you can navigate to the package registry using the Browse registry button.
  • Browse: Lists the libraries in the package registry. You can search using the Search packages field, view the current version of each package, and add the package using the Add button. For example, popular libraries such as Newtonsoft.Json, System.Text.Json, and Serilog are supported.

The libraries you add become available for use in your C# code. Paying attention to library versions is important for compatibility.

Kuika AI: You can create functions with AI support from the panel on the right side of the editor. (See Section 3)

Test Console: You can test your function by expanding the TEST CONSOLE area below the editor.

Saving Functions: After creating functions, you can save them by clicking the CREATE button in the top-right corner.

Creating C# Functions with Kuika AI
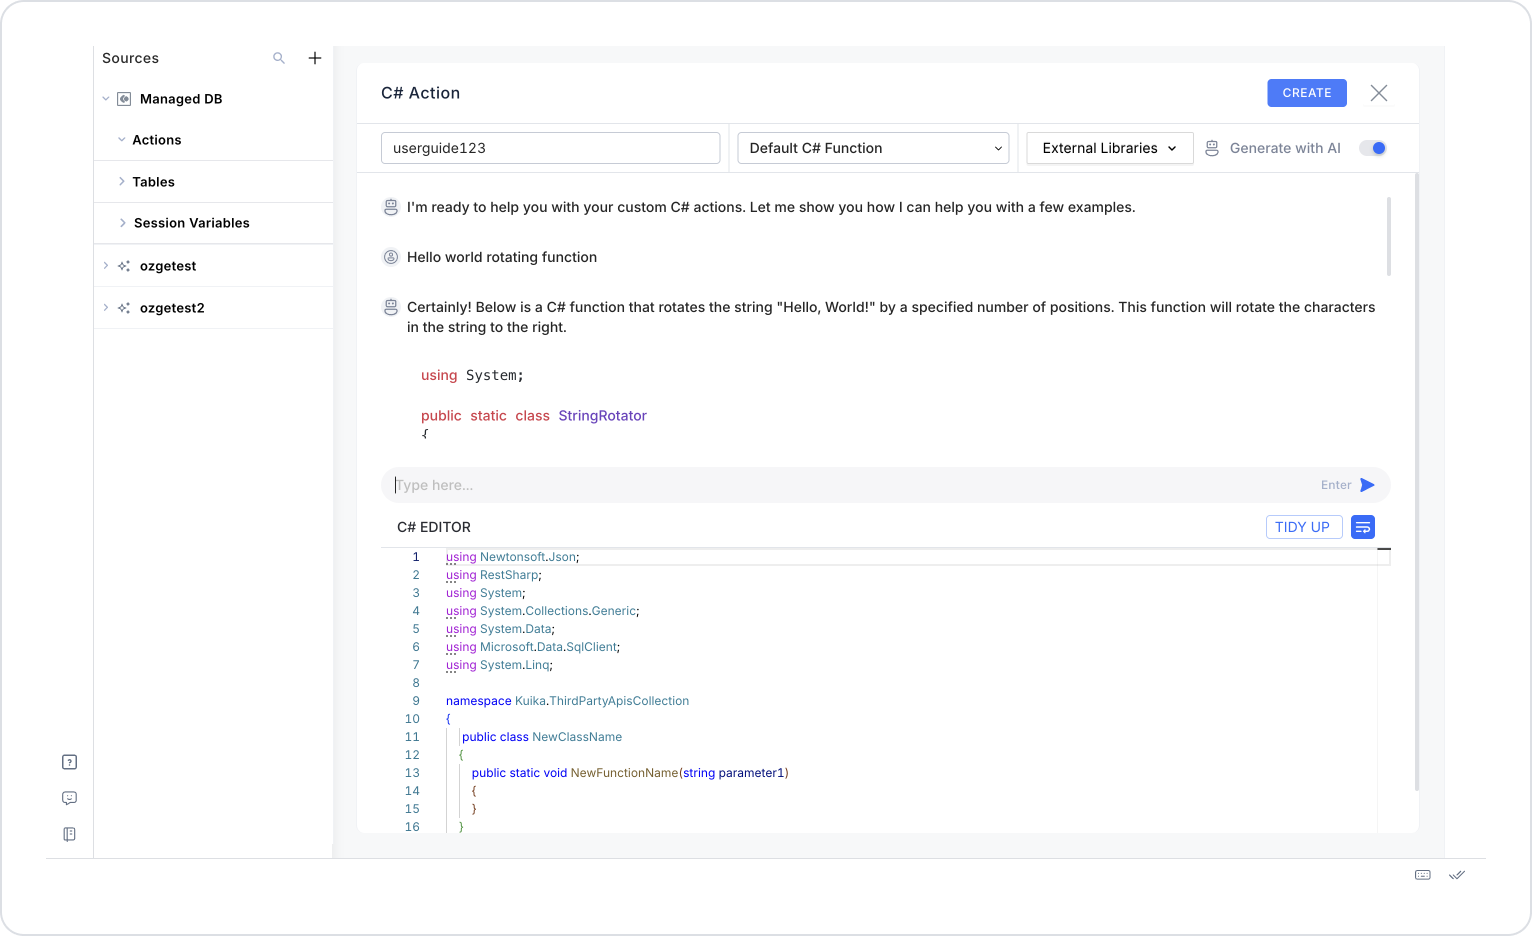
  1. In the Type here field at the bottom of the Kuika AI panel on the right side of the editor, define the function you want to create (for example, “Hello world rotating function”).
  2. Click the Submit button.
  3. Copy the code generated by Kuika AI and paste it into your C# editor.

Creating C# Functions with AI Assistant

  1. Generate with AI  to open the AI-powered chat field.
  2. Define a function (“Hello world rotating function” etc.).
  3. Copy the code generated by AI and add it to your C# editor.

Custom Authentication Provider

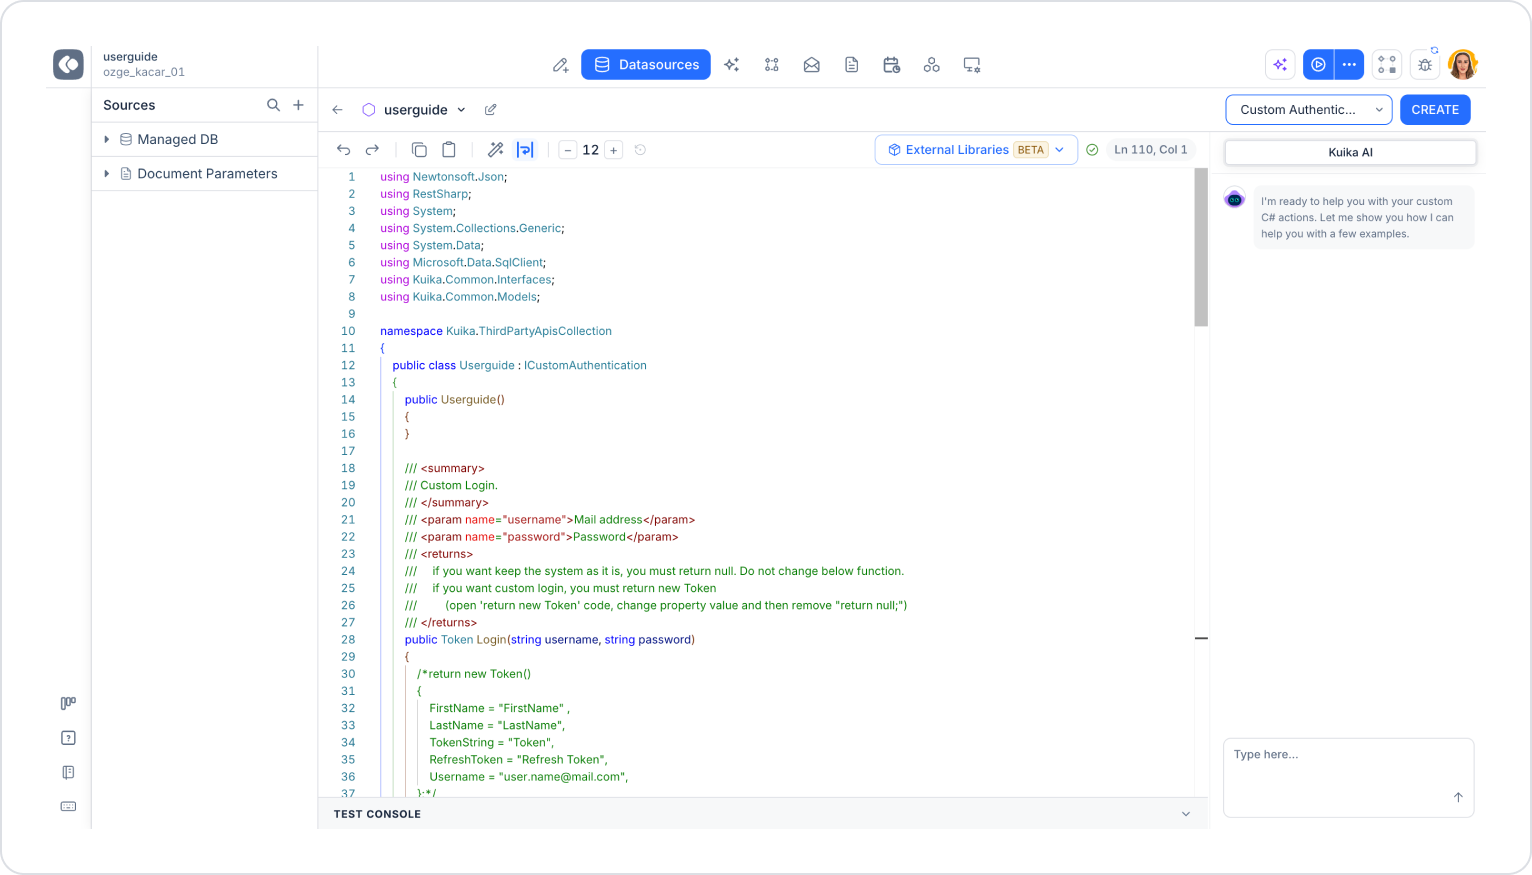
The Custom Authentication Provider allows you to create customized authentication systems.
  1. Select C# Functions and enter a name.
  2. From the Template field, select the Custom Authentication Provider template.
  3. Click the CREATE button.

The class in the template implements the ICustomAuthentication interface and defines authentication functions. The following methods are provided out of the box:

Login Method: Allows users to log in. There are two separate versions:

  • Log in with username and password: Login(string username, string password)
  • Login using a username, an external token, and a refresh token

If the login is successful, the method returns a Token object containing the user’s information. This object includes the following fields: FirstName, LastName, TokenString, RefreshToken, and Username. The user’s login must be validated; this validation can be performed via a REST API or a custom database.

Refresh Token Method: Used to refresh an expired token.

Find Manager Method: Used to find a user’s manager. Frequently used in Process Automation.

Logout Method: Logs the user out of the system. This method has no return value.

Use return null in methods where you want to preserve Kuika’s default behavior. If you want to implement custom authentication logic, uncomment the `return new Token()` code in the template, adjust the field values, and remove the `return null;` line.

Custom Authorization Provider

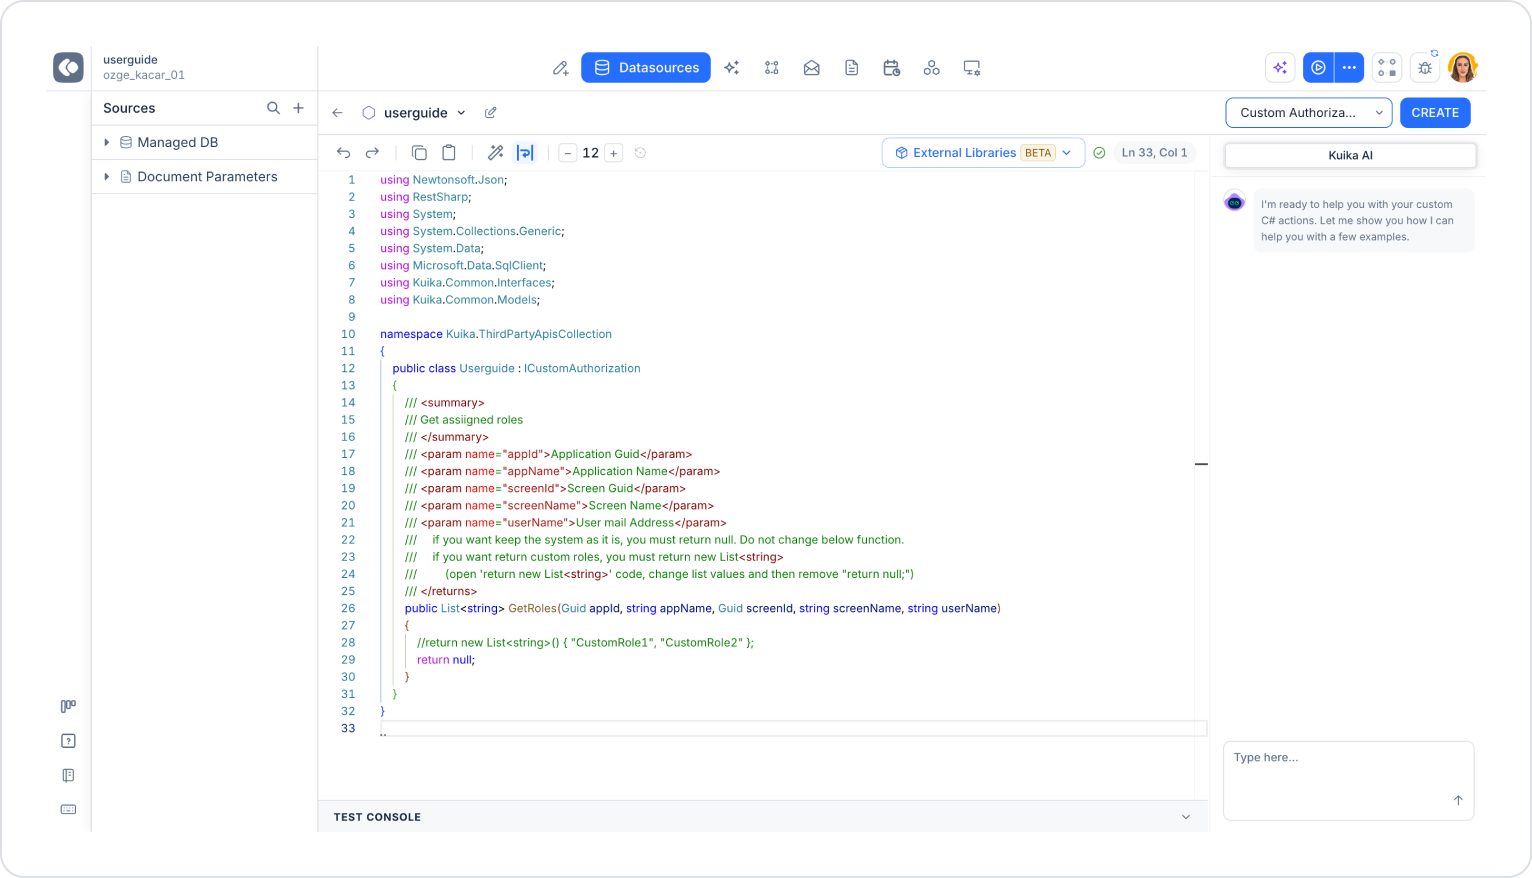
The Custom Authorization Provider is used to determine users’ roles within the application.
  1. Select C# Functions and enter a name.
  2. From the Template field, select the Custom Authorization Provider template.
  3. Click the CREATE button.

The class in the template implements the ICustomAuthorization interface and contains the GetRoles method.

GetRoles Method: Returns the roles the user has within the application as a List<string>.

Parameters:

  • appId (Guid): The application’s unique ID
  • appName (string): The application’s name
  • screenId (Guid): The screen’s unique ID
  • screenName (string): The screen’s name
  • userName (string): The user’s email address
If custom authorization is not to be applied, return null must be used. In this case, the default system behavior is preserved. If you want to return custom roles, uncomment the code return new List<string>() { “CustomRole1”, “CustomRole2” }; in the template, edit the role names, and remove the return null; line.

This structure can be used to define customized roles for users working on specific screens or in specific sections of the app.

Custom Verification Code Sender Provider

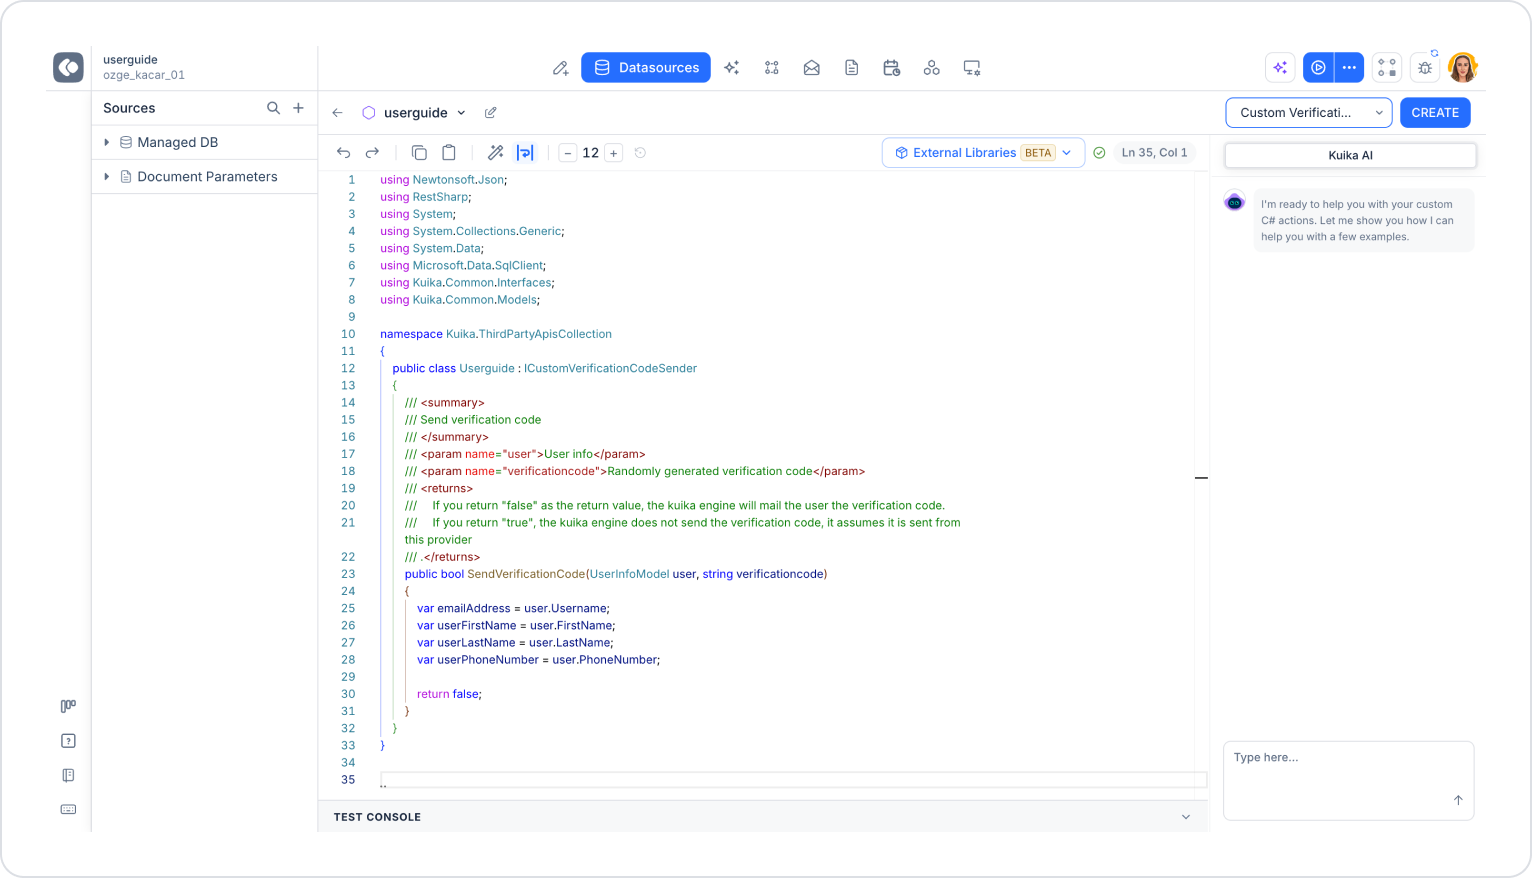
The Custom Verification Code Sender Provider allows you to send verification codes generated by Kuika to users via a channel of your choice (SMS, email, push notification, etc.).
  1. Select C# Functions and enter a name.
  2. From the Template field, select the Custom Verification Code Sender Provider template.
  3. Click the CREATE button.

The class in the template implements the ICustomVerificationCodeSender interface and contains the SendVerificationCode method.

SendVerificationCode Method: Takes two parameters:

  • user (UserInfoModel): User information. You can access the following fields through this object:
    • user.Username: The user’s email address
    • user.FirstName: The user’s first name
    • user.LastName: The user’s last name
    • user.PhoneNumber: The user’s phone number
  • verificationcode (string): A verification code randomly generated by Kuika

The method’s return value determines who will send the code:

  • return false: Kuika sends the verification code to the user via email itself.
  • return true: Kuika does not send the code; it assumes the code was sent by this provider.

For example, if you want to send the verification code via SMS, call your SMS service within the method using the `user.PhoneNumber` and `verificationcode` values, and return true when the sending is successful.

Custom Mail Provider

The Custom Mail Provider allows you to handle your application’s email sending process through an infrastructure or third-party service of your choice. With this setup, you can use your own SMTP server, an email sending API (such as SendGrid, Mailgun, or Amazon SES), or an on-premises email infrastructure instead of Kuika’s default email sending mechanism.

It can be used in the following scenarios:

  • When the application needs to use the organization’s own SMTP server instead of Kuika’s default email provider,
  • When email delivery needs to be handled through a third-party service,
  • When the delivery logic (e.g., logging, additional verification) needs to be customized,
  • When different email providers need to be used for different environments or tenants.

Creation steps:

  1. Select C# Functions and enter a name.
  2. From the Template field, select the Custom Mail Provider template.
  3. Click the CREATE button.

Custom Mail Provider Class

The CustomMailClient class in the template implements the ICustomMailClient interface and handles email sending requests triggered from within the application.

request parameter: Contains the email ready for sending:

  • Subject: The email’s subject
  • Body: HTML content ready for sending. Notification templates are parsed and @parameters are substituted.
  • Sender: The sender’s address
  • Receivers, Cc, Bcc: Recipient addresses
  • Attachments: Attachments
  • InlineImages: Images embedded in the body

Important notes:

  • The Sender may be empty. Kuika’s built-in providers use the From address from their own SMTP/AWS settings in this case; however, these settings are not read when a custom provider is selected. Therefore, define your own default sender address in the code.
  • Cc and Bcc are returned as plain text and may contain multiple addresses separated by “,” or “;”.
  • Attachments are returned as the file name and base64 content (FileContentBase64). Whether attachments are delivered or not is not checked; an email delivered without attachments is also considered successful. You must also check your API’s size limits yourself.
  • InlineImages are images referenced in the body in the format “cid:ContentId.” If your API does not support inline images, you must upload the images and replace the cid references with URLs; otherwise, the images will appear broken.

Return value: Success = true indicates that the email was accepted, not that it was delivered. Return this value only after your API has approved the email (2xx or 202 if queued). Otherwise, the platform will report an email as successful even though it may never have been sent. Subsequent bounces are not reported to the application.

Sensitive information such as the email provider’s API key, username, and password must be securely stored within the code and must not be logged.

C# Example

In this example, a class named Calculator is created that contains a method to add two numbers:

using System;
namespace Kuika.ThirdPartyApisCollection
{
public class Calculator
{
public static int Add(int a, int b)
{
return a + b;
}
}
}

using System: Adds the System library, which is required to use basic system functions in C#.

namespace Kuika.ThirdPartyApisCollection: This is the namespace where the C# functions in Kuika are located. It is included by default in templates; it should not be changed.

Calculator class: Created to perform mathematical operations.

Add method: The statement `public static int Add(int a, int b)` takes two integer (int) parameters. The statement `return a + b;` returns the sum of these two values. The method is defined as `public static`, just like in Kuika templates.

This example demonstrates the process of creating a class, defining a method, and performing a simple calculation in the C# language.

Glossary

No items found.

Alt Başlıklar