The QR Renderer element is an interactive element that allows you to generate QR codes from dynamic or static data in your application. Users can scan these QR codes with their mobile devices to be redirected to a link, initiate a process, or quickly access specific content.
A commonly used component in modern applications, the QR Renderer is particularly functional in scenarios such as payment systems, ticketing, event check-ins, registration processes, data sharing, and user authentication. Any text, URL, ID, or value returned from an external source within the application can be converted into a QR code via the Symbol Picker.
Automatic updating of the QR code ensures that data changes are immediately reflected to the user. This provides fast and practical solutions in dynamic applications.
The QR Renderer element is supported in web and mobile applications.
1.1. Common Use Cases
Payment and Billing Transactions: QR codes can be used to redirect users to a payment page, create quick payments in POS integrations, or share invoice viewing links.
Event and Ticket Management: QR codes can be used for verification at event entrances and for concert or seminar tickets. QR codes generated specifically for each user provide unique access.
User Verification Processes: QR codes generated specifically for the user can be used in processes such as two-factor authentication (2FA), email verification, and account activation.
Quick Link Sharing: A QR code can be generated for quick access to a URL, document, or in-app page via mobile devices.
Redirecting to Forms or Registration Pages: Dynamic QR codes can be generated to redirect to webinars, events, or registration pages.
Product Information Display: In a product listing or inventory management application, QR codes can be used to redirect to the details page for each product.
Inventory and Warehouse Management: Information such as shelf, box, or product ID can be converted into a QR code for quick scanning and processing.
2. Key Features
Static or Dynamic Data Support: A QR code can contain fixed text, a URL, or a code, or it can be created dynamically via the Symbol Picker. For example, an order number or user ID can be automatically converted into a QR code.
Flexible Use with Container Structure: QR Renderer works as an image element; it only produces QR output. No other elements are added to it, and it does not require user interaction.
Quick Integration: The QR code can be generated instantly by entering a single value. It integrates seamlessly with data obtained from REST API, Managed DB, or user input.
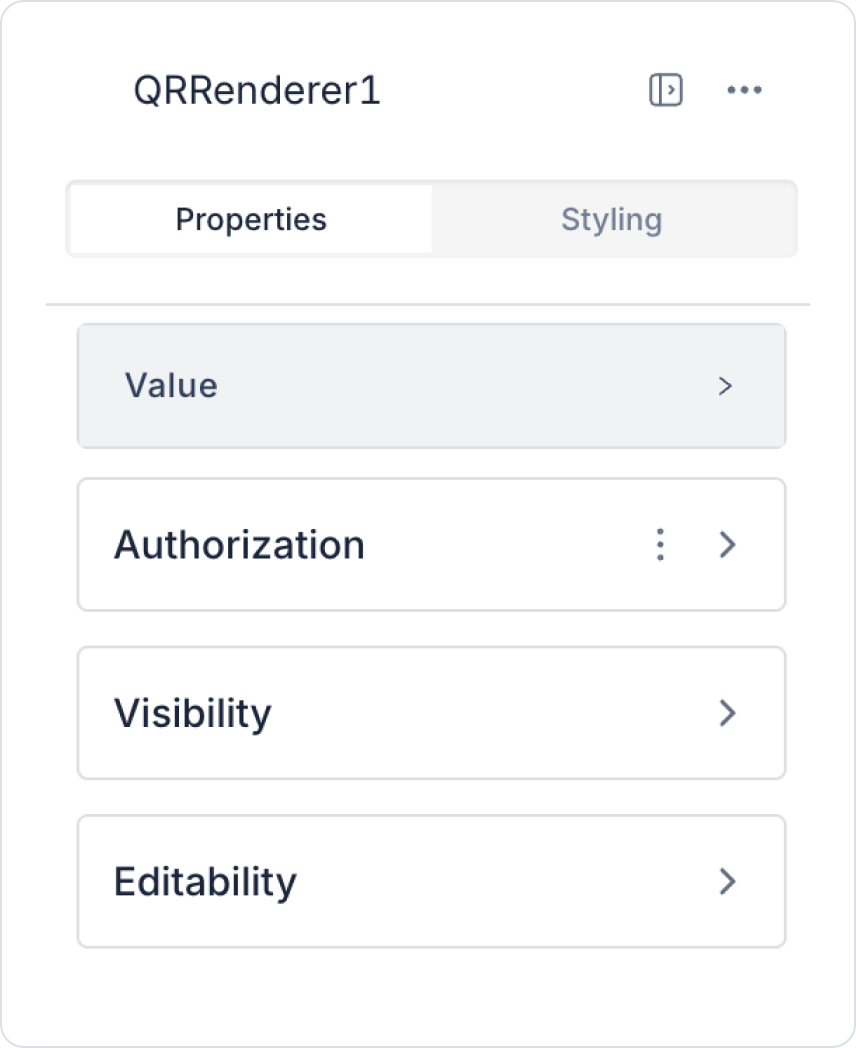
2.1. QR Renderer Element Properties
You can configure the properties of the QR Renderer element from the Properties panel on the right side.
Value: Specifies the data to be converted to a QR code. You can enter a static value or dynamically retrieve the content of an Input element or a value obtained as a result of an action using the Symbol Picker.
2.1.1. Creating and Reading Data with QR Codes
Creating QR codes in Kuika is an effective way to enhance the user experience in your application and make data more accessible. QR codes are commonly used for product tracking, user authentication, or mobile payment systems.
Data Encoding: You can provide quick access to information by converting your data into QR codes. QR codes are created by converting string-formatted data (e.g., text or URL) into base64 format and can be read by scanners or mobile devices.
Customization: QR codes can be integrated into your visual content. You can dynamically generate QR codes for different data and create codes specific to each user or product.
Performance: QR codes can be generated and scanned quickly. Scanning speed can be increased by optimizing data size, and fast feedback can be provided when scanning with mobile devices.
2.1.2. Creating a QR Code
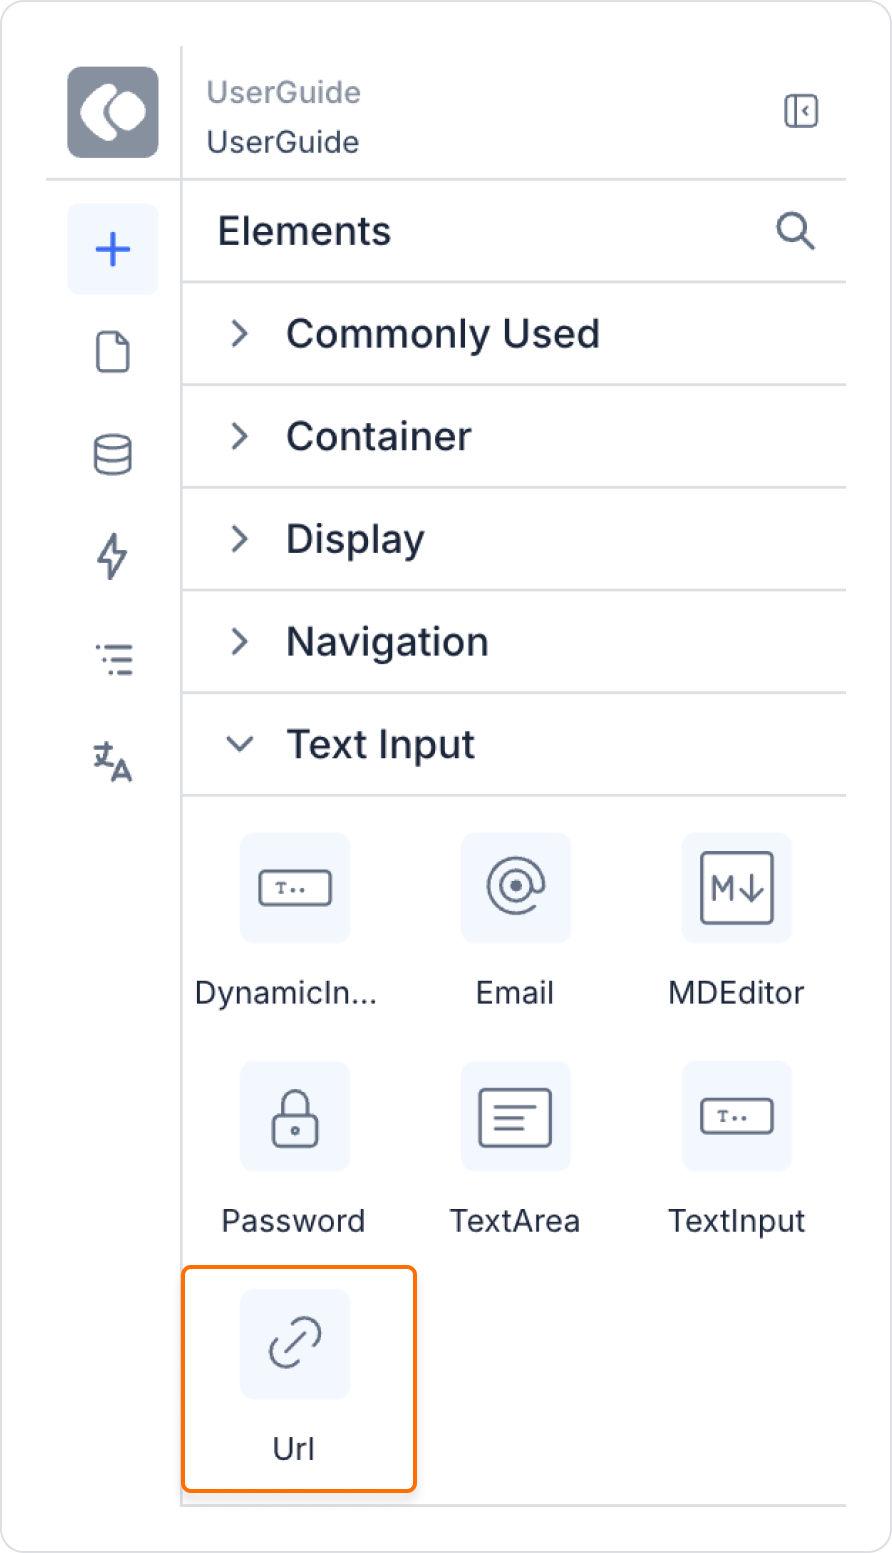
The first step in creating a QR code is to select the data you want to convert to a QR code. This data is usually stored in string format and converted to base64 format during the QR code creation process. In this example, you will learn how to create a QR code using the URL element.
Log in to the Kuika platform.
Enter the UI Design module.
From the Elements panel on the left, drag the URL element under the Text Input category onto the screen.
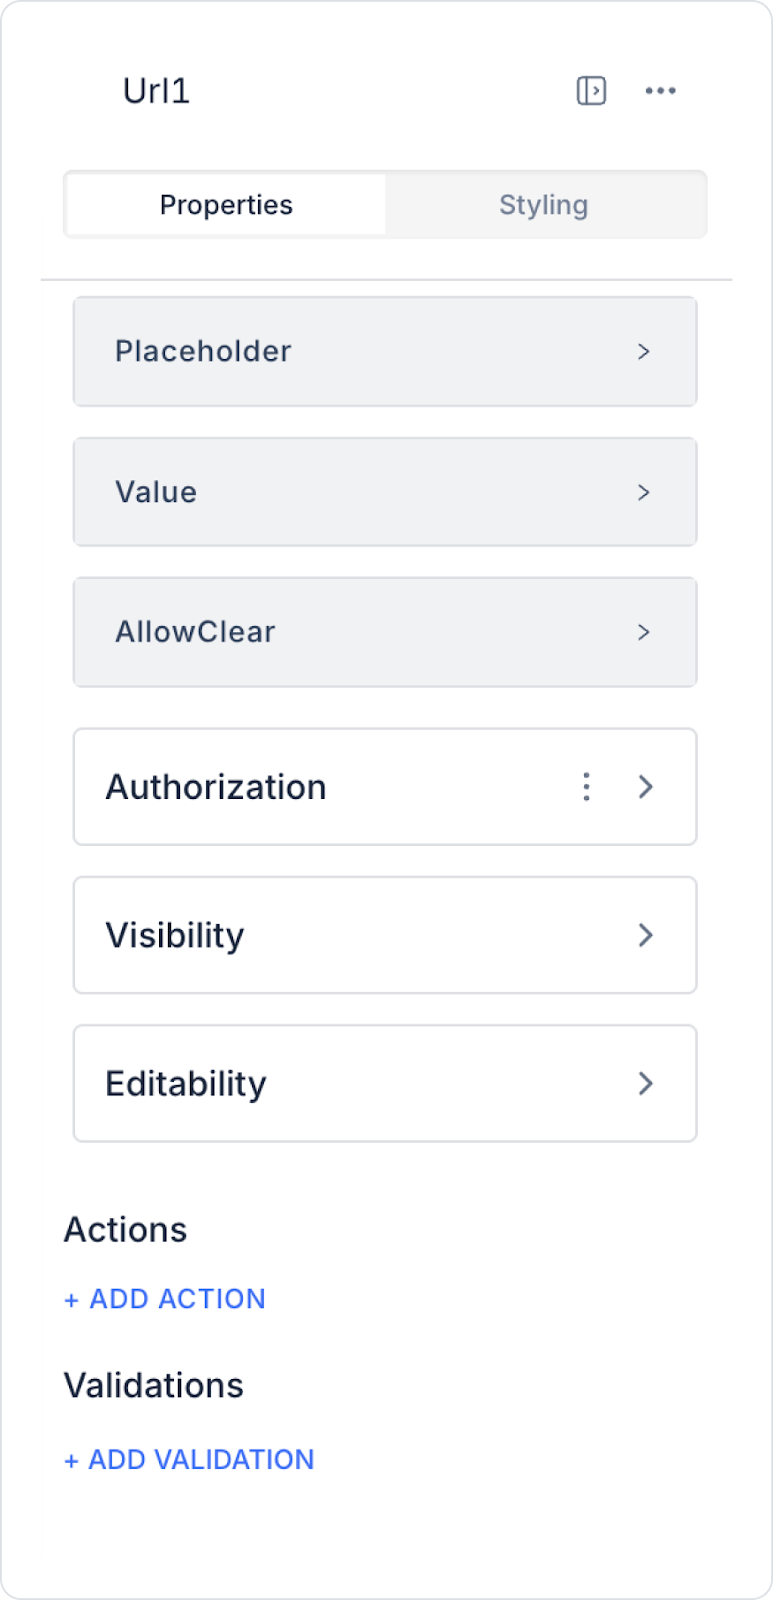
In the Properties panel on the right, enter the URL you want to convert to a QR code in the Value field.
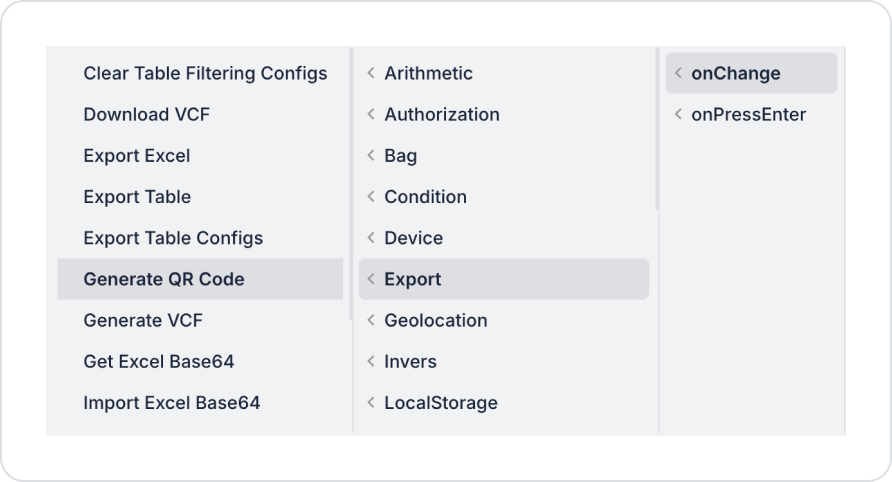
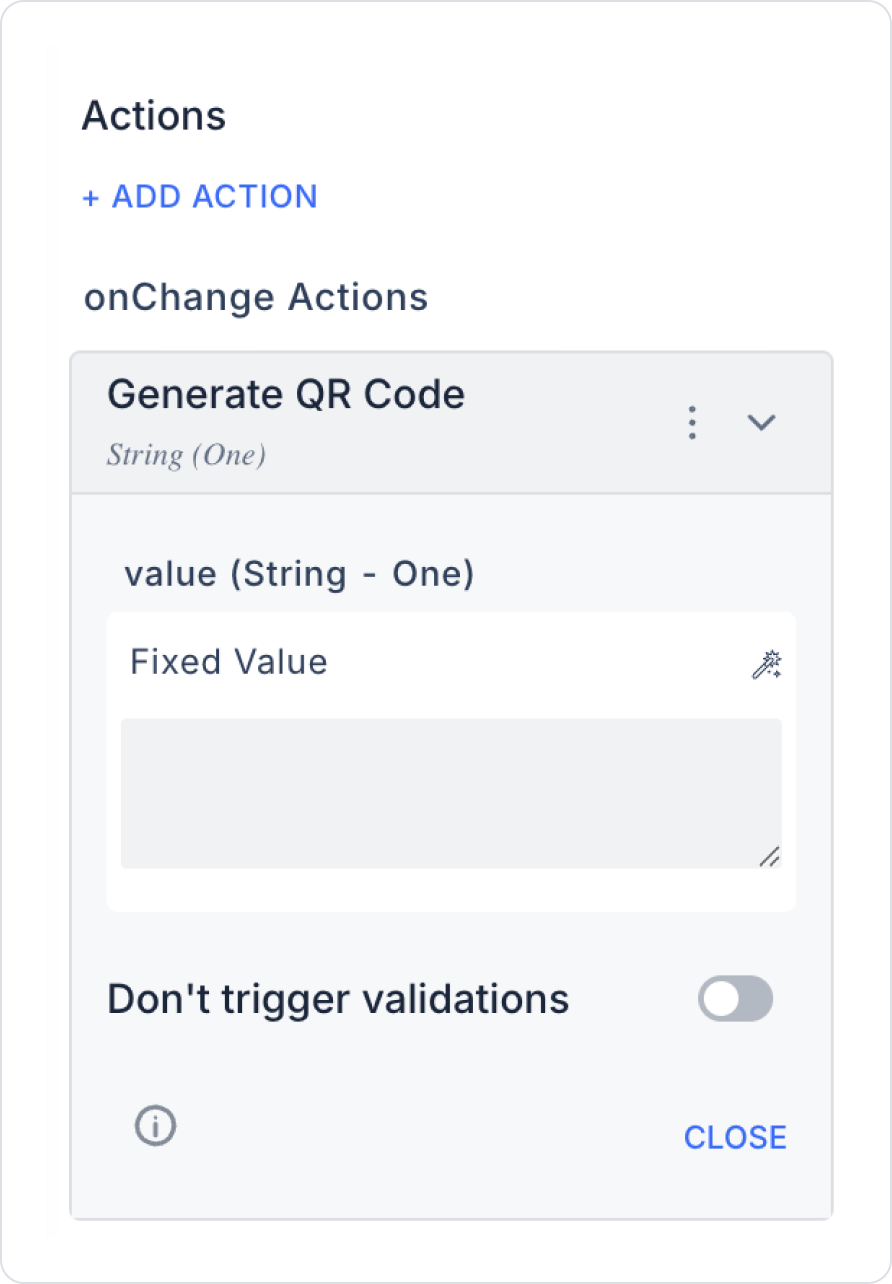
From the ADD ACTION drop-down menu, select On Change → Export → Generate QR Code.
In the Value field of the menu that opens, click on Symbol Picker and select Components → URL.
Once these steps are complete, the QR code for the entered URL will be generated automatically.
2.1.3. Displaying the QR Code
To display the QR code on a different screen, you can use the Navigate action to redirect to a new screen.
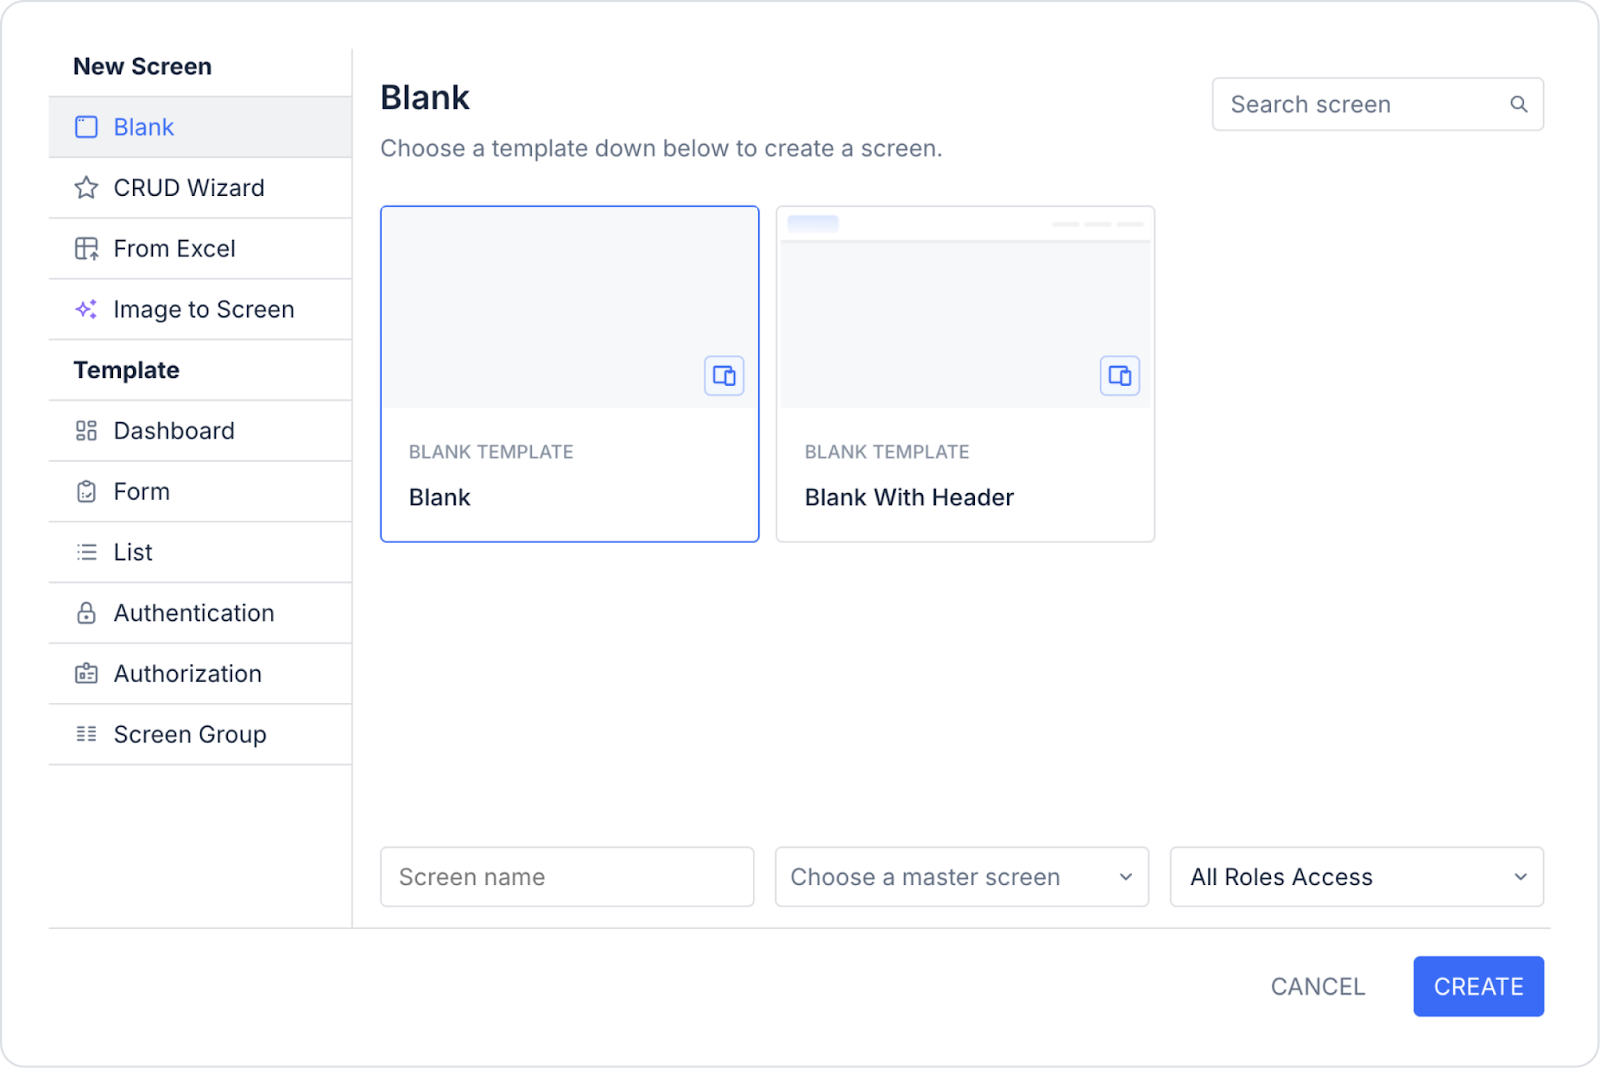
To display the QR code on a different screen, click the + icon in the Screens panel of the UI Design module.
Select New Screen and name the screen “QR Code”.
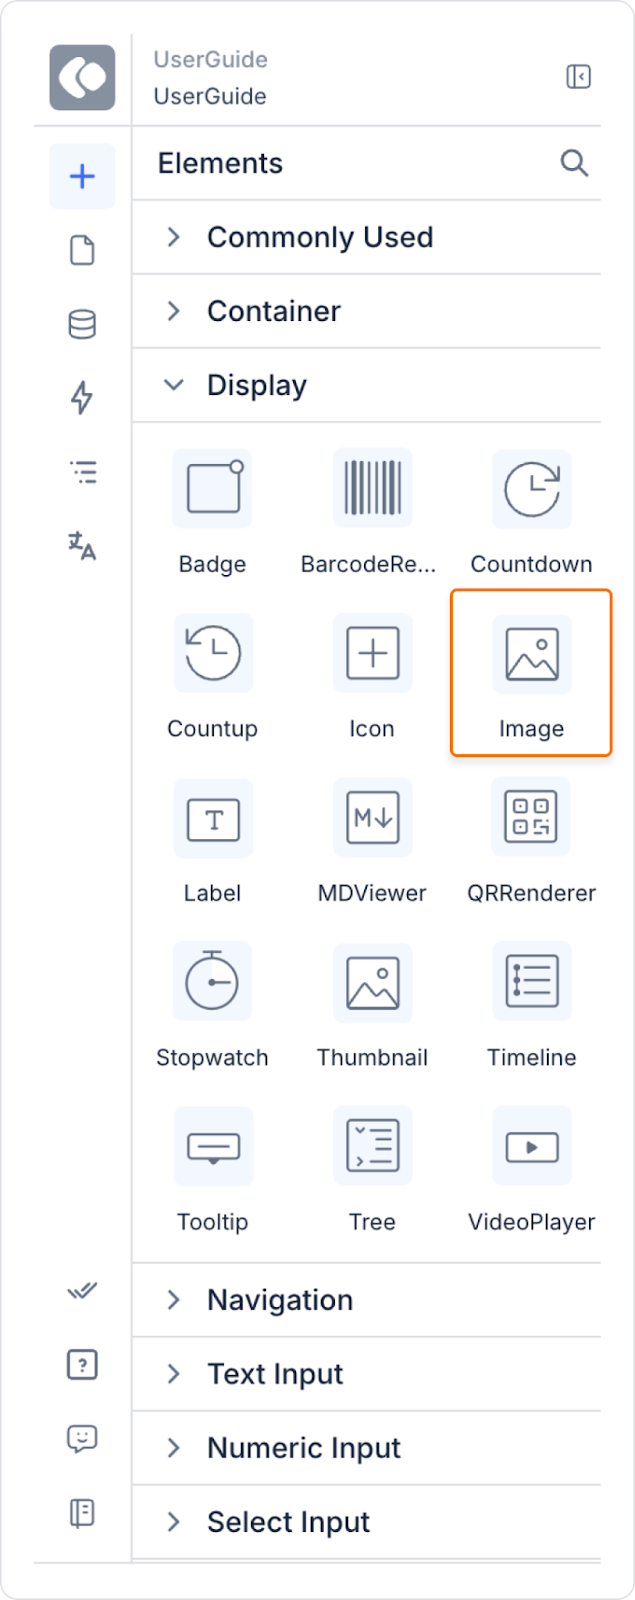
From the Elements panel on the left, drag and drop the Image element under the Display category onto the screen.
Return to the screen where you added the Generate QR Code action.
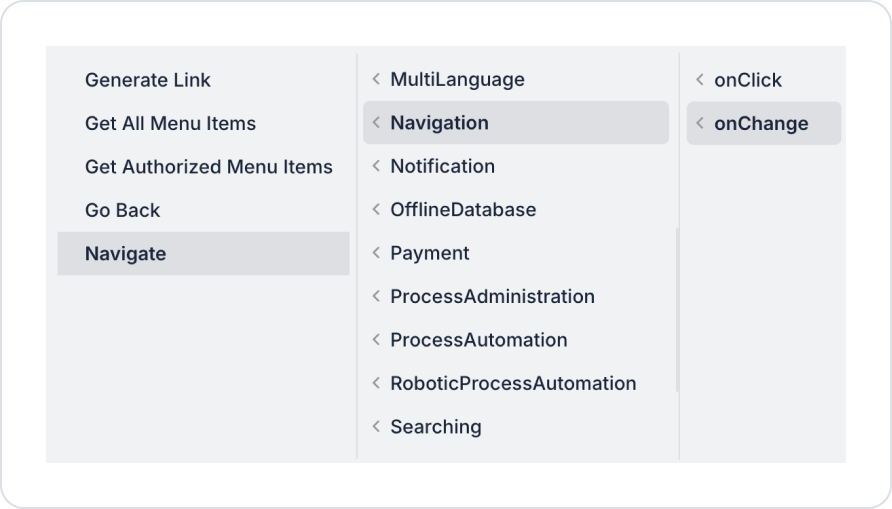
In the Properties panel on the right, add the On Change → Navigation → Navigate action from the ADD ACTION dropdown menu.
From the To Screen field, select the “QR Code” screen and the opening method.
Click on the Screen Input field on the right side to define the QR code's ID.
Once these steps are complete, your QR code will be displayed on the screen you just created.
2.1.4. Scanning the QR Code
Mobile devices and browsers can be used to scan QR codes. Simply add the Scan Barcode action to the element you want to scan the QR code.
Return to the URL element.
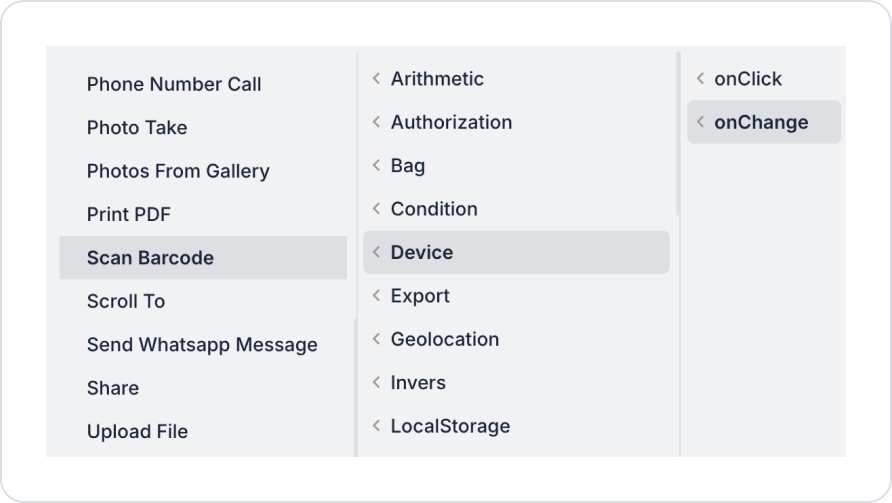
Add the On Change → Device → Scan Barcode action from the ADD ACTION dropdown menu.
This action allows users to scan QR codes using their mobile devices or browsers.
Important Notes
QR codes can be quickly created and scanned, even with large data sets.
The QR Renderer element allows users to instantly access specific data or links.
QR codes that can be easily scanned by mobile devices enhance the user experience and make your application more user-friendly.
2.2. Actions That Can Be Added to Elements
The QR Renderer element is a passive component used solely for data visualization. Therefore, when the element is selected, the ADD ACTION button is not displayed, and no user-triggered action can be attached to the QR Renderer.
Important information about actions for the QR Renderer:
It does not support any onClick, onChange, or similar triggers. Even if the user clicks on the QR code, no action can be executed.
Updating the QR code is triggered only by data changes. If the value of the QR code is linked to a dynamic value via the Symbol Picker, the QR Renderer is automatically updated when this value changes.
All operations must be performed through external elements. For example:
If the content of the QR code changes when the user clicks a button → the button action makes the change.
If the QR code is updated by a table selection → the selection change is provided by an action in other elements.
The QR Renderer does not initiate any actions itself; it only converts the given text into QR format.
Therefore, the action structure of the QR Renderer is completely passive, and in-app behaviors are managed through other elements.
3. How to Use the QR Renderer Element?
In this section, we will cover the end-to-end use of the QR Renderer element through an example scenario.
Scenario: QR-Based Document Access Based on Analysis Documents
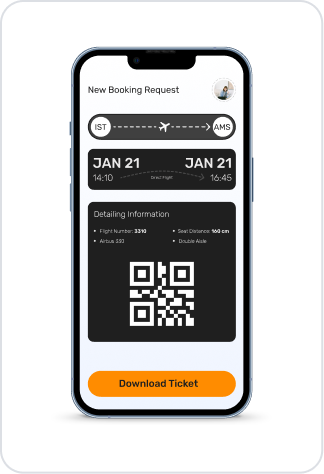
The QR Renderer is used in the application to provide users with quick access to analysis documents related to projects or processes. In this scenario, QR codes dynamically generated for each analysis document provide direct access to the digital version of the relevant document.
In the scenario:
When the application is tested, a QR code pointing to the relevant document is automatically displayed on the screen when an analysis or report record is viewed.
When the QR code is scanned, the PDF of the analysis document opens or downloads directly on the user's mobile device.
This redirection is done along with metadata such as the document's version information, report title, and date.
The user can also see a short description of the document and its version history on the same screen.
Step 1 – Creating the Sample Data Action
Open the UI Design module.
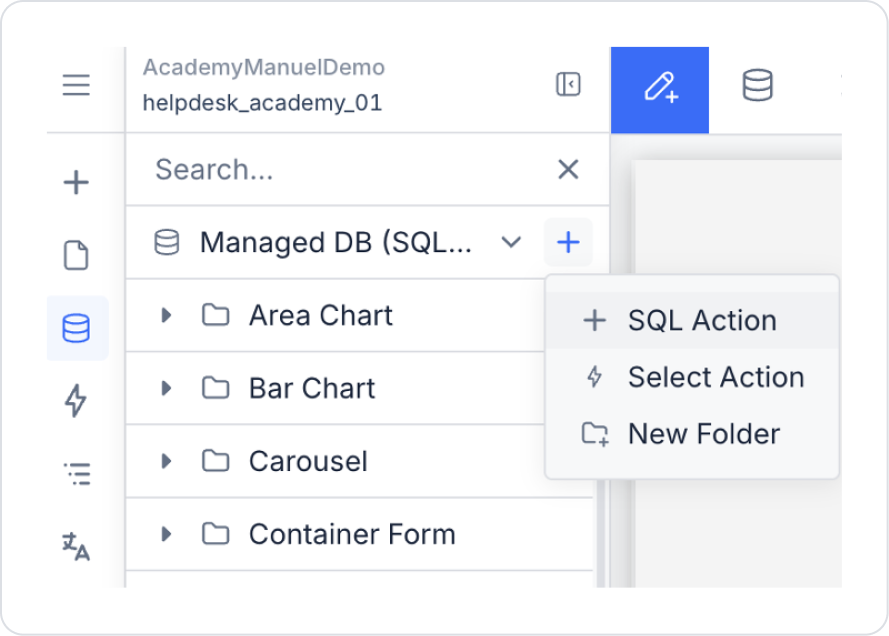
Create a new SQL Action from the Custom Actions area in the left side panel.
Add the following SQL query to the area within the editor and set the Action name to GetAnalysisDocumentForQR.
SELECT ‘https://academy.kuika.com/tr/designer-1/analiz-dokumaninin-okunmasi’ AS DocumentUrl,N'Analysis Document' AS DocumentTitle;
Step 2 – Add Initial Action
Go to the page where the element will be added from the Screens area in the left side panel.
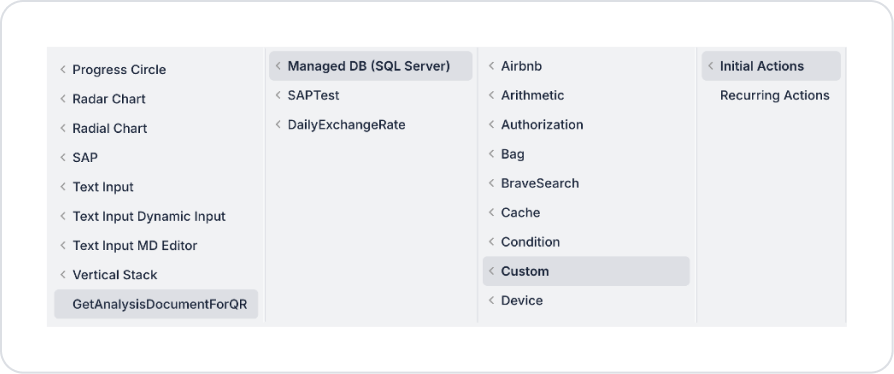
Add the Add Action > Initial Action > Custom > Managed DB > GetAnalysisDocumentForQR action to the page.
Step 3 – Add and Connect the QR Renderer Element to the Page
Drag and drop the Elements > Display > Label element onto the page.
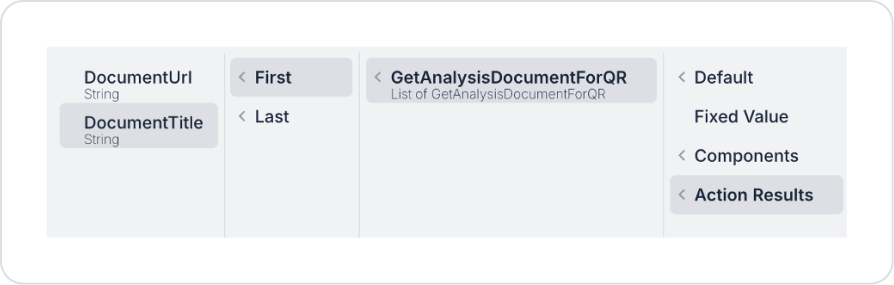
Set the text to Label > Properties > Value > Action Result > GetAnalysisDocumentForQR > First > DocumentTitle.
Drag and drop the Elements > Display > QRRenderer element onto the page.
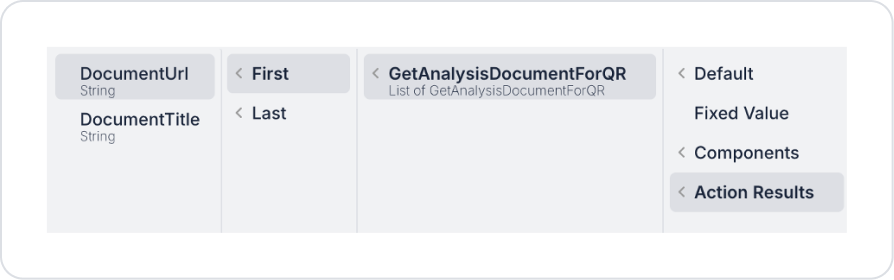
Define the value to be written in the Barcode field as QRRenderer > Properties > Value > Action Result > GetAnalysisDocumentForQR > First > DocumentUrl.
Preview
When the application is tested, the QR code for the relevant document is automatically generated and displayed on the screen under the Analysis Document heading. The QR code is configured to redirect to the digital version of the analysis document.
When the user scans the QR code with their mobile device, the analysis document opens directly, providing quick access to the document. This structure allows the user to access the relevant analysis in a single step, without manually sharing the document link or performing a search.
4. Common Properties
Some fields on the QR Renderer element are used in common across all UI elements. Therefore, detailed explanations of the following properties can be found in the relevant general guide pages:
Check for data changes when linking dynamic data. If the value changes constantly, the QR code will be redrawn each time, which may affect performance.
Leave sufficient space to increase the scannability of the QR code. A minimum of 16–24 px of space around it is recommended.
6. Limitations
No action can be added to the element. No action can be triggered by clicking on the QR code; all actions must be performed through external elements.
If the data is empty or invalid, the QR code cannot be generated. In particular, dynamic fields linked with Symbol Picker that are empty prevent QR rendering.
Element Settings and Customization
Authorization
To manage access control at the element level, you can use the Authorization section in the Properties panel.
Access Types
Anonymous
Allows all users to view the element without logging in.
Restricted
Restricts access to only verified users or specific roles.
Everyone: When enabled, all logged-in users can access the element.
Roles: The roles allowed to access the element are selected here. To edit the role list, click the gear (⚙️) icon next to the Roles field to open the Role Management window. From this window, you can add new roles, create folders, or manage existing roles.
Unauthorized Behavior (Hide / Disable)
If the user does not have the required role, you can specify how the element should behave in the Choose field:
Hide: If the user is not authorized, the element is completely hidden and does not appear on the screen.
Disable: The element remains visible but becomes unclickable / unusable.
This setting is used to manage how unauthorized users encounter the element.
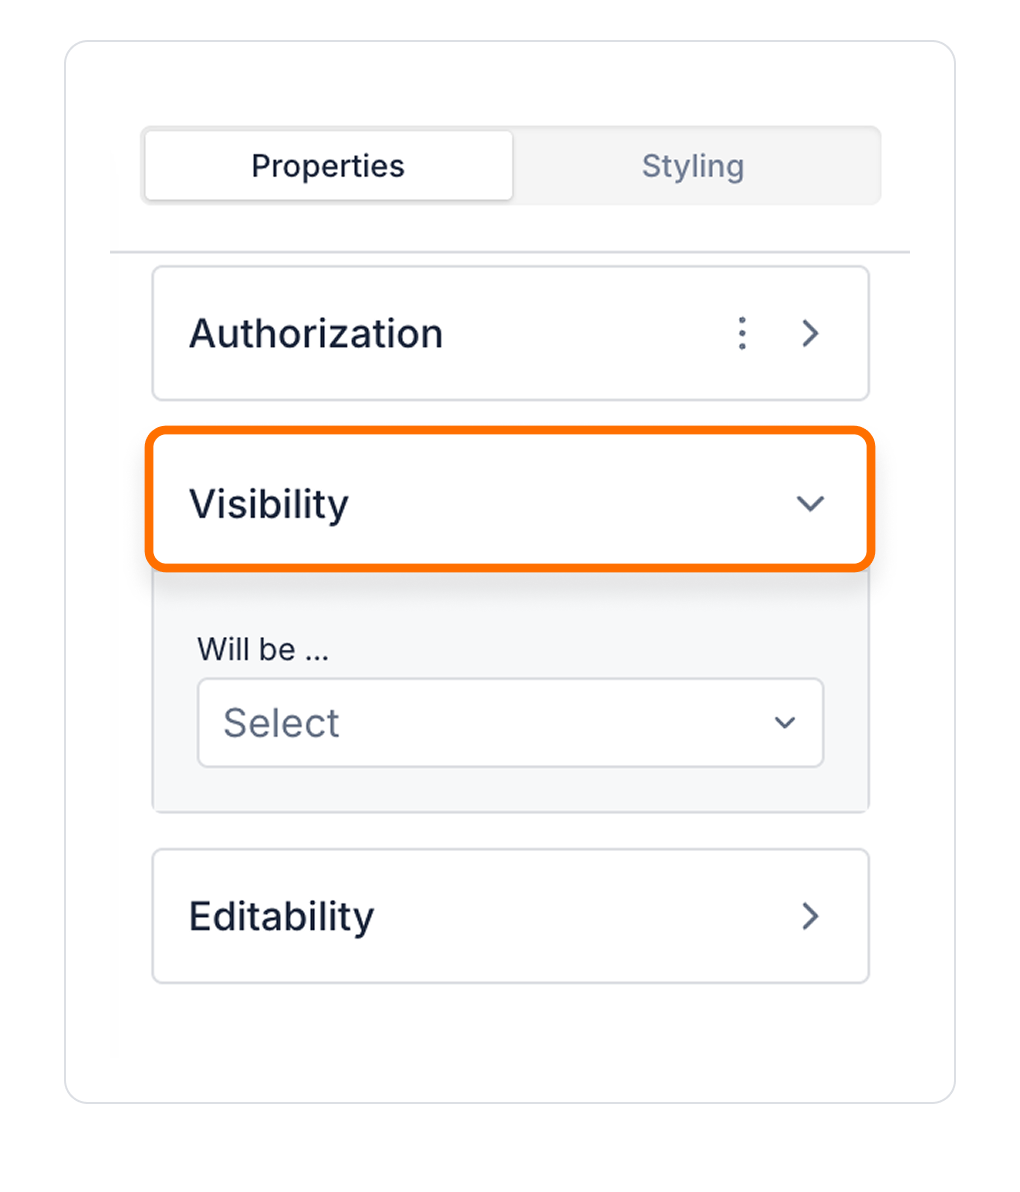
Visibility
Always Visible: The element is always visible. Hidden: The element is hidden. Sometimes Visible: The element becomes visible based on specific conditions.
When Sometimes Visible is used, AND / OR groups can be added directly, allowing visibility rules to be grouped and more complex scenarios to be managed easily.
To configure the setting:
Select the element on the screen.
Open the Properties panel on the right.
Choose the appropriate option under Visibility.
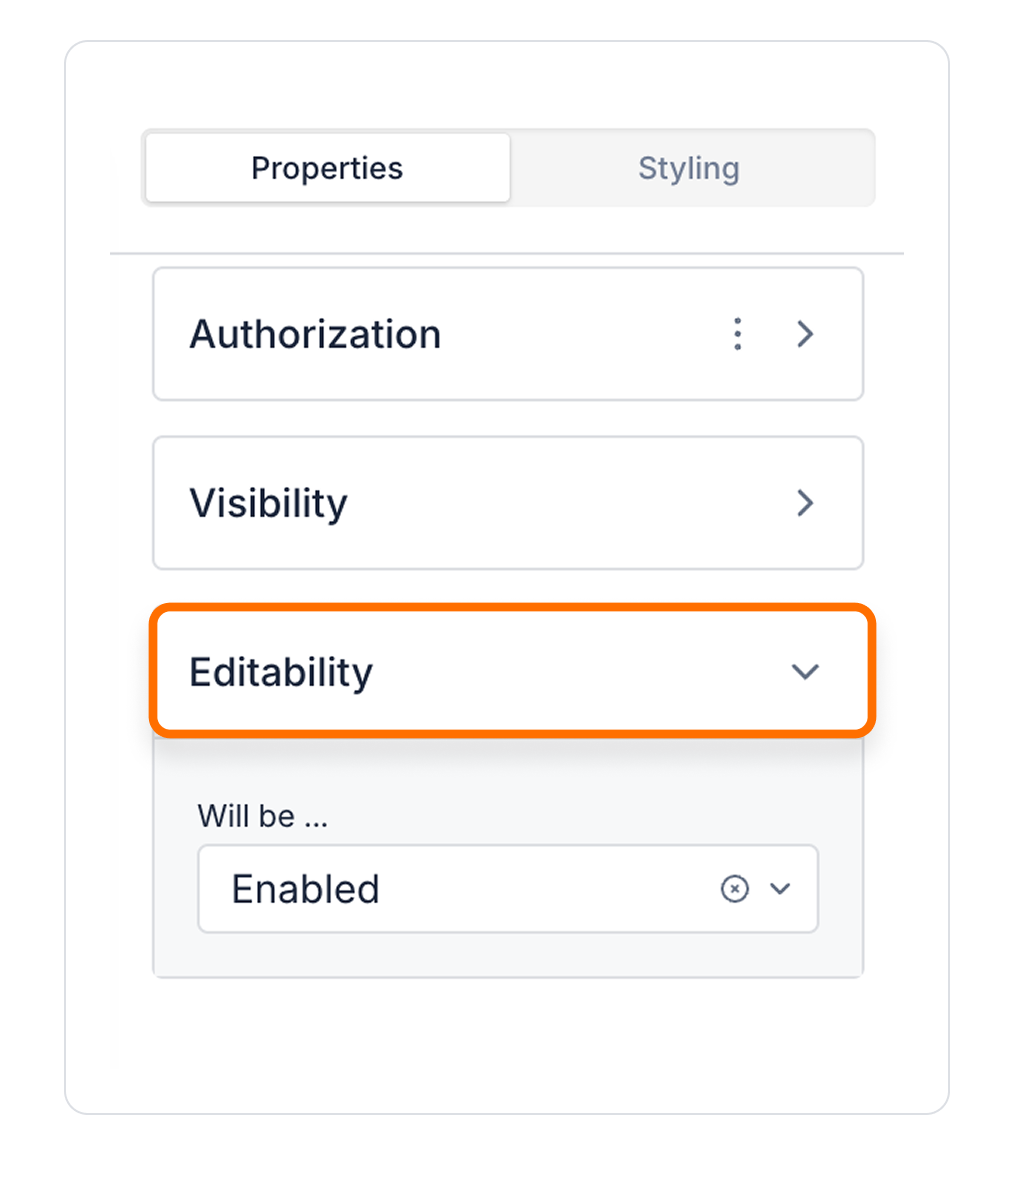
Editability
Enabled: Elements can be edited.
Disabled: Element cannot be edited.
Sometimes Enabled: The element can be edited or uneditable according to certain conditions.
Interface Design with Style Panel
By customizing your elements with the Styling Panel, you can create impressive interfaces for your web and mobile applications. In this section, you can configure the following settings:
Layout: Sizing, alignment and padding settings. Settings include Size, Min Size and Align.
Text: Font, style, color, size and spacing settings.
Fill: Customize the background with color or images.
Border: Add borders and corner radius settings.
Shadow: Add a shadow effect to add depth to elements.
By following these steps, you can configure the Area Chart element to suit your needs.