The Big File Upload element is an advanced file upload component that enables users to upload large files to the application securely, quickly, and in a controlled manner. Thanks to its structure designed for handling large files, it can be used in scenarios where standard file upload solutions fall short.
The Big File Upload element is used in situations where content such as media files (videos, high-resolution images), project files, archives, and large datasets needs to be uploaded. The ability to monitor the upload process and configure limits enhances both the user experience and system security.
The Big File Upload element is supported only in web applications.
1.1. Common Use Cases
Uploading videos and large media files
Transferring project, design, or archive files
Uploading large datasets to the system
Content management and sharing platforms
File-based workflows and application processes
2. Key Features
Large file upload support: Large files (videos, archives, project files, etc.) can be uploaded seamlessly.
Upload limit configuration: System resources are used in a controlled manner by defining file size limits.
Upload process tracking: Users can track the file upload status and progress.
Secure file transfer: Data integrity is preserved during the transfer of large files.
2.1. Big File Upload Element Features
Chunk Size: This parameter enables large files to be split into smaller chunks during upload to the server. It minimizes issues such as connection drops, particularly when uploading files of 100 MB or larger. For example, if the upload is configured in 10 MB chunks, the file is sent in 10 MB blocks, and in the event of interruptions during upload, only the relevant chunk is re-uploaded. This helps balance network traffic and makes the upload more stable. The Chunk Size setting is a critical parameter for application performance and user experience. The optimal value should be determined based on the file size and the target audience’s internet speed.
Label: A short informational text explaining the purpose of the file upload field. It clearly communicates the type of file that needs to be uploaded and the system’s expectations. For example, a label stating “Please upload your ID document” guides the user and prevents the upload of the wrong file. The label text can be customized based on the application’s use case and should be clear enough to enhance the user experience.
Tip: This text provides hints or technical constraints related to the file upload process. It may include file format requirements, maximum size limits, or specific upload instructions. For example, text such as “You can only upload .pdf or .jpg files” or “You can upload files up to 200 MB” can be used. It is positioned to appear in the upload area or immediately below the upload button and ensures the process completes smoothly.
Upload Confirmation Message: Specifies the confirmation message to be displayed to the user when the file upload is complete.
Show Delete Icon: Specifies whether to display the delete (trash can) icon so that the uploaded file can be deleted.
Show Upload Confirmation: Specifies whether to display a confirmation message to the user before the file upload begins.
Show Cancel Icon: Enables the display of the cancel icon to allow the user to cancel the upload process.
Is Multiple: Allows the user to select and upload more than one file at a time.
Accept: This parameter restricts which file types (extensions) can be uploaded to the Big File Upload element. The restriction is defined by selecting the desired extension(s) from the dropdown list accessed via Properties in the right panel. Multiple extensions can be selected. The supported extensions are displayed in the dropdown list, organized by category:
Follow the steps below to configure the upload directory for file upload operations:
Go to the Configuration Manager module.
Locate the File Upload Path field.
Enter the server directory path where files will be uploaded. (Example: /userUploads/)
Save the settings.
The file upload directory is defined via the File Upload Path setting in the Configuration Manager module. Dynamic file path configuration is not supported.
2.3. File Upload, Download, and Deletion Operations
2.3.1. File Upload
The client uploads large files selected or dragged and dropped by the user to the server in HTTP multipart/form-data format. The process is performed using a chunk (part) approach to optimize network performance and prevent data loss in case of potential interruptions.
Drag and drop the file directly onto the element.
The system divides the file into chunks based on the Chunk Size parameter (e.g., 10 MB).
Each chunk is transmitted to the server sequentially and stored in temporary memory.
When the upload is complete, the On Upload Finish action is triggered. The following values are generated with this action and should be used for management:
File ID(GUID): The unique identifier assigned to the uploaded file by the system.
File Name: The original file name uploaded by the user.
The File ID must be stored in the database, and all download and deletion operations must be managed via this ID. Otherwise, no operations can be performed on the file.
2.3.2. File Download
Click the Big File Upload element.
Open the Properties panel on the right side.
From the +ADD ACTION menu, select the On Upload Finish → Device → Download File From Server option.
Configure the following fields:
File ID: Enter the unique identifier of the file to be downloaded. (e.g., “{{uploadedFileId}}”)
File Name: Specify a name for the file to be downloaded. The file will be downloaded to the user’s device under this name. (e.g., “Report_2024.pdf”)
If the File ID is missing or entered incorrectly, the system cannot locate the file and the download will fail. The ID must be obtained and stored during the upload process.
When the download request is triggered:
The system verifies the file using the specified File Path and File ID.
The file is transferred to the client via HTTP after the MIME type is checked.
The browser automatically downloads the file or offers a save option based on the user’s settings.
Before triggering the download process, you must verify whether the user has permission to access the relevant file.
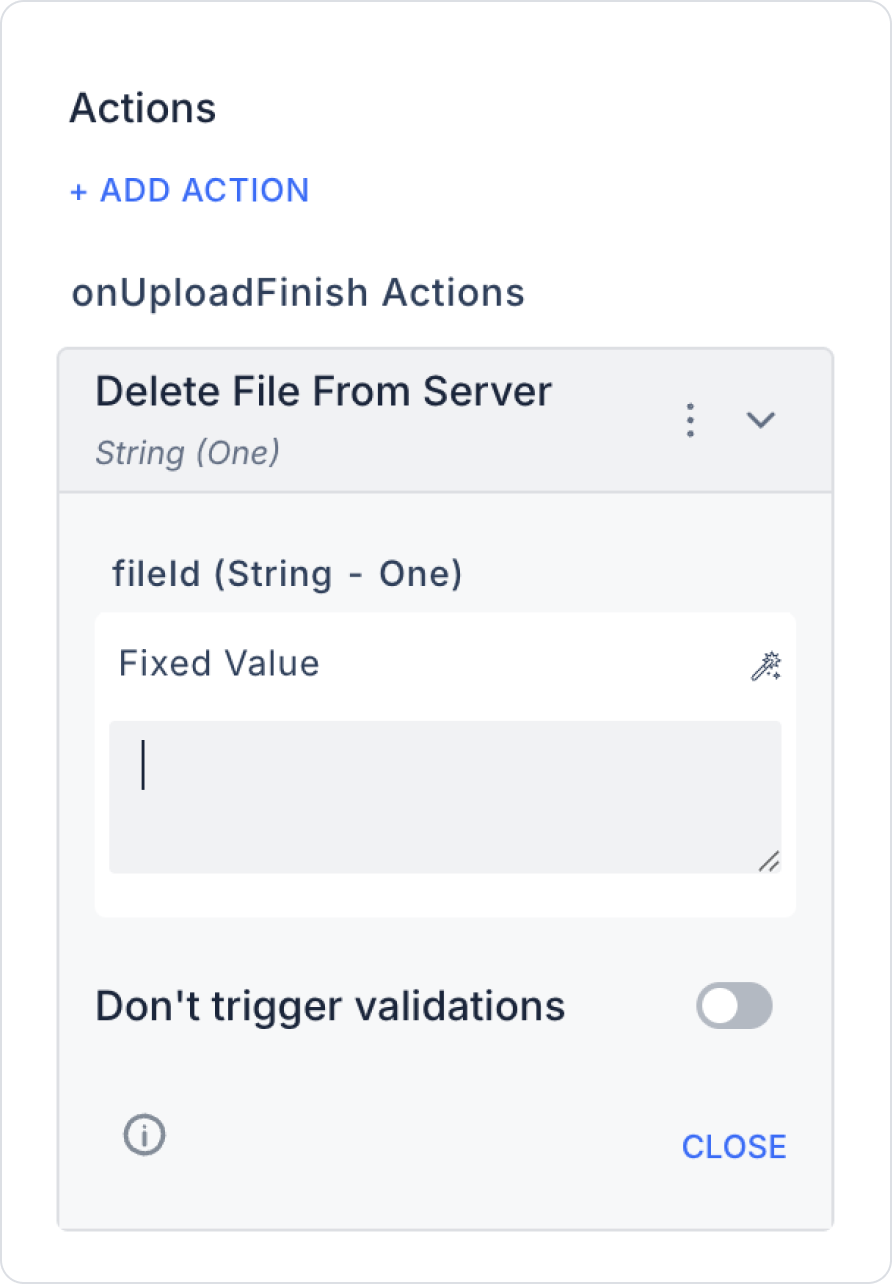
2.3.4. File Deletion
Click the Big File Upload element.
Open the Properties panel on the right side.
From the +ADD ACTION menu, select the On Upload Finish → Device → Delete File From Server option.
Configure the following fields:
File ID: The unique identifier of the file to be deleted.
If the File Path and File ID do not match, the file cannot be identified and the operation will fail. The File ID must be recorded immediately after upload.
When the deletion process is triggered:
The system verifies the file based on the File Path and File ID information.
Once verification is complete, the file is permanently deleted from the server.
The deleted file cannot be recovered.
Before initiating the deletion process, you must verify that the file is not in use by the system and is not referenced by other processes. Otherwise, system errors and data loss may occur.
2.2. Actions That Can Be Added to the Element
The Big File Upload element supports triggering event-based actions based on the completion of the file upload process. Actions are not tied to the element itself but are linked to the event triggered when the upload process is successfully completed.
For the Big File Upload element, actions can be defined via the following event through the Properties > Add Action section.
Supported Action Triggers
onUploadFinish: Triggered when the file upload process is successfully completed.
Use cases:
Save uploaded file information (file name, size, URL, etc.) to a state or variable
Proceed to the next step in the form flow after upload
Display a preview or notification after the file is uploaded
To save the file to the system by triggering an API or workflow
To display an “Upload Complete” message or success notification
Example scenario: When a user uploads a large video file, the file URL is saved to the state immediately upon completion of the upload, and a “Upload Successful” message is displayed.
Basic Rules Regarding Actions
The Big File Upload element executes actions event-based; the onUploadFinish event is triggered only when the upload process is successfully completed.
Multiple actions can be defined for the same onUploadFinish event.
When working with large files, the performance impact of actions triggered after upload must be considered.
The Big File Upload element provides a controlled and reliable user experience, especially when used with the onUploadFinish event in scenarios where post-upload processing is required.
3. How to Use the Big File Upload Element?
In this section, we will cover the end-to-end usage of the Big File Upload element using an example scenario.
Scenario: Document Upload and Management
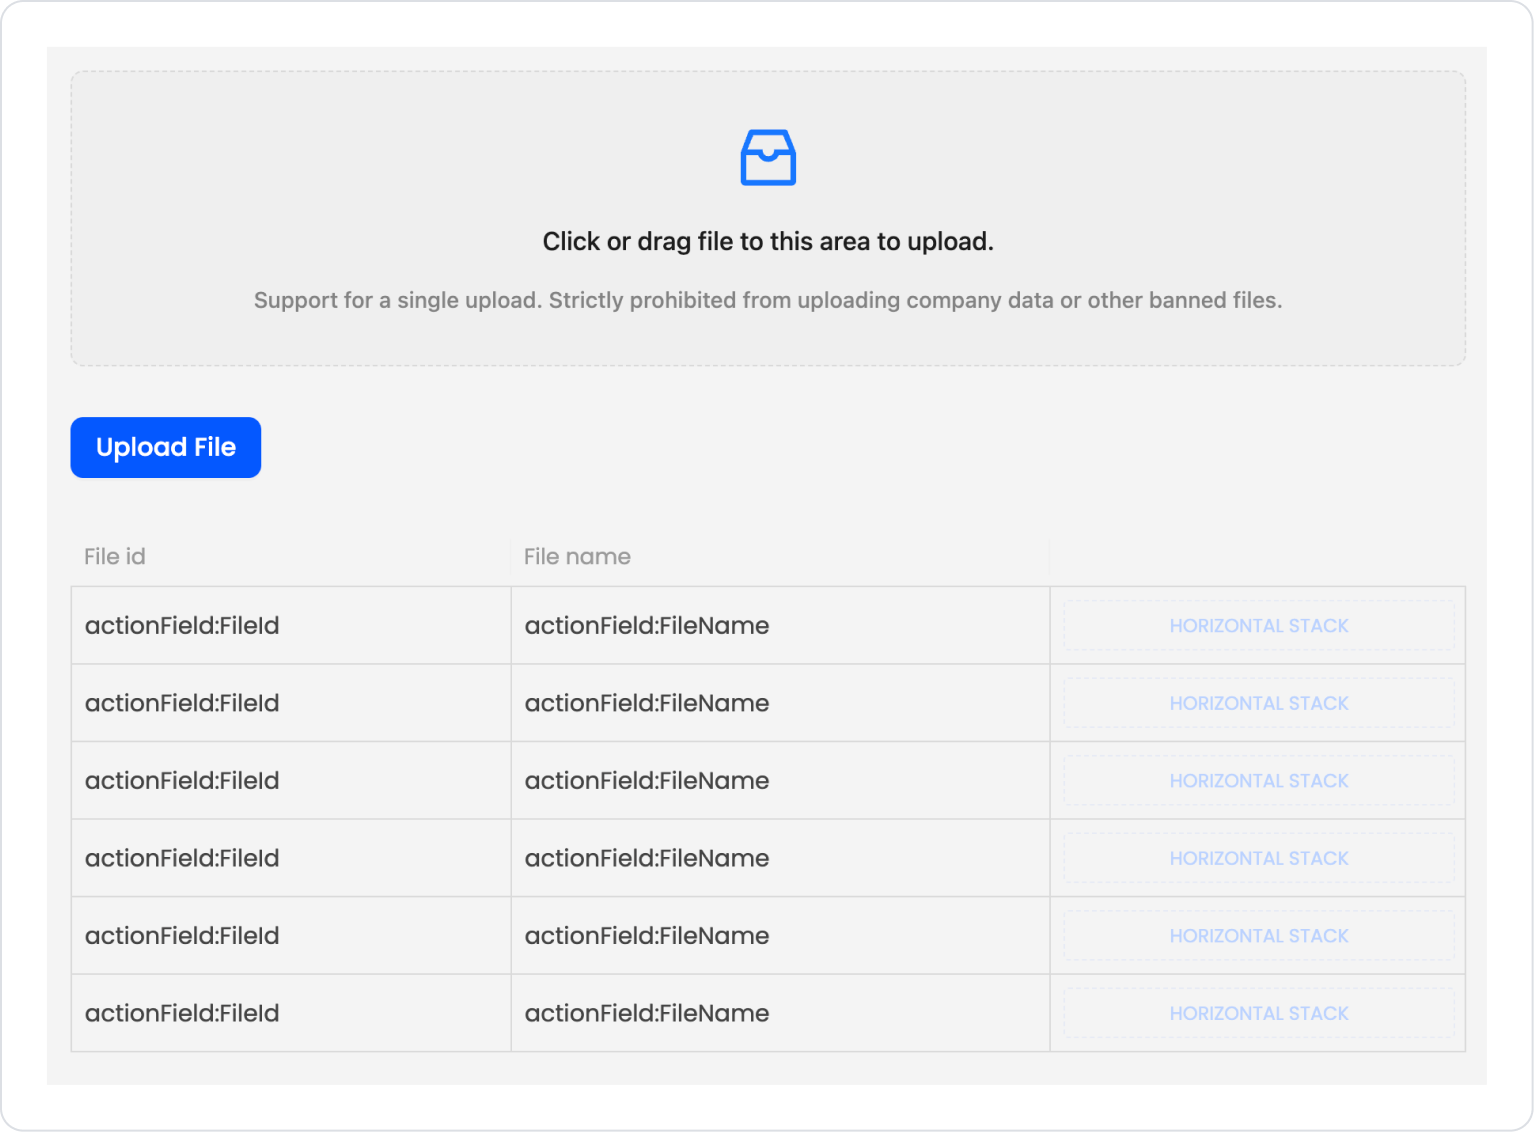
The user uses the Big File Upload element to add a file to the system. The file is selected by dragging and dropping it into the designated area or by clicking within the area. Once the file is selected, the upload process begins, and the file is added to the system by clicking the ‘Upload File’ button. The successfully uploaded file is listed in the table at the bottom of the screen with its File ID and File Name.
In the scenario:
The user can access previously uploaded files through the records listed in the table.
The file can be downloaded using the Download File button in the relevant row, and deleted from the system using the Delete File button.
This allows the user to view, download, and manage the files they have uploaded from a single screen.
Step 1 - Creating a Data Source
Creating a table in the DataSources module:
Go to the DataSources module.
Then go to the Tables tab.
Create a new table named “Files”.
The table structure to be created is as follows:
Important Field Names:
FileId: Creates and stores a unique identifier for each file.
FileName: The name of the file uploaded by the user as it appears in the system.
Step 2 - Defining the Required Action
To display the data on the interface:
You must define an example action.
Add a new action via the Actions > New SQL Action tab within the Datasources module.
Action to Retrieve User Preferences (UploadedFiles):
SELECT * FROM Files;
When applying, delete the “Files” part, type “Files” again, and press Enter. This will add the correct schema name before the table name.
Step 3 - Adding an Initial Action
On the home page initially:
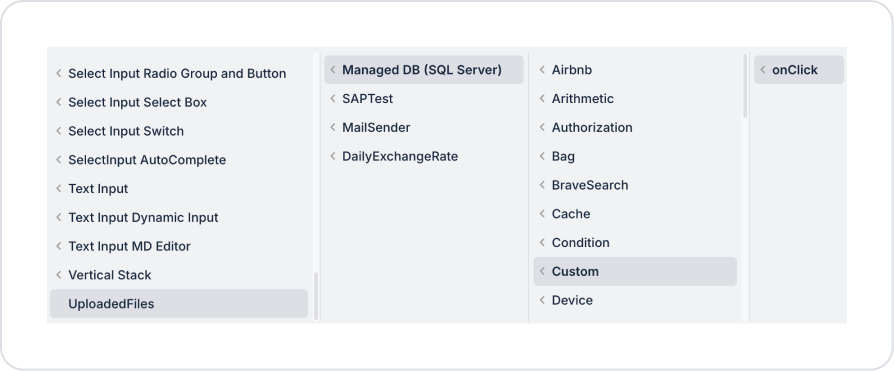
To display the list of currently uploaded files, add the Add Action > Initial Action > Custom > Managed DB > UploadedFiles action.
Step 4 - Adding the Big File Upload Element and Defining the Action
On the main page:
Drag and drop the Elements > Special > Big File Upload element from the left panel onto the page.
Add the Elements > Navigation > Button element below the Big File Upload element to save the uploaded file.
Set the text on the button to Button > Properties > Label > “Upload File”.
To save the uploaded file, add the Button > Properties > Add Action > onClick > Save Record action to the button.
In the Save Record action, select the Select Table > Files table and choose FileId and FileName in the Columns field.
Set the FileId field to Components > BigFileUpload > FileId.
Set the FileName field to Components > BigFileUpload > FileName.
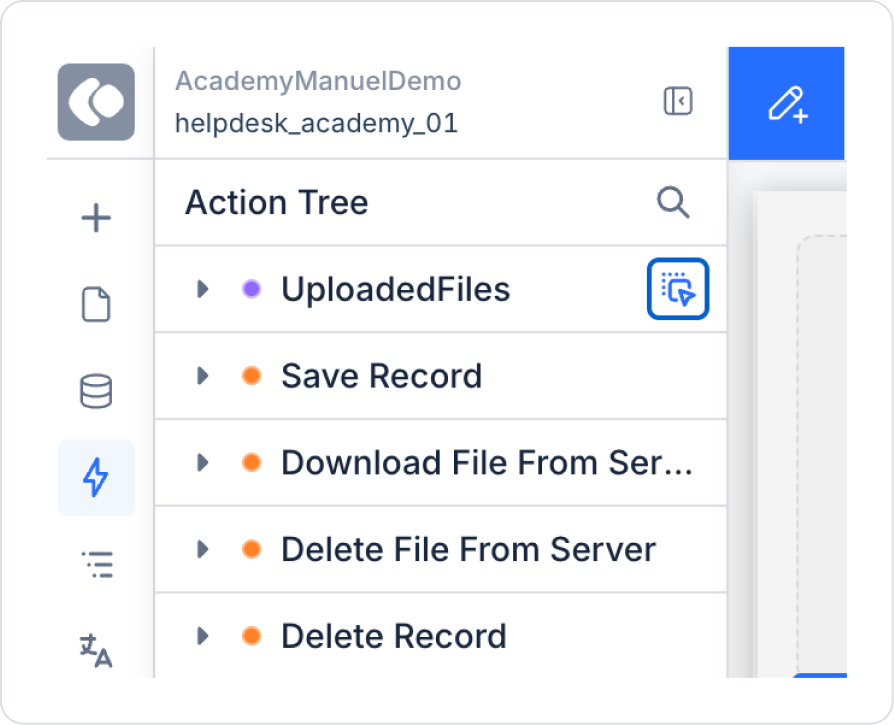
To update the list after saving, add the Button > Properties > Add Action > Custom > Managed DB > UploadedFiles action after the Save Record action.
From the Action Tree section in the left panel, drag the icon next to the UploadedFiles action onto the page.
In the opened screen, make the following configuration:
In the settings of the Table element added to the page, add a new column to the table via Table > Properties > +TableTemplateColumn.
Clear the name of the newly created column via TableTemplateColumn > Title.
Drag and drop the Elements > Container > Horizontal Stack element into the new column.
Drag and drop the Elements > Navigation > Button element into the Horizontal Stack.
Update the button text to Button > Properties > Label > “Download File”.
Add the Button > Properties > Add Action > onClick > Device > Download File From Server action to the button to download the file.
In the Download File From Server action, set the fileId value to Current > fileId.
Set the FileName field to Current > fileName.
Add another Elements > Navigation > Button element inside the Horizontal Stack element next to the Download Filebutton.
Update the button text to Button > Properties > Label > “Delete File”.
To delete the file, add the Button > Properties > Add Action > onClick > Device > Delete File From Server action to the button.
In the Delete File From Server action, set the fileId value to Current > fileId.
To delete records from the table, additionally add the Button > Properties > Add Action > ManagedDb > Delete Record action.
In the Delete Record action, set Select Table > Files and Id > Current > Id.
Finally, to refresh the list after the deletion, add the Button > Properties > Add Action > onClick > Custom > Managed DB > UploadedFiles action.
To highlight the delete action, set the color to Button > Styling > Fill > Color > “E13C39”.
To remove the fixed 100px Width applied to button elements added to the Horizontal Stack, leave the Button > Styling > Layout > Width field blank.
The final page structure is as follows.
Preview:
With the Big File Upload element, users can add files to the system by dragging and dropping them or by clicking the upload area. The selected file is displayed along with a progress bar showing the upload process, and the file’s upload status is shown to the user.
After the file upload is complete, clicking the Upload File button saves the file to the list. When the button is clicked, the list is automatically updated, and the uploaded file is displayed in the table along with its File ID and File Name.
Users can manage files through the records in the table. They can download the file using the Download File button in the relevant row, or remove the file from the list using the Delete File button. This allows users to view, download, and delete the documents they have uploaded from a single screen.
4. Common Properties
Some fields on the Big File Upload element are shared across all UI elements. Therefore, detailed descriptions of the following properties are available on the relevant general guide pages:
Make the upload process visible to the user. Progress indicators or informational text allow users to track the upload status.
Use the onUploadFinish event as the main trigger. Attach all actions that need to run after the upload is complete to this event.
Provide post-upload feedback. Display clear messages to the user in case of successful or failed uploads.
Add additional validations for large files. Additional validations, such as file type, format, or content checks, enhance security.
Inform the user during long uploads. Since upload times may be longer for large files, it is recommended to inform the user about the estimated waiting time.
6. Limitations
The Big File Upload element is supported only in web applications.
Upload performance depends on the user’s internet connection speed and file size.
Actions can only be triggered via the onUploadFinish event.
If the connection is lost during upload, the process may need to be restarted.