User Manual

Email Builder

30/6/25
Email Builder

Kuika's Email Builder module allows you to quickly and easily prepare emails to be sent to the end users of the application you are developing. You can use more than 200 ready-made email templates in the module or you can start with a blank email and create the design that suits your needs. In this training content, you will learn the process of preparing e-mails step by step.

This training content consists of the following topics:

  • Create an email
  • Email templating interface tabs
  • Using email templates
  • Configure email parameters
  • Send email with Send Mail action

Email Creation

You can use the Email Builder module to create and add email notifications for end users of the application you are developing.

To create a new email:

  1. After logging into the Kuika platform, open the project you will work on from the Apps screen.
  2. Then select the Email Builder module from the top side.
  1. Give a name for the new email you will create and click the CREATE button.
  1. From the screen that opens, you can create a new email template by clicking the NEW BLANK TEMPLATE button or you can use the ready-made email templates in the left panel.

Email Template Creation Interface Tabs

Content Tab

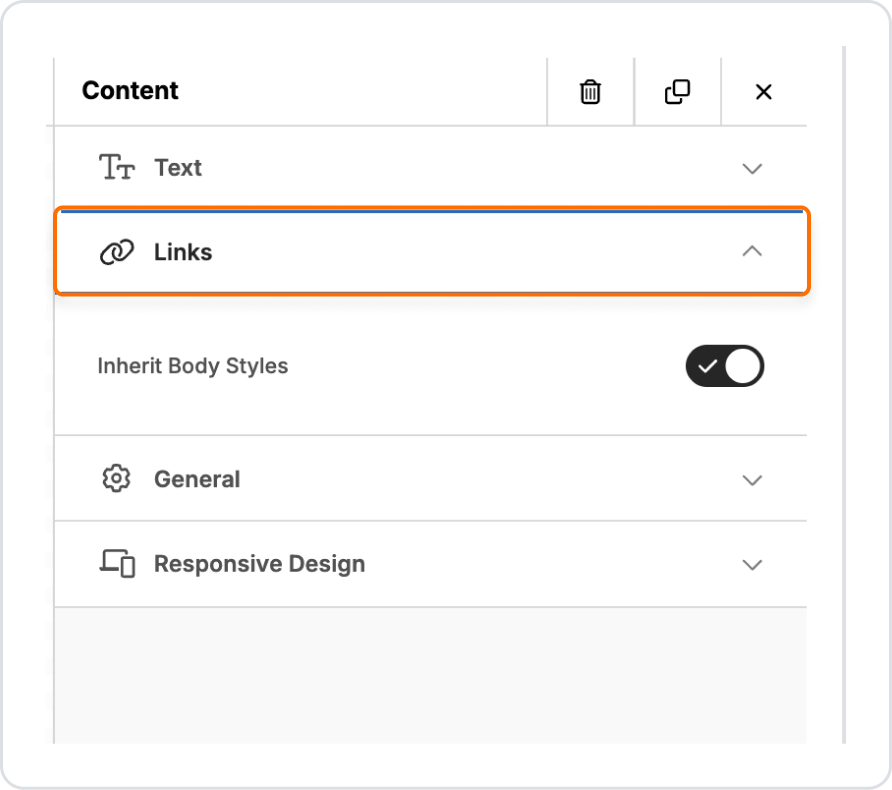
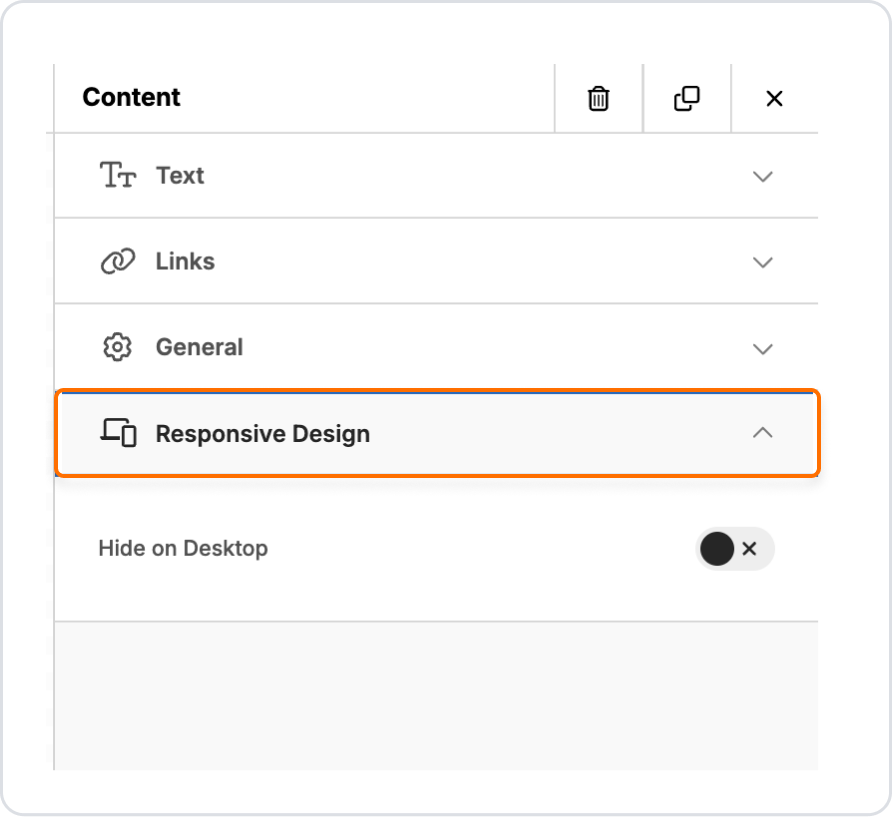
There are many elements in the Content tab in the email template creation interface. You can add the elements in the Content tab to the template with drag and drop.

Columns Element Settings

  1. Drag and drop the Columns element onto the template screen.
  2. You can customize the Columns element from the fields below:
  • Columns: Allows you to place different sections of your email template side by side, creating a more dynamic and organized layout.
  • Column Properties: Allows you to customize the appearance and layout of the columns.
  • Row Properties: Allows you to customize the layout and style of the rows in the email design. It also allows you to add images to the rows.
  • Responsive Design: It allows your template to be displayed in a compatible way on different devices, screen sizes and resolutions. There are Desktop and Mobile viewing options in the interface to create a responsive design.

Heading Element Settings

  1. Drag and drop the Heading element onto the template screen.
  2. You can customize the Heading element from the fields below:
  • Text: This is the area where you can customize the header text you will use in the email content.
  • Links: When a URL is added to the header text, it allows you to customize the URL link.
  • General: This is the area where you can adjust the width and height of the header.
  • Responsive Design: It ensures that your template is displayed harmoniously on different devices, screen sizes and resolutions. There are Desktop and Mobile viewing options in the interface to create a responsive design.

Text Element Settings

  1. Drag and drop the Text element onto the template screen.
  2. You can customize the Text element from the fields below:
  • Text: This is the field where you can write and customize the text you will use in the e-mail content.
  • Links: When a URL is added to the text field, it allows you to customize the URL link.
  • General: This is the area where you can adjust the width and height of the text field.
  • Responsive Design: It allows your template to be displayed harmoniously on different devices, screen sizes and resolutions. There are Desktop and Mobile viewing options in the interface to create a responsive design.

Button Element Settings

  1. Drag and drop the Button element onto the template screen.
  2. You can customize the Button element from the fields below:
  • Action: You can add an action for the Button element and specify the action to be taken when the button is clicked. You can use these options:some text
    • Open Website: Allows you to enter the URL of the website that will be opened when the button is clicked.
    • Send Email: Allows you to specify the text of the email to be sent when the button is clicked.
    • Call Phone Number: Allows you to enter the phone number to call when the button is clicked.
  • Button Options: This is the area where you can customize the button you will use in the e-mail content.
  • Spacing: This is the area where you can set the internal and external spacing of the button element.
  • General: This is the area where you can adjust the width and height of the button area.
  • Responsive Design: It ensures that your template is displayed harmoniously on different devices, screen sizes and resolutions. There are Desktop and Mobile viewing options in the interface to create a responsive design.

Divider Element Settings

  1. Drag and drop the Divider element onto the template screen.
  2. You can customize the Divider element from the fields below:
  • Line: Allows you to customize the appearance and style of the divider line.
  • General: This is where you can adjust the width and height of the Divider area.
  • Responsive Design: It allows your template to be displayed in a compatible way on different devices, screen sizes and resolutions. There are Desktop and Mobile viewing options in the interface to create a responsive design.

Image Element Settings

  1. Drag and drop the Image element onto the template screen.
  2. You can customize the Image element from the fields below:
  • Image: This is the area where you can customize the image you will use in the email content.
  • Action: You can add an action for the Image element and specify the action to be taken when you click on the image. You can use these options:some text
    • Open Website: Allows you to enter the URL of the website that will be opened when you click on the image.
    • Send Email: Allows you to specify the text of the email that will be sent when you click on the image.
    • Call Phone Number: Allows you to enter the phone number to call when you click on the image.
  • General: This is the area where you can adjust the width and height of the image area.
  • Responsive Design: Allows your template to be displayed harmoniously on different devices, screen sizes and resolutions. There are Desktop and Mobile viewing options in the interface to create a responsive design.

Menu Element Settings

  1. Drag and drop the Menu element onto the template screen.
  2. You can customize the Menu element from the fields below:
  • Menu Items: This is where you can add menu options or links.
  • Styles: This is the area where you can customize the menu you will use in the email content.
  • General: This is where you can adjust the width and height of the menu area.
  • Responsive Design: It ensures that your template is displayed harmoniously on different devices, screen sizes and resolutions. There are Desktop and Mobile viewing options in the interface to create a responsive design.

HTML Element Settings

  1. Drag and drop the HTML element onto the template screen.
  2. You can customize the HTML element from the fields below:
  • HTML: You can customize your email design by adding custom HTML codes.
  • General: You can adjust the width and height of the HTML area.
  • Responsive Design: Ensures that your template displays responsively on different devices, screen sizes and resolutions. There are Desktop and Mobile viewing options in the interface to create a responsive design.

Social Element Settings

  1. Drag and drop the Social element onto the template screen.
  2. You can customize the Social element from the fields below:
  • Icon: When customizing the Social element, you can select or change the icon here. For example, you can use social media icons such as Facebook, Twitter, Instagram, etc.
  1. General: This is where you can adjust the width and height of the Social area.
  2. Responsive Design: It ensures that your template is displayed harmoniously on different devices, screen sizes and resolutions. There are Desktop and Mobile viewing options in the interface to create a responsive design. 

Blocks Tab

The Blocks tab in the email template creation interface provides a variety of block structures for page layout. To add block structures to the email template you are creating, simply drag and drop the desired element into the templating area. By hovering over the columns in the block structure you added, you can add the element to these columns.

Body Tab

  1. From the Body tab you can customize the following fields:
  • General: This is the area where you can customize the general email structure.
  • Email Settings: This is where you will write the summary text that appears immediately after the subject line in the email inbox.
  • Links: This is the area where you can customize the link to the email template that allows it to redirect to websites.

Use Email Templates

You can use the default Verify Email, Set Password, Task Notification and Reset Password templates from the Add Email template area in the left panel.

The ML support switch in Mail templates allows the template to be added and designed in multiple languages; each new language is automatically updated by duplicating the default template and the template can be added to the SendMail action with the language selection parameter.

Verify Email Template

Verify Email is a canned email template used to ask recipients to verify their email address. This template is typically used when users of the application you are developing are registering for the application or to ensure account security.

  1. You can customize your email template from the Content, Blocks and Body tabs.
  2. You can then update the template with UPDATE or cancel the changes with CANCEL.

You can create templates in different languages using the ML Support switch.

Task Notification Template

Task Notification is a ready-made email template used to notify or remind end-users of applications with Process Automation (Workflow) added to them about a specific task.

  1. You can customize your email template from Content, Blocks and Body tabs.
  2. You can then update the template with UPDATE or cancel the changes with CANCEL.

You can create templates in different languages using the ML Support switch.

Set Password Template

Set Password is a canned email template for when users create an account or want to reset their password. This template aims to help users securely set their passwords and access their accounts.

  1. You can customize your email template from the Content, Blocks and Body tabs.
  2. You can then update the template with UPDATE or cancel changes with CANCEL.

You can create templates in different languages using the ML Support switch.

Reset Password Template

Reset Password is a canned email template used to reset a user's password when they have forgotten it or are unable to access it. Reset Password guides the user to regain access to their account.

  1. You can customize your email template from the Content, Blocks and Body tabs.
  2. You can then update the template with UPDATE or cancel the changes with CANCEL.

You can create templates in different languages using the ML Support switch.

Creating Parameters in Email Builder

You can add parameters on the template to work with dynamic data in the e-mail template you have created.

To add parameters, you can add dynamic data to the field you want to pull in parameter format.

To define the parameter values you have added, you can return to the UI Design module and define parameter values through actions.

Sending E-mail with Send Mail Action

In the applications you develop with Kuika, you can perform configuration and parameter definition operations for the e-mail template you created using the Send Mail action from the system actions.

In an example scenario, follow the steps below, considering that an e-mail template created and containing parameters is given an action through the application screen:

  1. After logging in to the Kuika platform, open the project you will work on from the Apps screen.
  2. In the UI Design module, drag and drop the Button element under the Commonly category from the Elements panel on the left side to the screen.
  3. After selecting the Button element, click the ADD ACTION button from the Properties panel on the right.
  4. Select onClick → Notification → SendMail from the menu that opens.

Configure Send Mail Action Parameters

Mail Type Custom

  1. The Custom option in the drop-down menu titled Mail Type (1) allows you to create the email content without using any template.
  2. Under Custom, you need to enter the recipient email information via the Receivers (2) tab.
  3. In the Subject (3) tab, you can specify the subject of the email to be sent. By adding optional parameters you can configure the sender, cc, bcc, file attachment and image attachment via base64 and enter the values of these parameters. You can pull the value information of all tabs under Custom option dynamically or statically using Symbol Picker .
  4. The content is organized in the Body (4 ) tab under the action. You can pull the email content dynamically or statically with the Symbol Picker tool in the Body tab.

Mail Type Template

  1. You can send e-mails using the e-mail template you created with the Template option in the drop-down menu titled Mail Type (1). First, after selecting Template as Mail Type, select the email template you want to use via the drop-down menu under the Templates heading.
  2. Then, enter the recipient e-mail information via the Receivers (2) tab.
  3. In the Subject (3) tab, specify the subject of the email to be sent.
  4. The Verification Code (4) tab allows you to send a one-time code to authenticate users or confirm a specific transaction. The email template will list the parameters you added and you can enter these parameter values using Symbol Picker.

Other Related Content

Glossary

No items found.

Alt Başlıklar