You can use Kuika's Configuration Manager module to configure the definitions to be used during the creation of the application you are developing, preview, test and publish the application. In this training content you will learn how to configure the definitions to be used during the creation of the application through the Configuration Manager module.
Anatomy of the Configuration Manager Module
When you switch to the Configuration Manager module on the Kuika platform, you will see the configuration creation screen.
A. Left Panel
You can access the home page or different projects.
You can add new configurations and manage the configurations of your existing projects.
Configuration +: This is the field to add a new configuration.
Project / Global:
Project: Lists the configurations prepared specifically for the open application.
Global: Lists the configurations added with Configuration Manager on the Apps screen and available across the workspace.
B. Configuration Management Area
You can create and test new configurations.
Name: This is the field where you can name your configuration.
CREATE: Creates a new configuration.
Download: Allows you to download the configuration you created.
Preview: It allows you to test your configuration.
Duplicate: You can create a new build by copying your mobile application configurations with a single click. This feature saves time when creating applications with similar settings.
C. Right Panel
Through the documentation panel, you can access content on how to configure your configurations in web and mobile apps.
Add Configuration to Your App
To create a new configuration:
Log in to the Kuika platform.
Open the project you will work with from the Apps screen.
Click on the Configuration Manager module.
From the screen that opens, give a name to the configuration and click the CREATE button.
This adds a new configuration to your app.
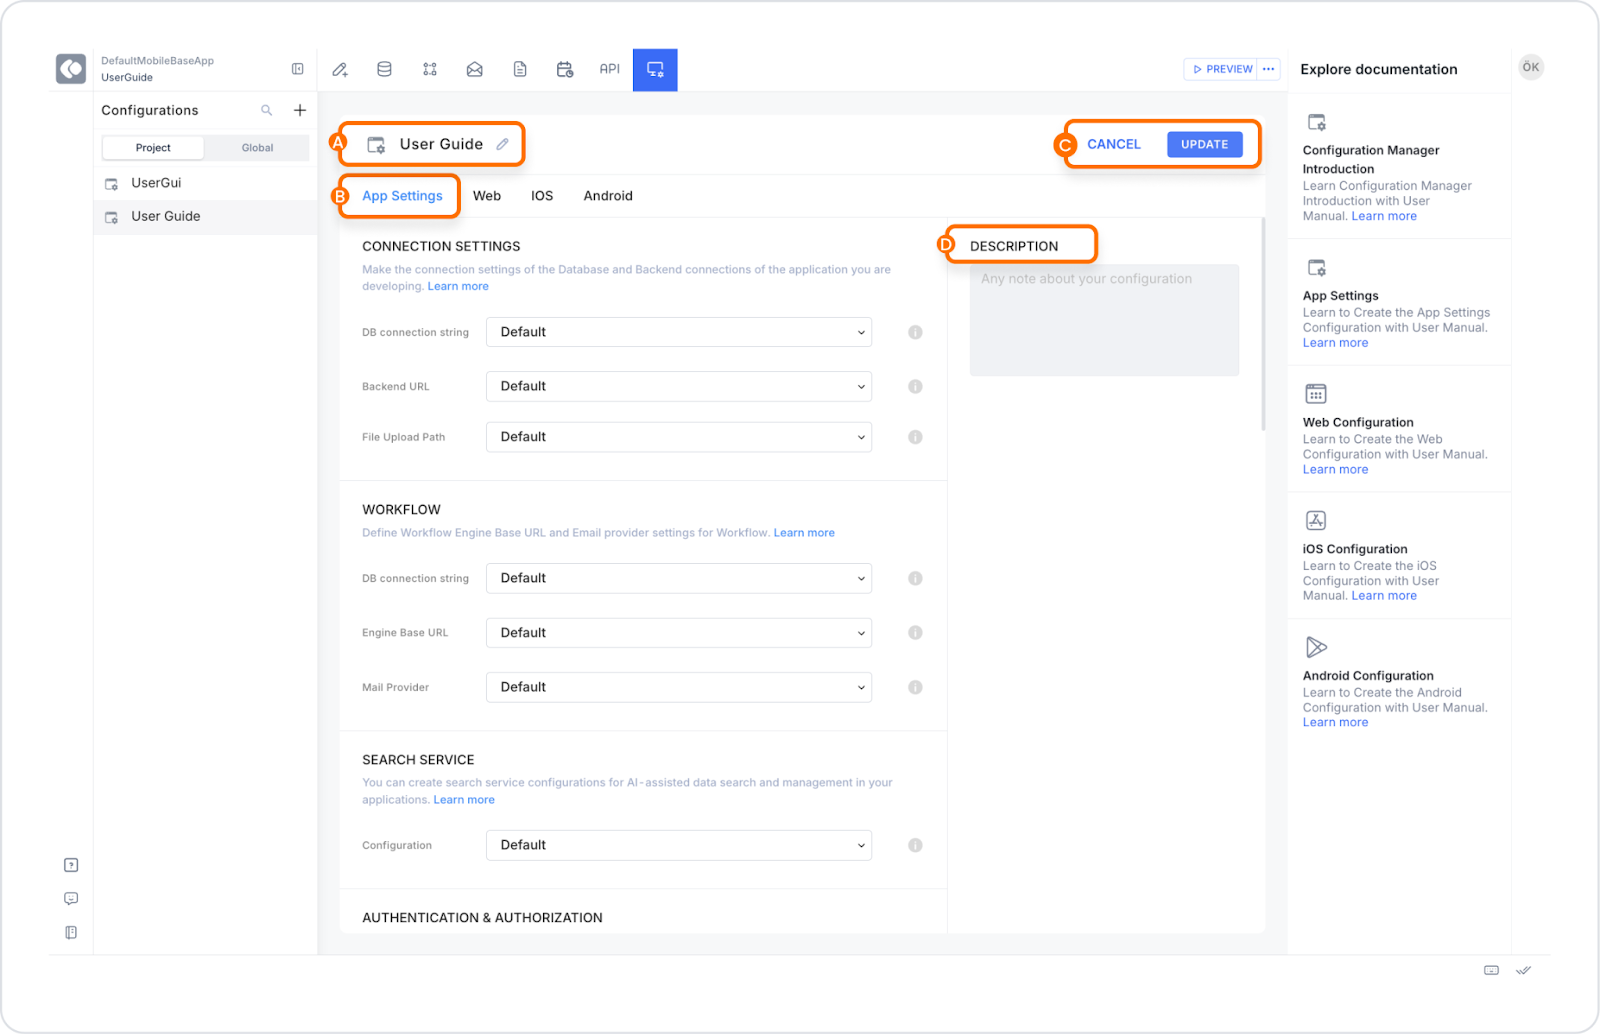
Anatomy of App Settings Module
To preview and publish an app developed in Kuika, you need an App Settings configuration.
1. Namespace
You can change the name you gave your configuration and save it.
2. App Settings Configuration Area
CONNECTION SETTINGS: Shows you how to connect your application's database to the API or another service.
DB connection string: A string containing the information needed to connect to your application's database. It usually contains the server address, database name, username and password.
Backend URL : The URL used to access the backend services of your application.
Backend URL settings accept “IP” and “Port” information.
Engine Base URL: The main URL used to access your application's API.
Mail Provider: Used for sending or receiving e-mails from within the application.
Workflow Engine Connection String: This is the field where you will enter the connection string to integrate your application with Workflow Engine.
SEARCH SERVICE: Used for data search and management operations in your applications.
Name: The name specified for the created configuration.
Base URL: This is the base URL that allows connection to the search service. It allows the application to send search queries through the Search Service API and get results.
Vector Database Service Port: The port number used by the vector-based database service. It is used to perform similarity-based searches (e.g. text-based searches, etc.) on large and complex datasets.
Python Service Port: The port number used by the python service that enables the search service to communicate with the vector database. It allows operations such as adding resources and searching to be performed.
Storage Path: Specifies the directory where the data of the search service is stored. It is where the indexes and results related to the search are stored.
AUTHENTICATION & AUTHORIZATION: Includes authentication and authorization settings.
Password Policy: Allows you to set the length, complexity and frequency of changing your password. Incorrect entries made on this screen are now displayed as warning notifications. This provides the user with a warning notification without interrupting the workflow.
Google: Allows you to sign in to third-party apps using your Google accounts.
Facebook: Allows you to log in to your app with your Facebook accounts.
MSAL: Allows you to authenticate with Microsoft accounts.
OTP: It is a one-time password and is used in two-factor authentication processes.
2F Auth: When you activate the switch, the authentication process becomes two-factor. The first step is usually a password and the second step is the OTP security code.
2 Auth Duration: The validity period of the OTP or security code, which is the second step in the two-factor authentication process. It authenticates via SMS every 15 days.
Expire Old Sessions Upon New Login: A security feature that ensures that when a user opens a new session with the same account, old sessions belonging to that account are automatically terminated.
NOTIFY ACTIONS: Manages email notifications and other alerts in your app.
Name: The name given for the notification. For example, the title or type of notification shown to the user can be specified here.
Default Duration: By default, this determines how long notifications are displayed on the screen.
Success Duration: Specifies the length of time that notifications remain on the screen after successfully completed transactions. For example, if the user performed an action and it was successful, the notification will appear on the screen for this duration.
Info Duration: Duration of notifications shown for informational purposes. It is used to inform about developments in the system or important information.
Warning Duration: Determines how long warning messages will be displayed.
Error Duration: Specifies the duration of error messages.
MAIL / PROVIDER: Provides email sending, receiving, and management services.By configuring different email providers (SMTP, AWS, Exchange Server), you can establish a secure and manageable email infrastructure within your application. Supported providers:
SMTP: Enables sending via the standard email protocol.
AWS (Amazon Web Services SES):Enables sending via AWS Simple Email Service.
Exchange Server: Provides sending, receiving, and management services via Microsoft Exchange Server.
PAYMENT METHOD: Includes payment methods (Stripe, Iyzico, Param).
Stripe: Payment processing platform that you can use to process online payment transactions.
Iyzico: A payment processing platform based in Turkey that makes it easy for you to manage online payments.
Param: Offers various payment methods for e-commerce sites, mobile apps and other digital platforms.
GOOGLE RECAPTCHA: Used to prevent activities such as spam and abuse.
Name: The name set for the ReCaptcha configuration.
Site Key: The public key that allows ReCaptcha to run in your application.
Secret Key: It is the private key used on the server side in ReCaptcha verification processes.
WHATSAPP BUSINESS: Contains WhatsApp API integration information.
WhatsApp Business API is a service that enables businesses to communicate more efficiently with their customers. The following configuration information is required to correctly integrate the API and manage messaging flows through WhatsApp. You can visit the Facebook for Developers platform to access the necessary information.
Then enter the following information in the WhatsApp Business field in the App Settings area:
Name: The name given to the WhatsApp Business account.
Account ID: The unique ID number that identifies your WhatsApp Business account. It must be the same for all WhatsApp configurations.
App ID: The unique ID of the app created through Facebook Business and used to access the API.
App Secret: A secret key used to secure your Facebook app.
Access Token: The verification key used to access the WhatsApp API. It can be purchased for a period of time or indefinitely. If it is received for a period of time, when it expires, messages cannot be sent through the application created with Kuika.
Phone Number ID: The unique identification number of the phone number linked to your WhatsApp Business account.
Version Number: The number indicating which version of the WhatsApp Business API is being used. It is important for compatibility with the current version.
Message Sending and Template Usage:
A message template is created on WhatsApp Dashboard and WhatsApp approval is obtained.
Template example:
Title: “About Offer Status”
Message: "Congratulations! Your process has been concluded positively. Please select one of the buttons below to indicate whether you accept or reject our offer."
Buttons: “Accept”, “Decline”
Approved templates are sent with the Send WhatsApp Business Message action on Kuika. For detailed information, you can review our related content.
Template Types: The parameters of the templates used for WhatsApp messages are selected when they are created on Facebook. These parameters come to Kuika automatically and can be set here and the message can be sent.
Buttoned Templates: Only available for steps with external assignment.
Templates without buttons: Can be used in every step of the process.
Kuika currently only supports Quick Reply buttons. Other button types are not available.
Quick Reply Usage:
Buttons used to advance the process must be of Quick Reply (custom) type.
Each button must be mapped to a mail interaction.
FILE UPLOAD PATH: Specifies the directory to be stored during the file upload process.
Name: This is the field where the name identifying the files to be uploaded should be entered.
File Upload Path: Specifies the directory where the uploaded files will be stored on the server. For example, a path like /upload/user_documents/ can be specified for uploaded documents.
DATE & TIME FORMAT: Determines the format in which date and time information is displayed in the application.
Date Format: Specifies the date order. Example formats:
MM/DD/YYYY (07/09/2025),
DD-MM-YYYY (09-07-2025),
YYYY.MM.DD (2025.07.09)
Time Format: Allows you to choose whether the time is displayed in a 24-hour or 12-hour (AM/PM) format. Example formats:
HH:MM (14:30),
HH:MM AM/PM (02:30 PM)
CACHE SETTINGS: Provides data caching and fast access to improve the application's data performance.
Name: Name given for cache configuration.
Type: Type of data provider to be used:
Redis: Memory-based, provides fast data access and caching.
Mongo: NoSQL, document-based database. Flexible and scalable.
SQL: Relational database, offers powerful querying and table structure.
Memory: Stores data in temporary memory, deleted when the application is closed.
Connection Settings: Server and authentication information for the cache to connect to.
BUCKET UPLOAD: Enables files uploaded by the application to be stored in the cloud environment.
Name: Name given to the bucket.
Type: Cloud provider to be used:
AWS or Google.
Encryption Key: The key used to encrypt files.
Encryption IV: Additional initialization vector used during encryption.
ELASTIC APM: Used to monitor the runtime performance of the application, transaction durations, and error and exception logs. With Elastic APM (Application Performance Monitoring) settings, processes within the application can be tracked on a service basis, performance bottlenecks can be analyzed, and separate monitoring can be performed for different environments (production, development, etc.). These settings become active when the application is Previewed or Run and, by integrating with the Elastic APM Server, enable the centralized collection of the application's real-time performance data.
3. Save & Cancel Field
CANCEL: Cancels the configuration settings.
SAVE: Saves configuration settings.
Configure Your App through App Settings
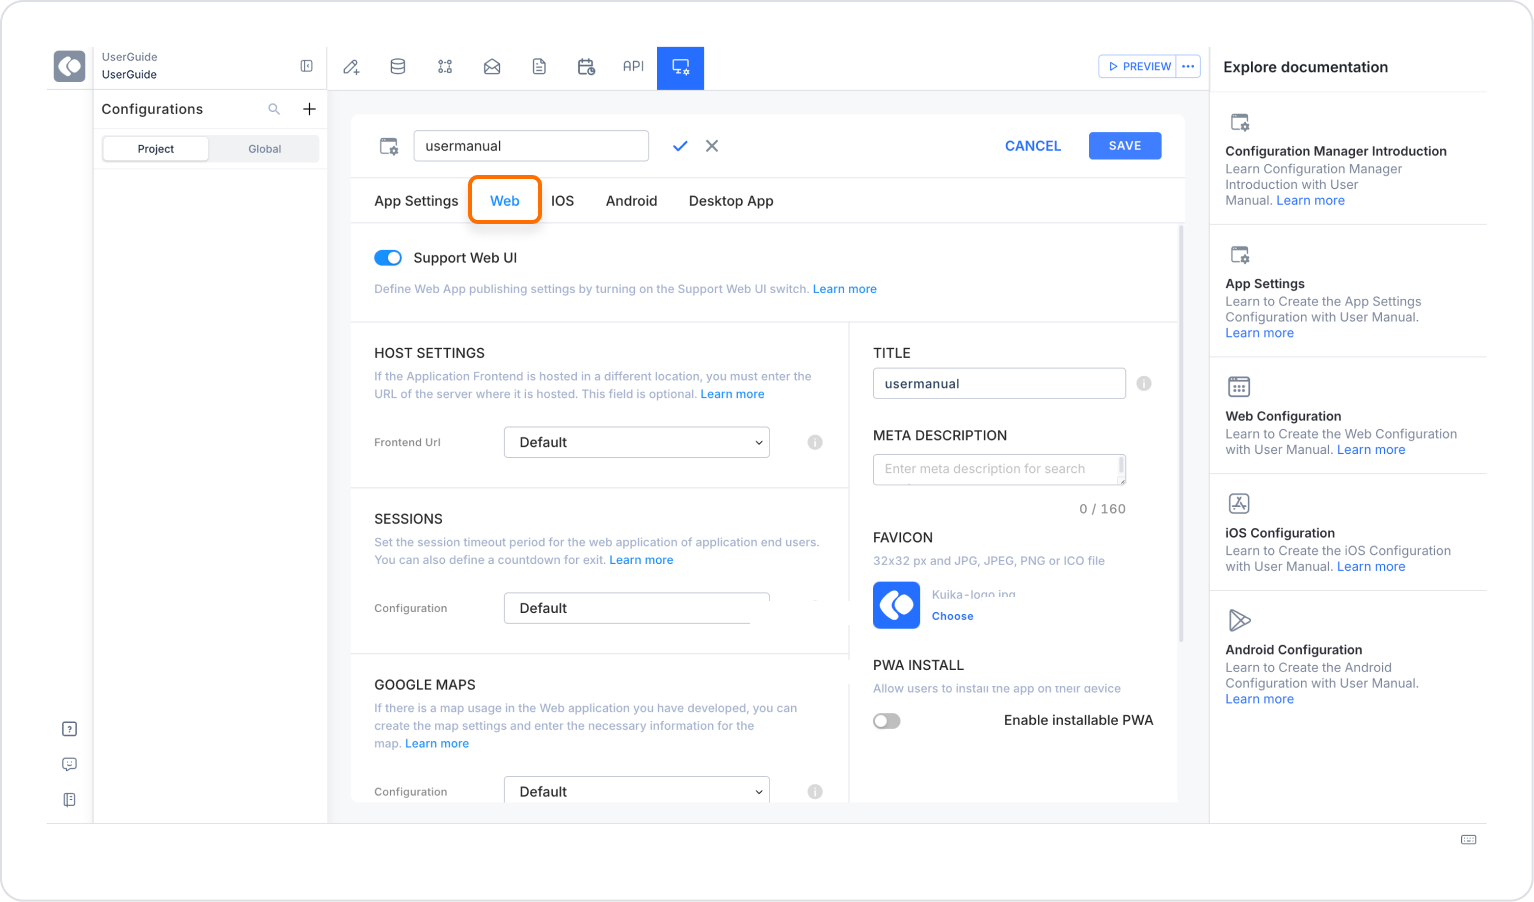
Configure Your Web Apps
Create a configuration using the Configuration Manager module.
From the App Settings modal, click the Web tab.
Configure fields such as Host Settings, Sessions and Google Maps.
HOST SETTINGS: Determines how a service or app will run and interact with other devices.
SESSIONS: Allows you to set the session timeout period of the web app for the end users of your app.
GOOGLE MAPS: If a web application you have developed uses maps, you can create map settings and enter the necessary information for the map.
Title: The title displayed in the browser tab.
Meta Description: The description used in SEO and social sharing previews.
Favicon: The application icon displayed in browser tabs and bookmarks.
PWA Install: When enabled, the application can be installed as a Progressive Web App.
Save your settings by clicking the SAVE button.
Configure Your iOS Applications
Create a configuration using the Configuration Manager module.
From the App Settings modal, click the iOS tab.
Configure settings such as Mobile App Settings, Apple Sign In, App Store Settings.
MOBILE APP SETTINGS: This is the area where you will enter the application name, Bundle ID and application version information that you will use in the Apple App Store.
APPLE SIGN IN SETTINGS: You can sign in with your Apple accounts by making configuration settings in the applications you develop.
APP STORE SETTINGS: You can make App Store settings to connect the application you developed with AppMachine.
FIREBASE SETTINGS: You can integrate the services and features offered by the Firebase platform into your application.
GEOLOCATION: You can define the location information permission you will use in your app.
CAMERA: You can define the camera usage permission text to be shown to end users.
BLUETOOTH: You can define the Bluetooth permission text to be shown to end users.
PUSH NOTIFICATIONS: You can define the permission text to be shown to end users to send push notifications.
GPS TRACKER: You can set the GPS tracking function you use in your application.
Options:
Orientation: Determines the screen orientation of the application. All orientation, landscape, and portrait options are available.
Devices: Determines the device types on which the application will run. All, phones, and tablet options are available.
APP Icon: The main icon image for the application.
Splash:
Image: The image to be displayed when the application opens.
Fitting: Determines how the image used in the Splash Screen will be adapted to the screen size. The options available are Default and Stretch.
Color: The background color to be used in the Splash screen.
Save your settings by clicking the SAVE button.
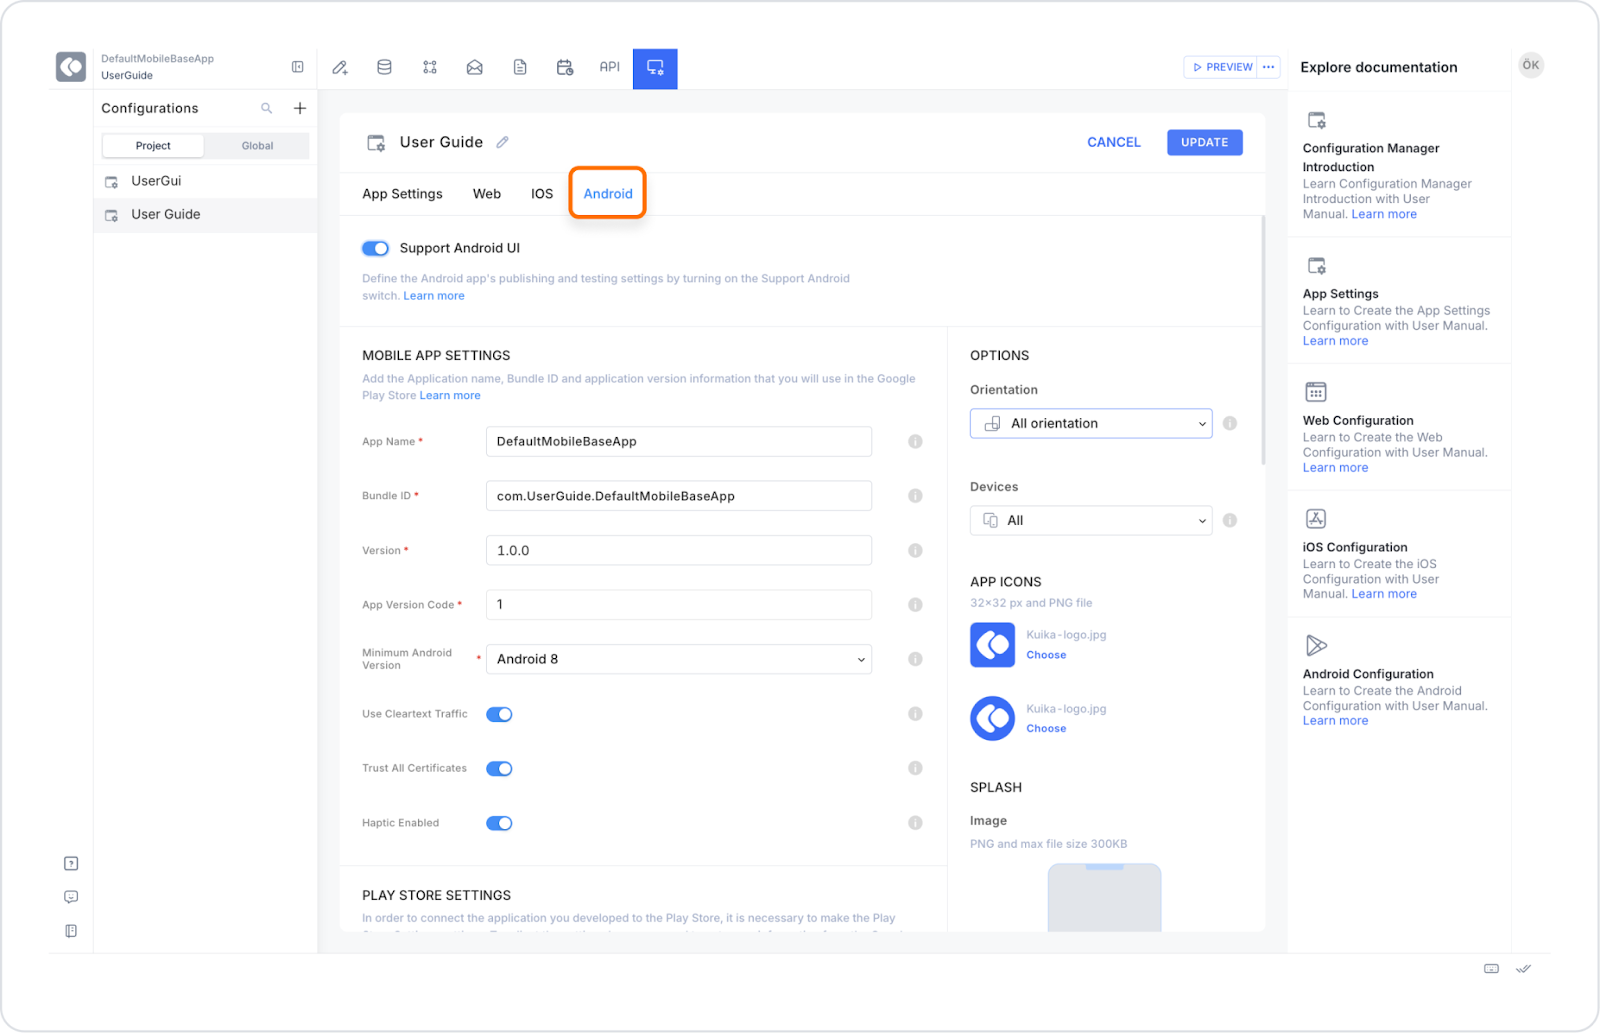
Configure your Android Apps
The Kuika platform has been made compatible with Android 16 support. Additionally, Android applications must now meet the 16 KB page size requirement.
Create a configuration using the Configuration Manager module.
From the App Settings modal, click on the Android tab.
Configure settings such as Mobile App Settings, Play Store Settings, Maps, Geolocation.
MOBILE APP SETTINGS: This is the area where you will enter the application name, Bundle ID, application version information and minimum Android version that you will use in the Play Store.
PLAY STORE SETTINGS: You can configure the application you developed to connect it to the Play Store.
MAPS: If the Android application you developed uses maps, you can create map settings and enter the necessary information.
GEOLOCATION: You can define the location information permission you will use in your application.
CAMERA: You can define the camera usage permission text to be shown to end users.
BLUETOOTH: You can define the Bluetooth permission text to be shown to end users.
PUSH NOTIFICATIONS: You can define the permission text to be shown to end users to send push notifications.
GPS TRACKER: You can set the GPS tracking function you use in your application.
Options:
Orientation: Determines the screen orientation of the application. All orientation, landscape, and portrait options are available.
Devices: Determines the device types on which the application will run. All, phones, and tablet options are available.
APP Icon: The main icon image for the application.
Splash:
Image: The image to be displayed when the application opens.
Fitting: Determines how the image used in the Splash Screen will be adapted to the screen size. The options available are Default and Stretch.
Color: The background color to be used in the Splash screen.
Save your settings by clicking the SAVE button.
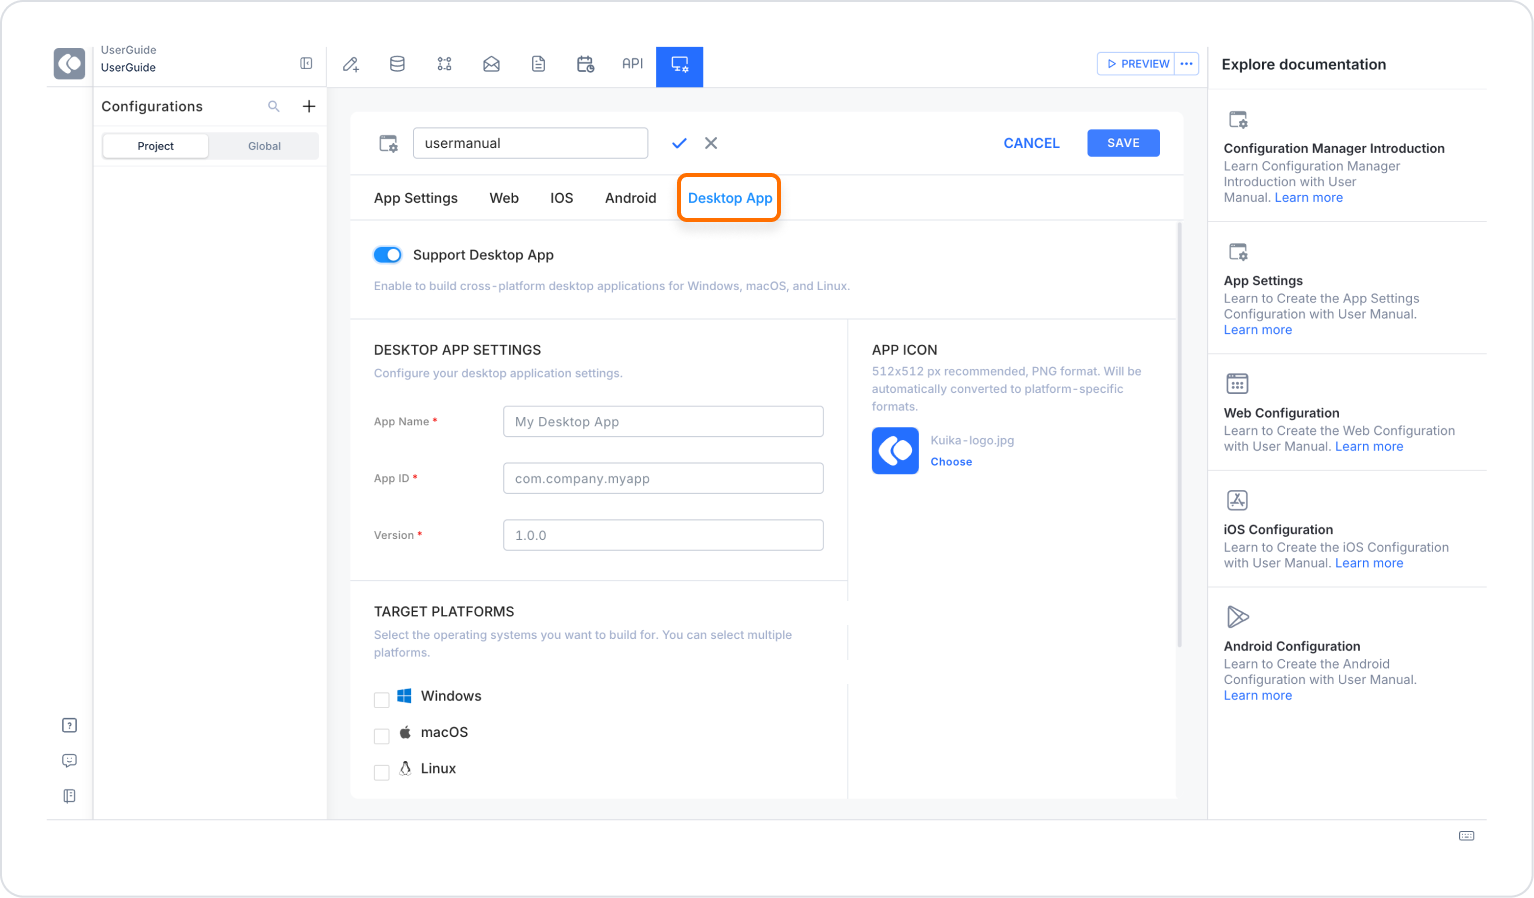
Configure Your Desktop Applications
Create a configuration using the Configuration Manager module.
Click the Desktop App tab in the App Settings modal.
Configure settings such as Desktop App Settings, Target Platforms, and Architectures.
DESKTOP APP SETTINGS: This is where you enter the application name, App ID, and application version information to be used for your desktop application.
APP ICON: This is the main icon image to be used in your desktop application. It is recommended to upload it in 512×512 px size and PNG format. The uploaded icon is automatically converted to formats suitable for target platforms.
TARGET PLATFORMS: This allows you to specify which operating systems the application will be compiled for.
Windows, macOS, and Linux options are available.
ARCHITECTURES: Allows you to specify the processor architecture on which the application will run. x64 (Intel/AMD 64-bit) and arm64 (ARM 64-bit) options are available.