User Manual

Oracle Data Source Add User Guide

24/9/26
Oracle Data Source Add User Guide

Oracle

Oracle is one of the external data sources you can use on the Kuika platform. You can integrate an existing Oracle database into the application you’re developing in Kuika as a data source.

The main difference between Oracle and MSSQL is that MSSQL offers features specific to SQL Server, while Oracle supports extended SQL commands and functions.
Once a project is started with MSSQL, you cannot switch to the Oracle workspace. Therefore, it is important to select the correct workspace at the beginning of the project.

Add a Data Source Connection to Your Application with Oracle

  1. Log in to the Kuika platform and open the project you’ll be working on from the Apps screen.
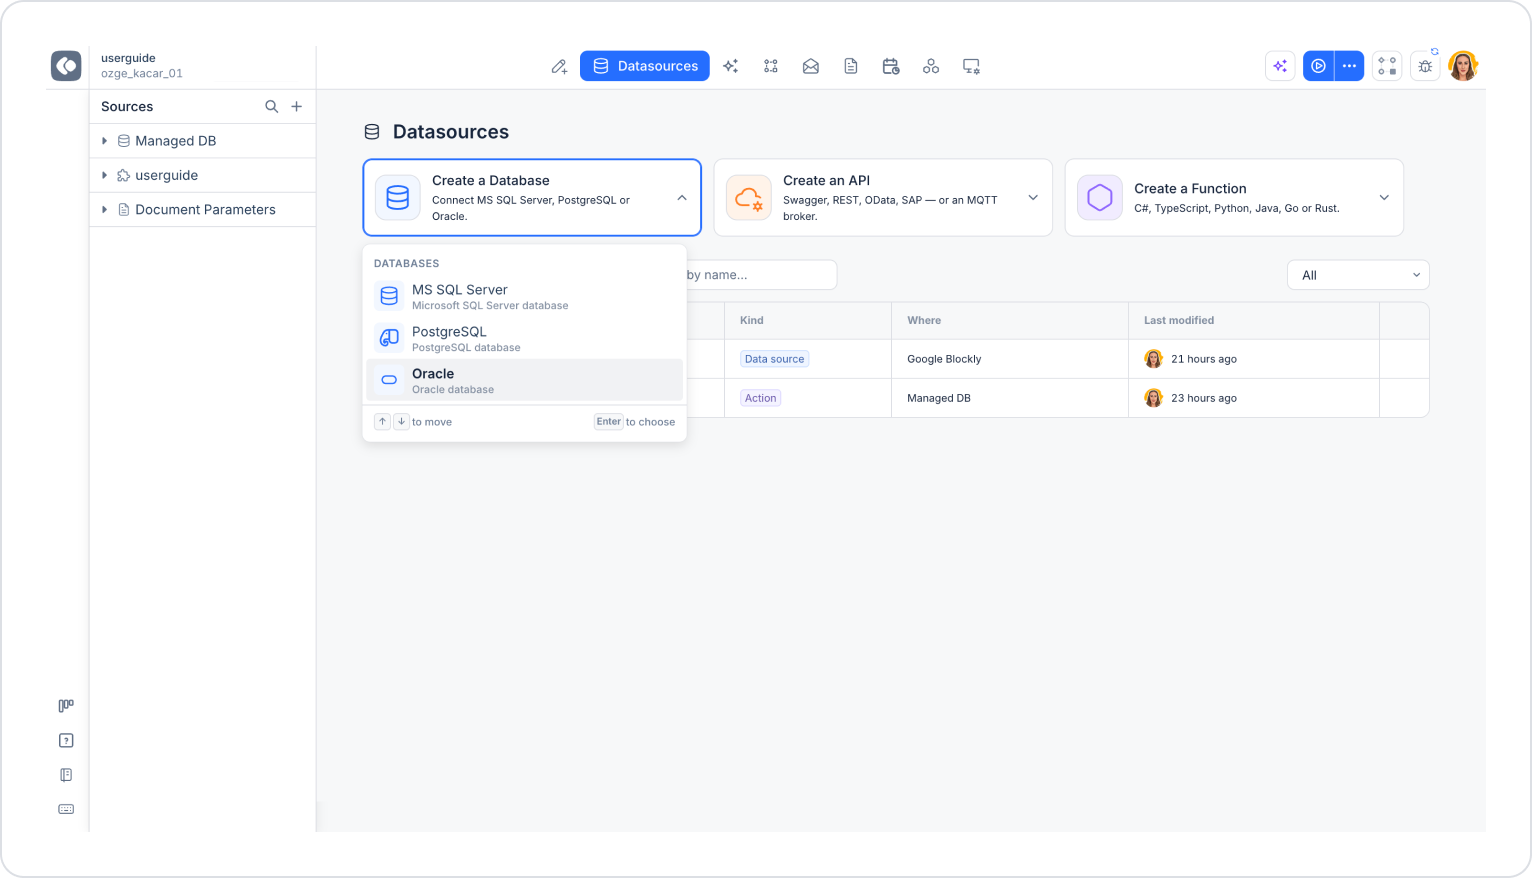
  2. Open the Datasources module from the top menu. In this module, you can view the data sources and actions in your application under the Recently modified and Data sources tabs, search using the Search by name field, and add a new data source.
  3. Click the Create a Database card at the top of the screen. This card allows you to connect to MS SQL Server, PostgreSQL, and Oracle databases.
  4. From the Databases list that opens, select the Oracle (Oracle database) option. You can use the ↑/↓ keys to navigate the list and the Enter key to make a selection.
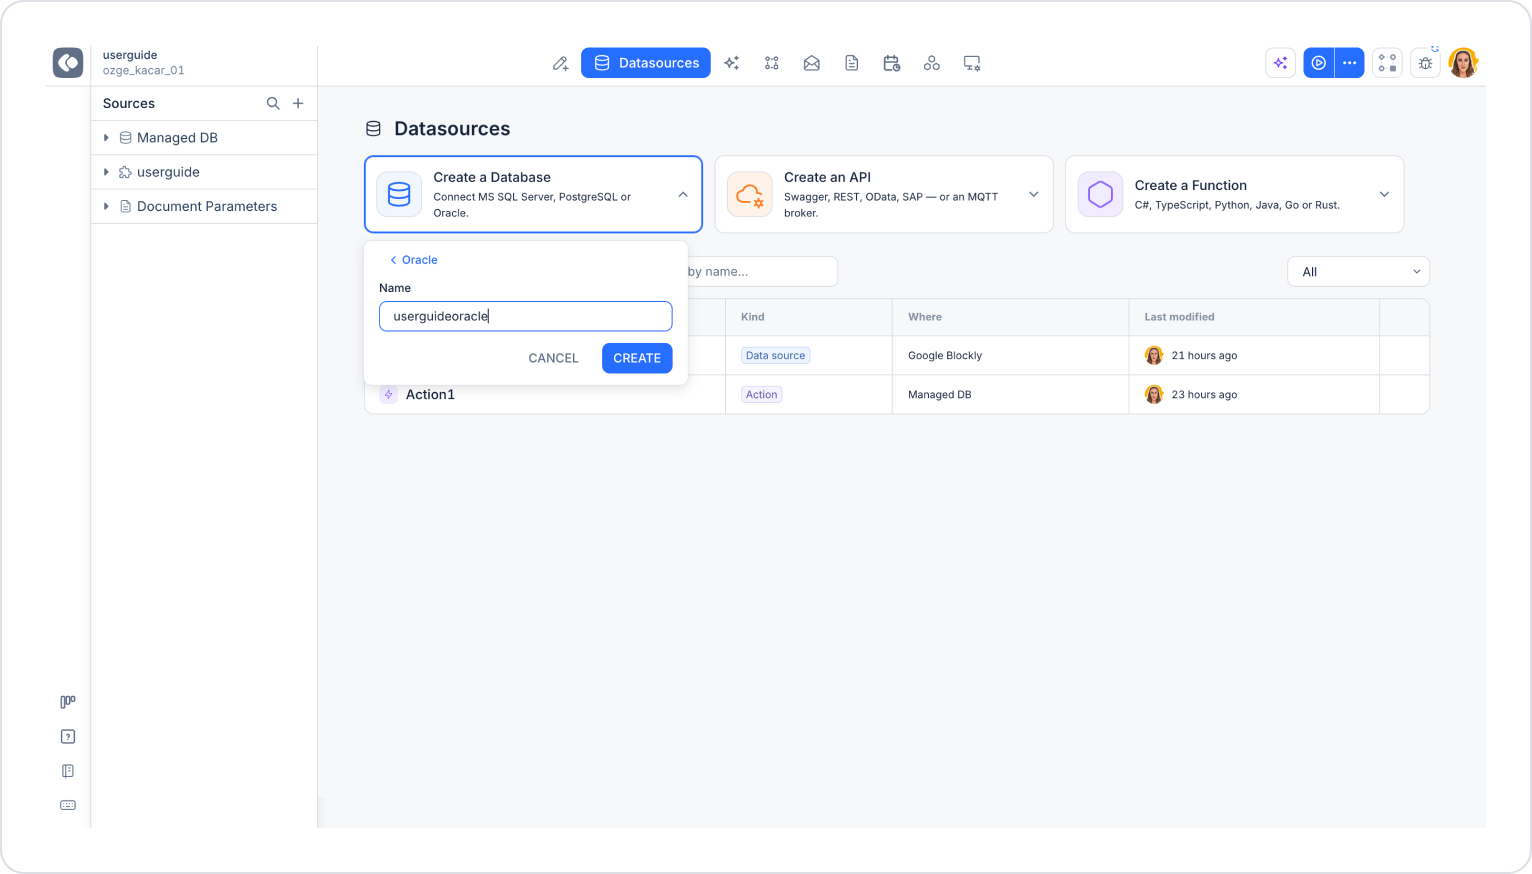
  1. Enter a name for your data source in the Name field (e.g., userguideoracle).
  2. Click the CREATE button to complete the process. To cancel the operation, use the CANCEL button; to return to the database selection screen, use the < Oracle link.

Note: You can also start the process of adding a new data source by clicking the + icon next to the Sources heading in the left panel.

After these steps, the Oracle connection settings screen opens. At the top of the screen, you’ll find the back button (←), the data source name (with a pencil icon to edit it), and the CREATE button to save the settings. You can enter the connection information using either the Enter fields or Connection string tabs in the Endpoint section.

To connect to an Oracle database running locally, the Oracle Server must be accessible from the internet.

Configure Oracle Connection Settings

In the Endpoint section, select the Enter fields tab and fill in the following fields.
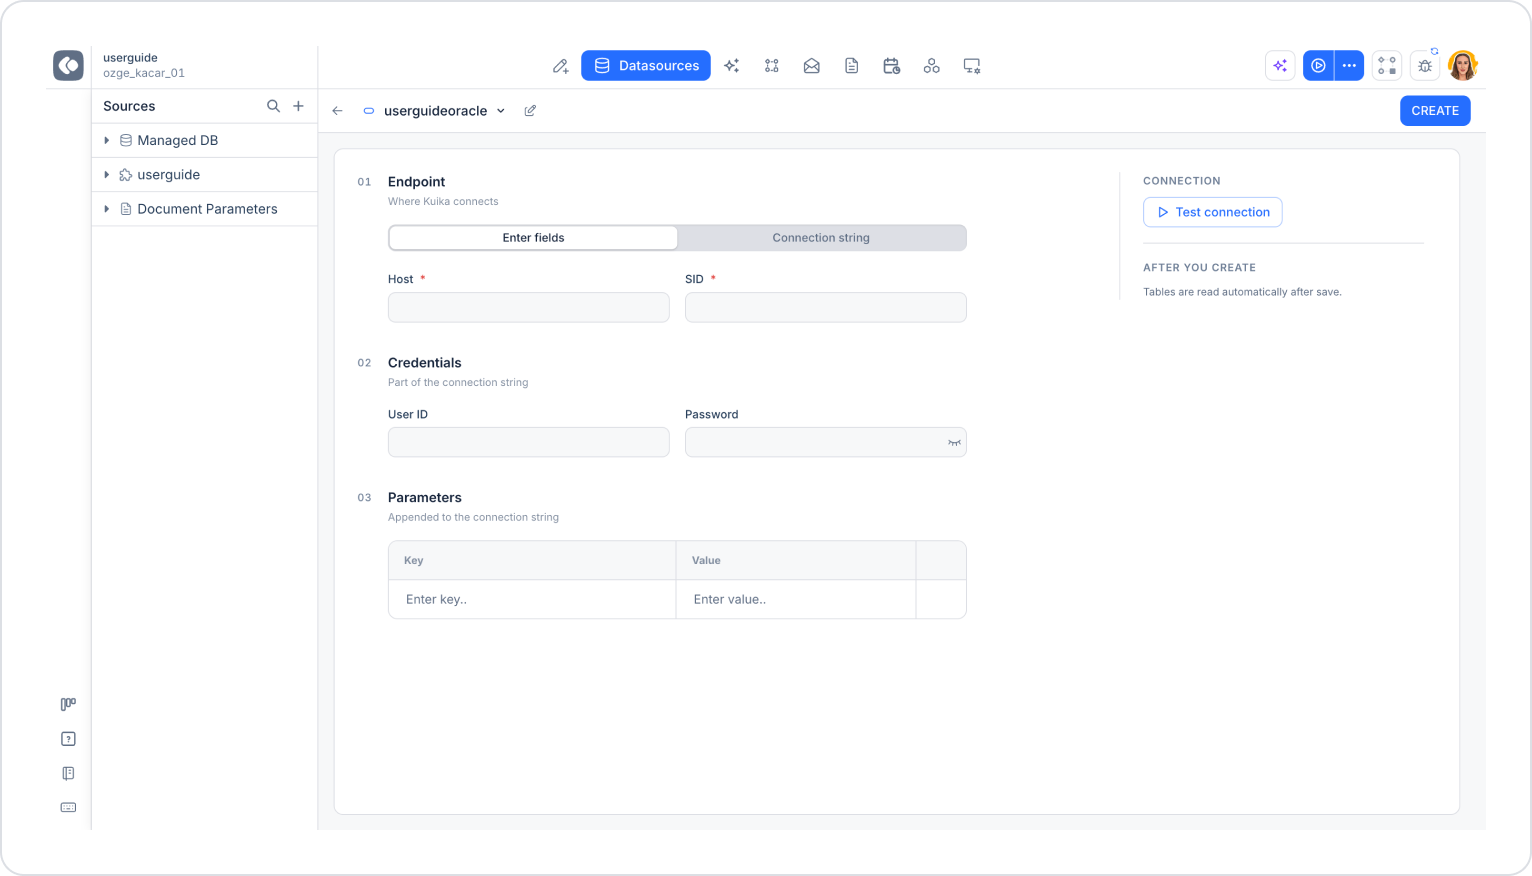
01 Endpoint

Contains the server information that Kuika will connect to.

  • Host (required): Enter the address of the Oracle server. Example: myOracleHost
  • SID (required): Enter the name of the Oracle database instance. Example: ORCL

02 Credentials

These are the credentials that are part of the connection string.

  • User ID: Enter the username to be used to access the Oracle database.
  • Password: Enter your Oracle database password. You can show or hide the password using the eye icon.

03 Parameters

You can enter additional parameters to be added to the connection string in the Key and Value fields. When you fill in a row, a new blank row appears below it; you can delete an added row using the trash can icon.

Example parameters:
  • Connection Timeout: 30
  • Pooling: true

Configure Settings via Connection String

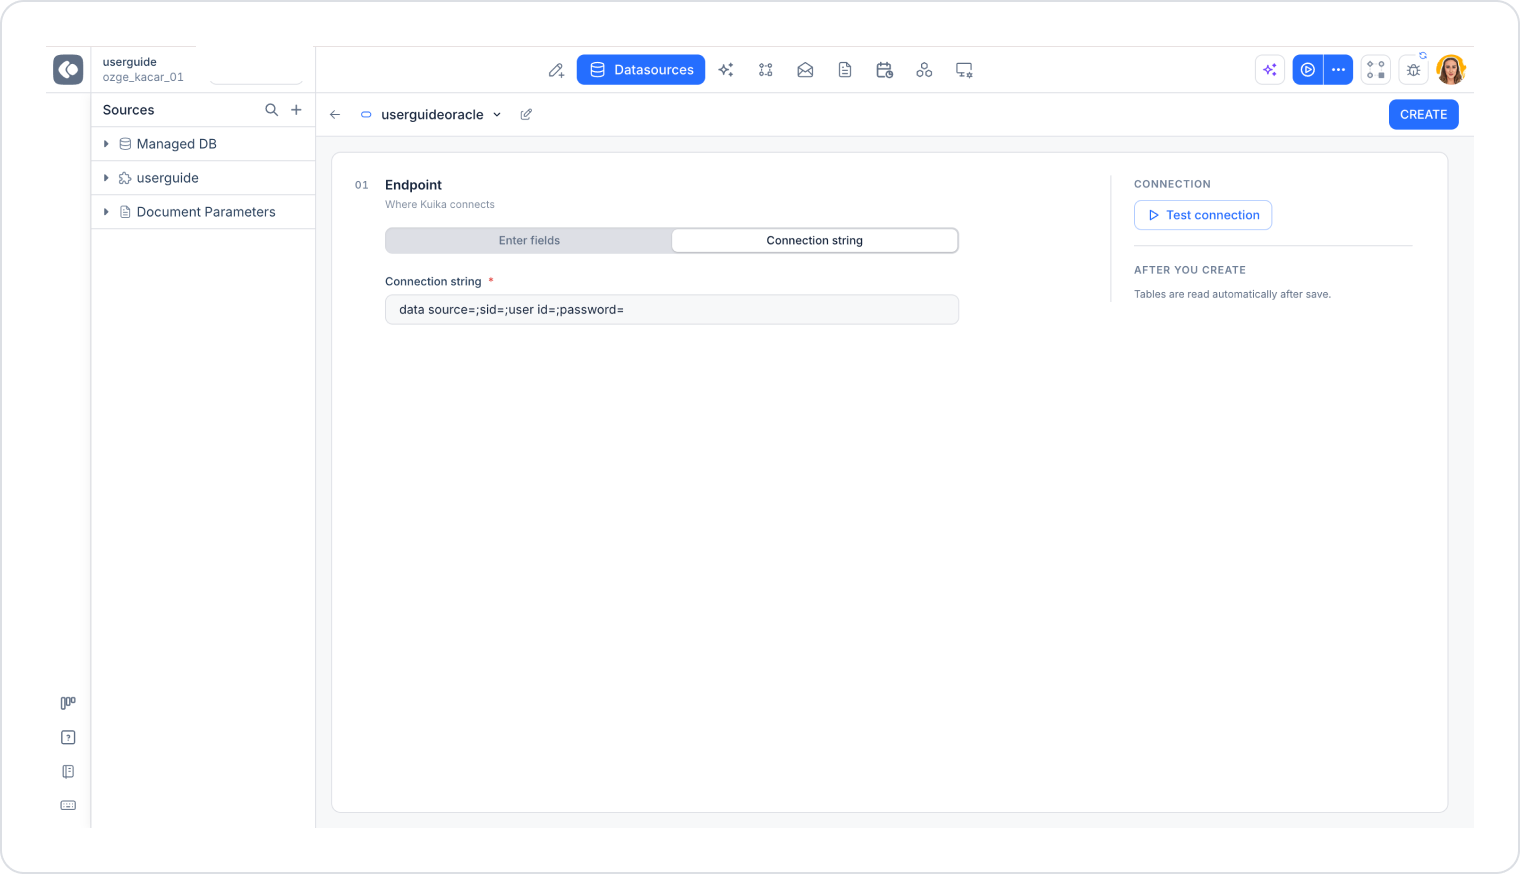
  1. In the Endpoint section, select the Connection string tab.
  2. In the Connection string (required) field, enter the connection string information for your Oracle database. The field defaults to the following template: data source=;sid=;user id=;password=

Example format:

data source=myOracleHost;sid=ORCL;user id=myUsername;password=myPassword;

Testing and Saving the Connection

  1. Click the Test connection button in the Connection section on the right to verify that the connection works.
  2. If the connection is successful, click the CREATE button in the top-right corner to create your data source.

After saving, the tables in your database are automatically read and become available in Kuika.

By following these steps, you can connect the Oracle data source to your Kuika applications.

Glossary

Alt Başlıklar