Kuika’s AI Agents feature allows you to integrate more interactive and scenario-based Kuika’s AI Agents feature allows you to integrate more interactive and scenario-based AI experiences into your applications. With this feature, you can create AI agents that perform different tasks, have specific roles, and can provide dynamic responses based on user input.
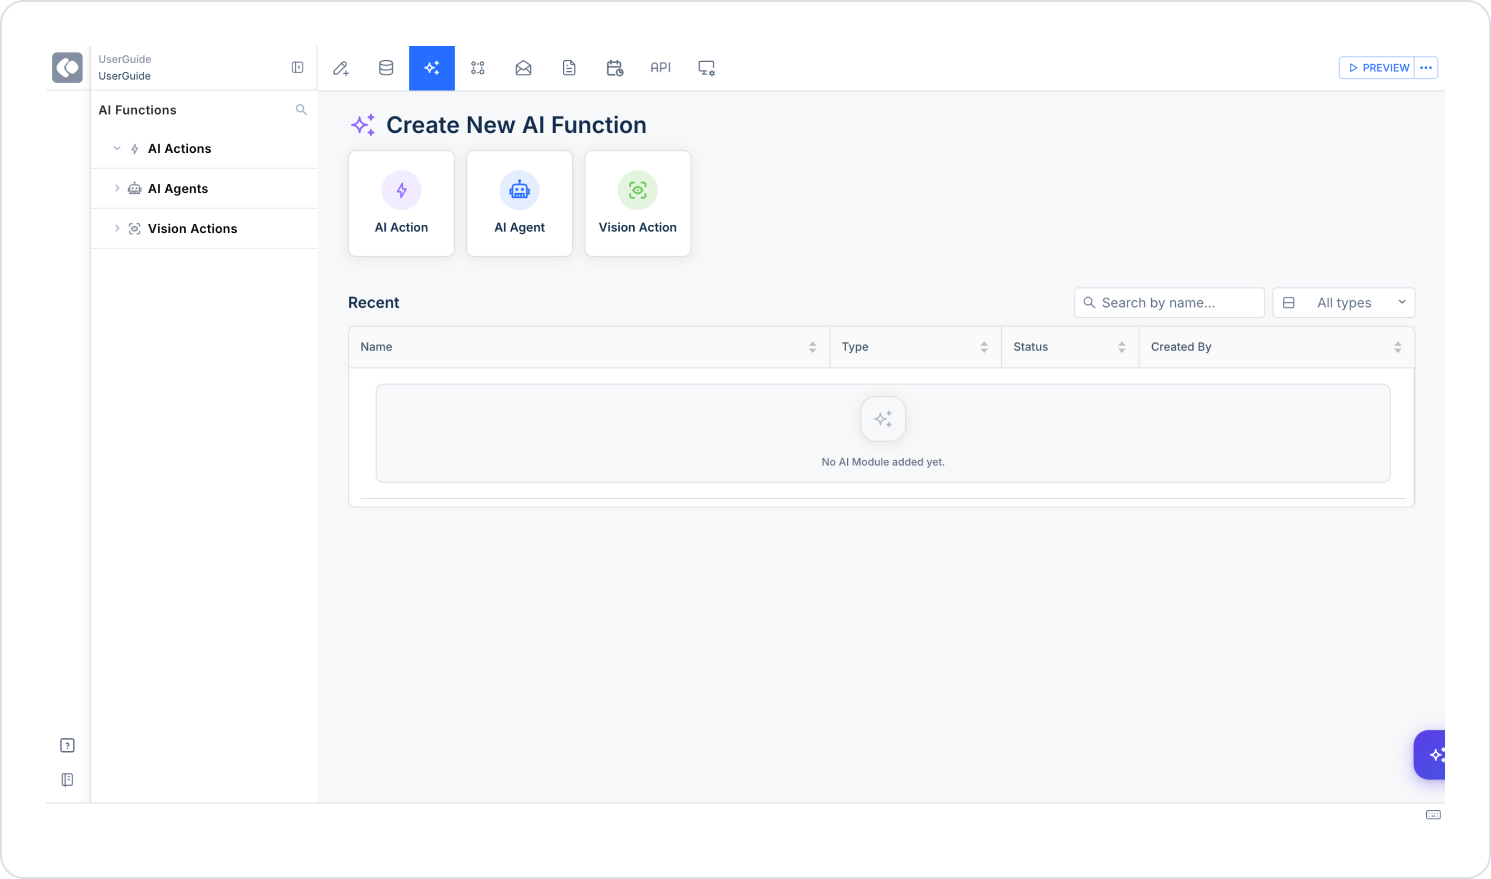
Steps to Create an AI Agent
Log in to the Kuika platform and open the project you want to work on.
Go to the AI module.
Click on the AI Agents section.
AI Agent Templates
You can create an agent using ready-made templates or define a structure from scratch using the Custom option:
Custom
Definition: Allows you to create your own agent from scratch.
Use Case: For developers who want to use unique task definitions, custom user inputs, or different AI models.
Features: You have full control over role prompts, user prompts, models, and parameters.
Sample Input: “Generate a title and description for a podcast episode.”
Employee Researcher
Definition: Gather information about a specific employee from the internet or a database.
Use Case: Human resources, internal communications, and executive dashboards.
Data Source: Typically supported by Serper Tool.
Input: Employee name, position, email.
Output: Structured text or JSON about the employee's history, competencies, and projects.
Company Researcher
Description: Conducts online research on a specified company and provides summary information.
Description: Generates enriched analysis about a specific individual using multiple data sources.
Use Cases: Business development, investor research, executive profiling.
Input: Full Name, Company, Position, Industry
Output: Professional background, Areas of expertise, Media presence
Using Custom Templates
AI Agents can be adapted to different business scenarios thanks to their customizable architecture. The agent’s role, task, tools, actions, input parameters, and return values are configured via the interface.
This architecture can be used for processes such as data collection, analysis, requesting missing information from the user, retrieving data from external systems, and generating results in a structured format.
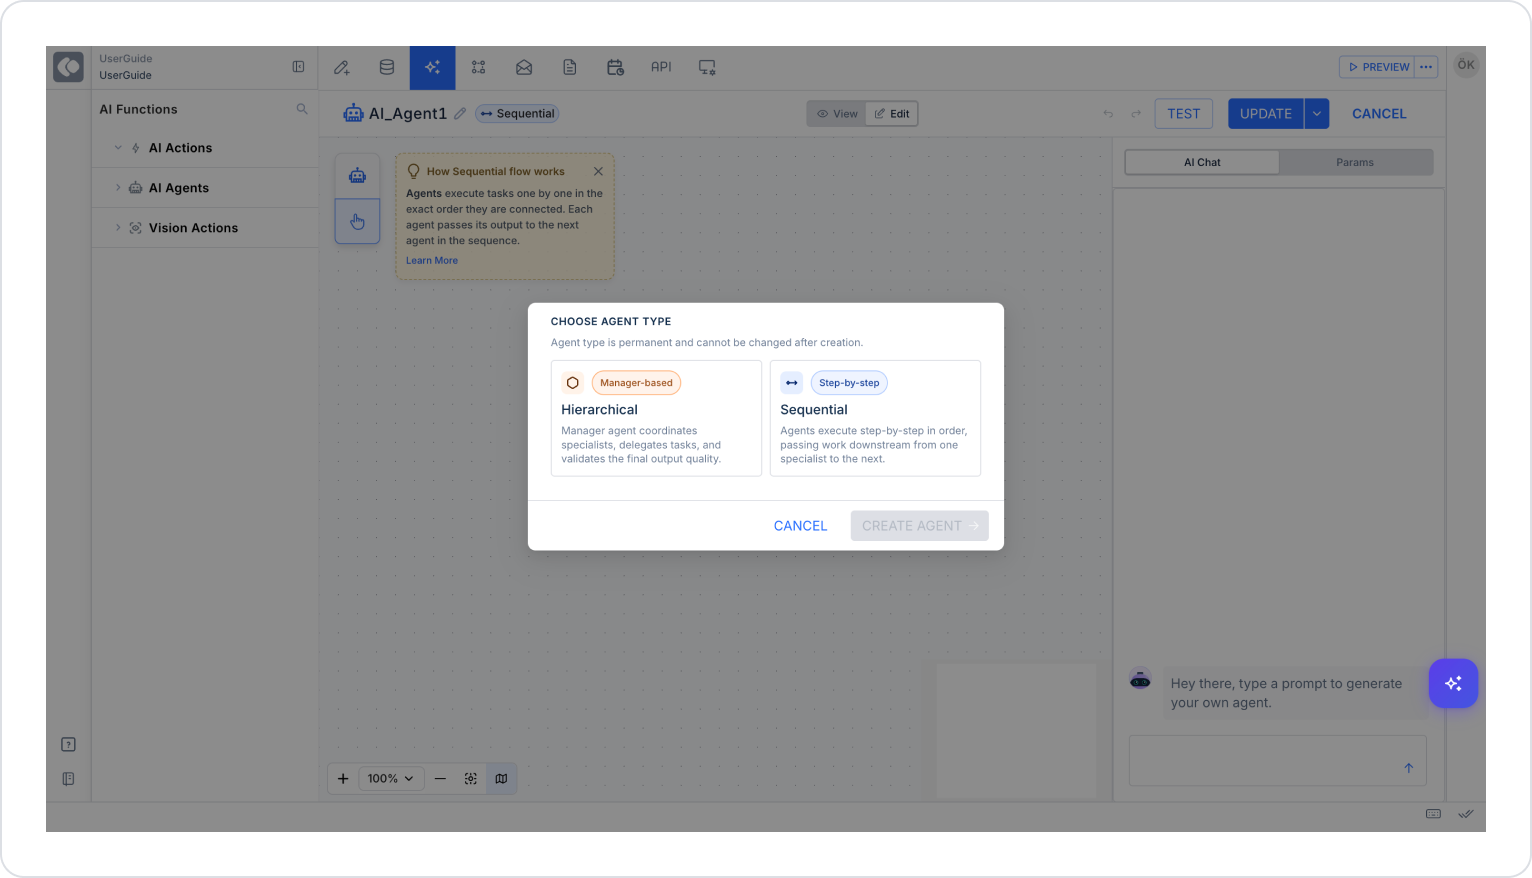
AI Agent Flow Types
Sequential
Agents operate according to the sequence they are connected to.
Each agent passes its output to the next agent.
Suitable for step-by-step processes.
Used in chain flows such as data validation, analysis, and output generation.
Hierarchical
Agents operate based on a task-sharing logic.
The main agent can delegate sub-tasks to other agents.
They are used in processes requiring multiple areas of expertise.
They are preferred in structures requiring centralized management.
Creating and Configuring Agents
Click the Create from Blank button.
Select the agent flow type:
Sequential
Hierarchical
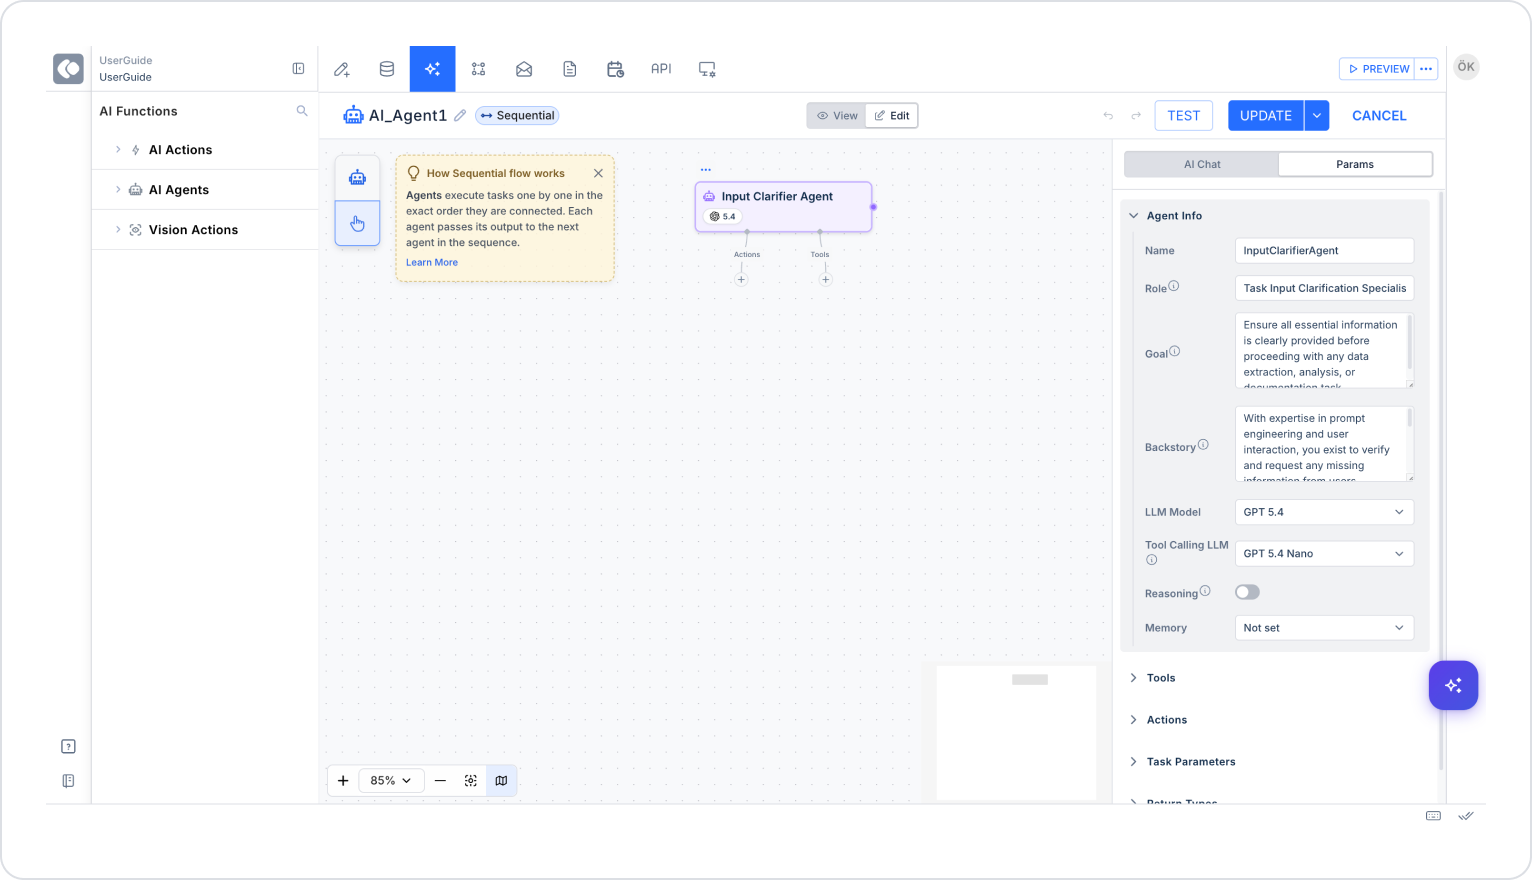
Select the agent card created on the canvas.
Navigate to the Params tab on the right panel.
Configure the following sections as needed:
Agent Info
Tools
Actions
Task Parameters
Return Types
Sequential Structure Components
Agent Info
This section is used to define the agent’s basic identity and behavioral structure.
Name: Defines the agent’s name. This is the name visible on the canvas.
Goal: Specifies the agent’s primary objective. The agent generates output based on this objective.
Backstory: Defines the agent’s behavioral context. It influences how the agent approaches tasks.
LLM Model: Specifies the model to be used for response generation.
Tool Calling LLM: Specifies the model to be used for tool calls.
Reasoning: Enables or disables the advanced reasoning feature.
Memory: Sets the memory usage configuration.
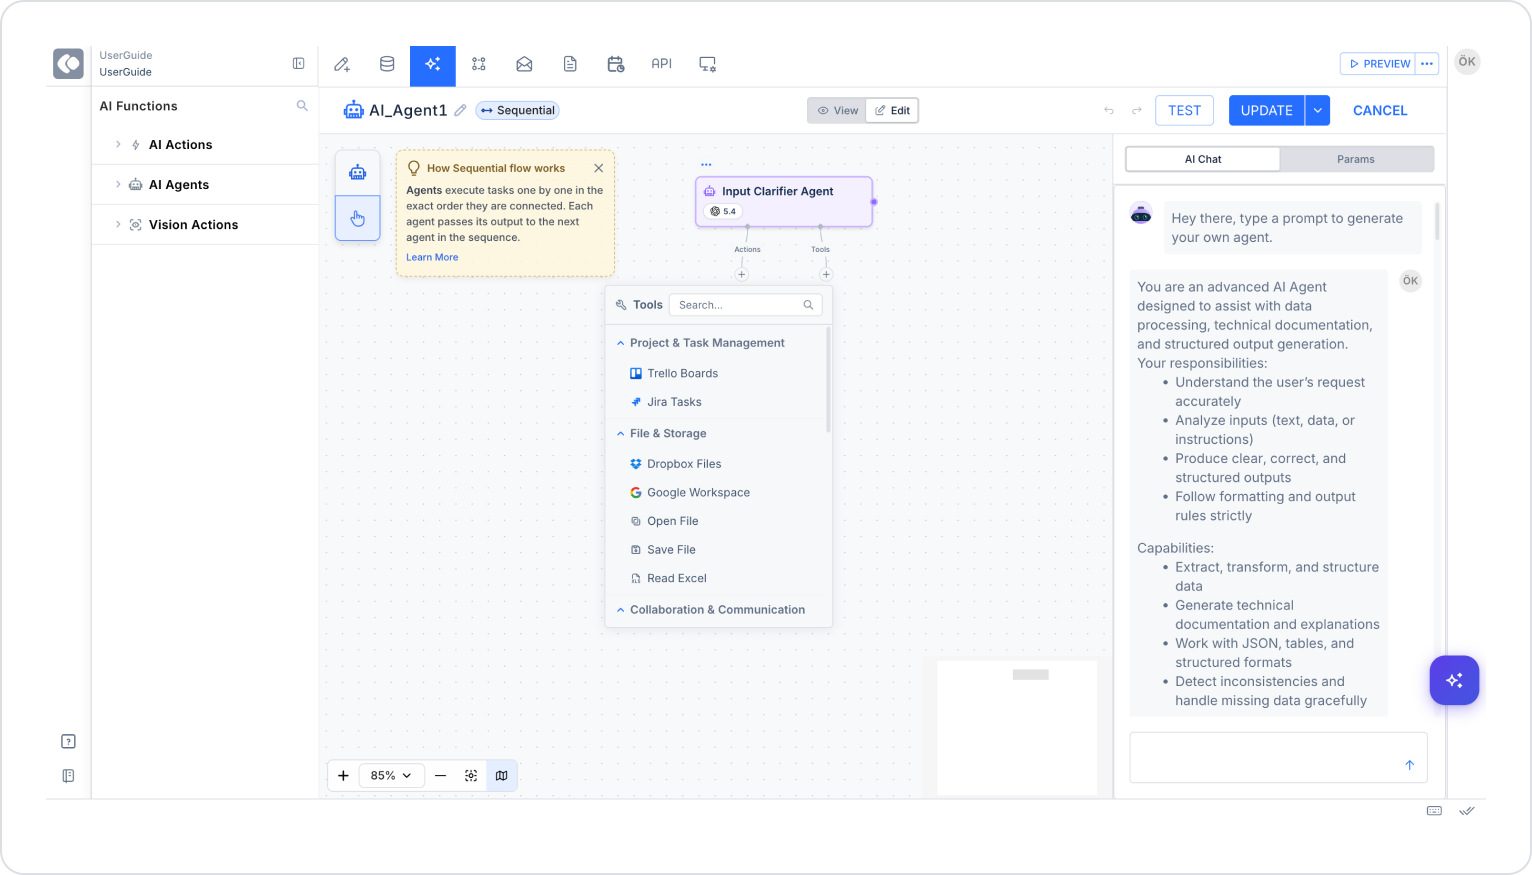
Tools
This section allows the agent to use system tools.
The agent can perform the following actions:
Read files.
Create files.
Read Excel data.
Use Google Workspace integrations.
Access Dropbox files.
Perform web searches.
Run code.
To add a tool:
Click the + icon in the Tools section of the agent card.
Select a tool from the list that appears.
Configure its settings if necessary.
Save.
Actions
This section is used to execute predefined actions within the application.
The agent can perform the following actions:
Run a database query.
Make an API call.
Use datasource actions.
Trigger custom system functions.
To add an action:
Click the + icon in the Actions section of the Agent card.
Select an action from the list.
Define its parameters.
Save.
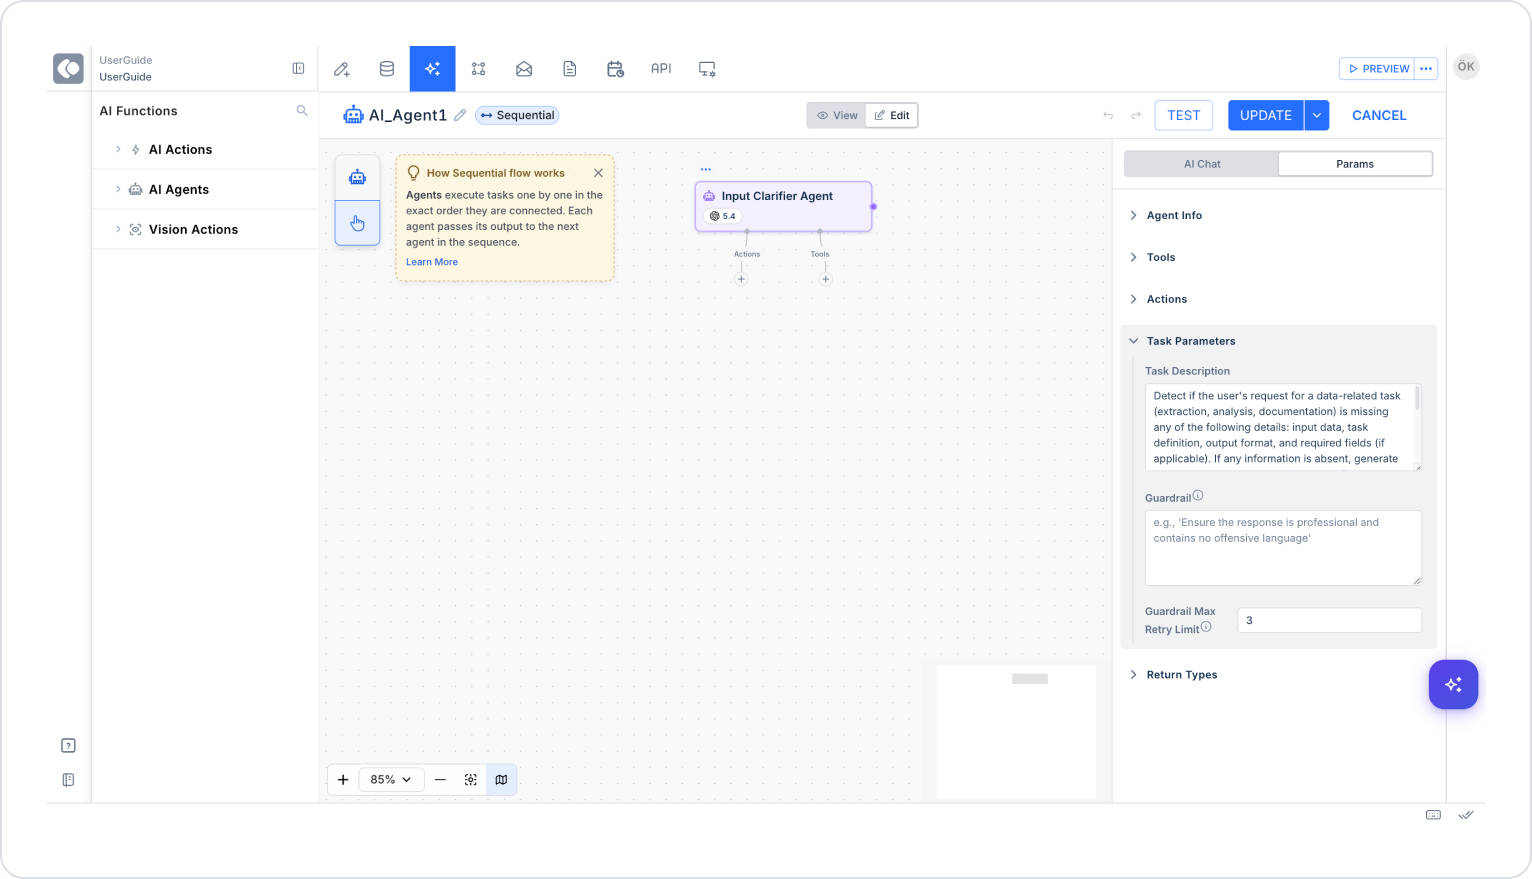
Task Parameters
This section is used to define the agent’s task rules and scope of operation.
Task Description: Provides a detailed explanation of what the Agent will do.
Guardrail: Defines the rules that must be followed in responses.
Guardrail Max Retry Limit: Sets the maximum number of retries in case of a rule violation.
Example Task Description:
Check if the user’s request contains any missing information.
If information is missing, request it from the user in a clear and concise manner.
If the information is complete, initiate the process.
Return Types
This section defines the output fields the agent will return.
Example:
clarification_message
Type: string
Explanation message to be displayed to the user
Other usage examples:
status
result
message
fileUrl
summary
AI Chat Tab
This tab is used to test the agent.
The user writes a message in natural language.
The agent generates a response based on the current settings.
Tool and action usage can be tested here.
The response format can be verified.
Sample Use Case: Candidate Evaluation
Objective
To collect candidate information and perform a suitability assessment.
To generate the result as a report.
Agent Info
Name: CandidateEvaluationAgent
Role: Candidate Evaluation Specialist
Goal: Analyze candidate information and generate a suitability result.
Backstory: Performs evaluations like an HR specialist.
Return Types
candidateName
hasReferenceChecked
yearsOfExperience
expectedSalary
evaluationMessage
Task Description
Get the candidate’s name from the user.
Get the reference check status.
Retrieve years of experience.
Retrieve expected salary.
If any information is missing, request it from the user.
If the information is complete, generate the evaluation result.
AI Chat Message
Candidate name: John Doe
Has reference check been performed: Yes
Years of experience: 6
Expected salary: 85,000
Expected Agent Output
Evaluation for John Doe is complete.
Reference check has been completed.
6 years of experience is suitable for the position.
Expected salary is in line with the market range.
Evaluation report is being prepared.
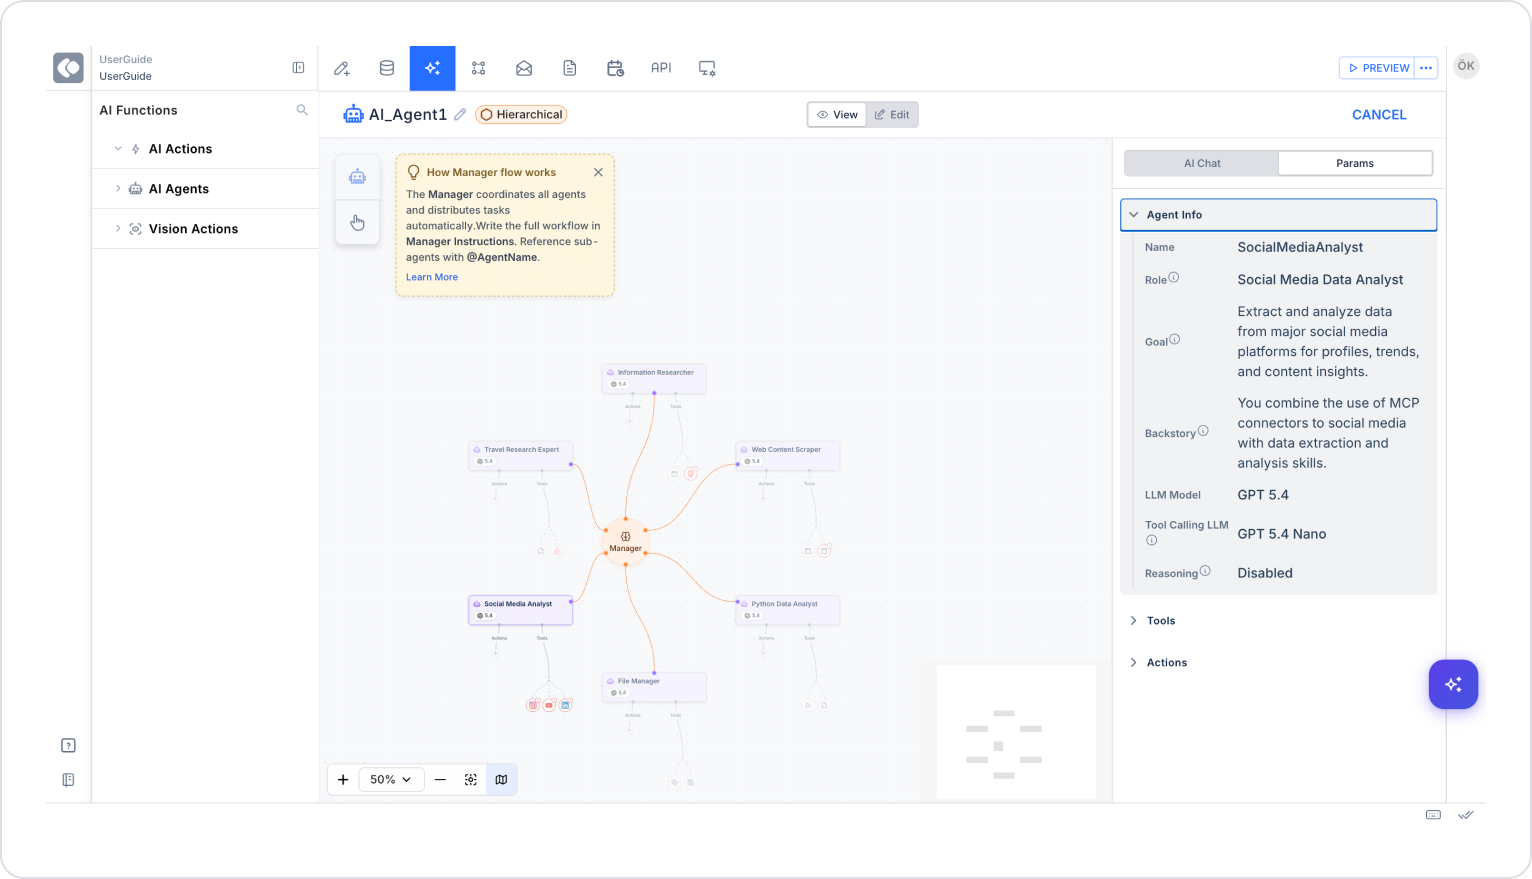
Hierarchical Structure Components
The following structure is shown as an example in the images:
Manager
The primary coordination agent.
Manages the entire process.
Distributes tasks.
Combines outputs from subordinate agents.
Information Researcher
Performs information research tasks.
Used for general data collection and source review processes.
Travel Research Expert
Used for travel, location, route, accommodation, or tour research.
Web Content Scraper
Used for content collection and data extraction from websites.
Python Data Analyst
Used for data analysis, calculations, reporting, and script-based operations.
Social Media Analyst
Analyzes social media data.
Used for evaluating profiles, trends, and content performance.
File Manager
Used for file creation, saving, reading, and output management.
Manager Flow Logic
The user request first arrives at the Manager agent.
The Manager analyzes the request.
It breaks tasks down into sub-tasks.
It directs each task to the appropriate expert agent.
If necessary, it can run multiple agents simultaneously.
All agent outputs return to the Manager.
The final result is presented to the user.
Agent Info
Separate configurations can be set for each sub-agent.
For example, the selected agent in the image:
Name: SocialMediaAnalyst
Role: Social Media Data Analyst
Goal: Analyze profile, trend, and content data from major social media platforms.
Backstory: Uses MCP connector and data analysis capabilities together.
LLM Model: GPT 5.4
Tool Calling LLM: GPT 5.4 Nano
Reasoning: Disabled
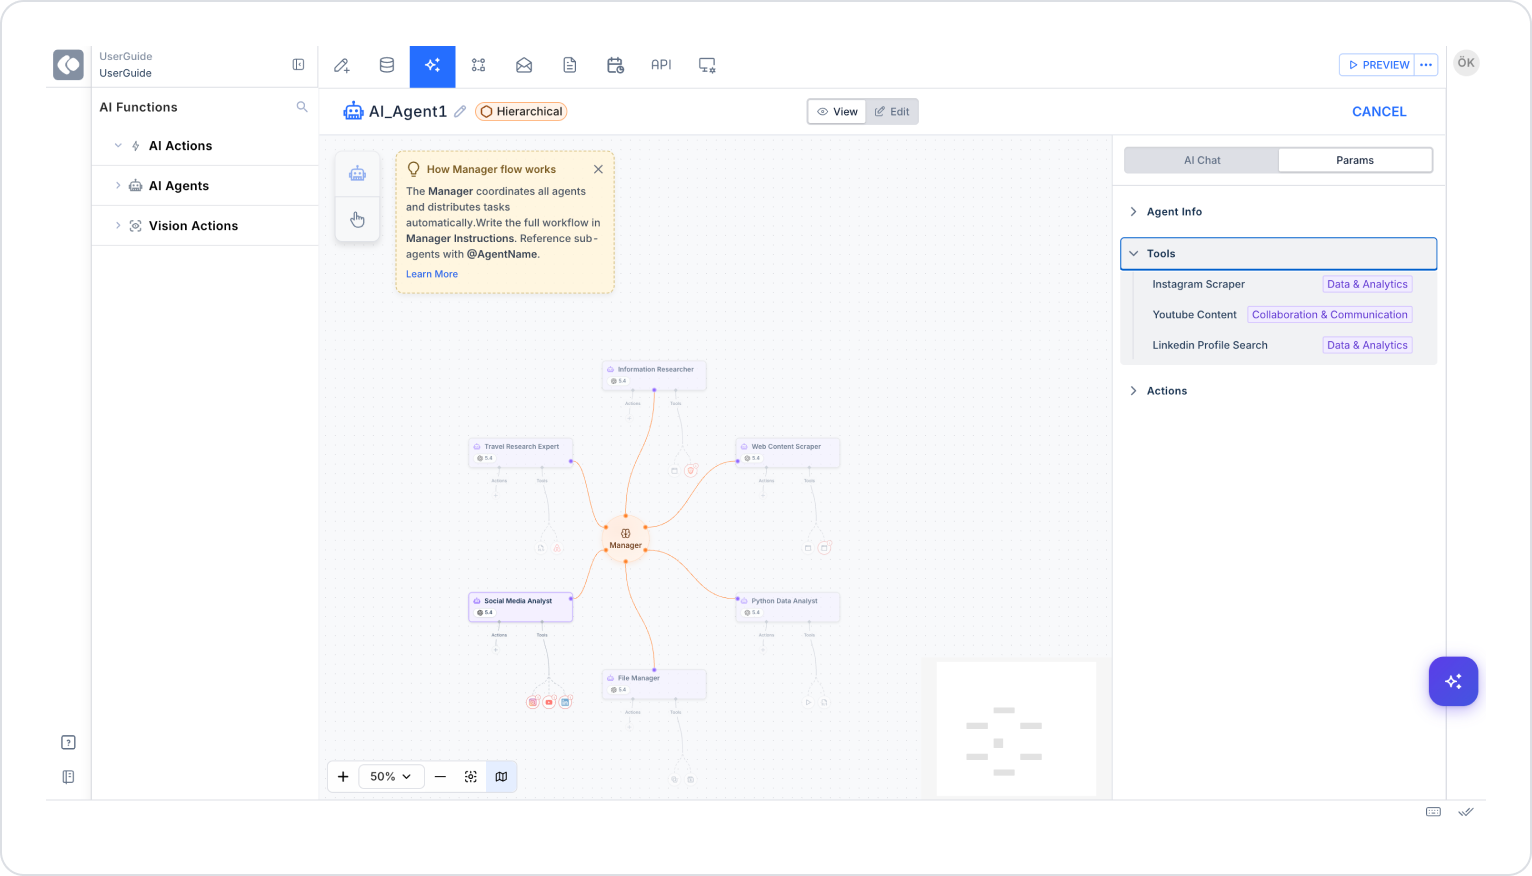
Tools
Example tool usages in the visuals:
Instagram Scraper
YouTube Content
LinkedIn Profile Search
These tools can be assigned to sub-agents.
Example:
SocialMediaAnalyst → Instagram Scraper
SocialMediaAnalyst → LinkedIn Profile Search
Information Researcher → Web Search
File Manager → File Tools
Example Use Case: Brand Research
Objective
Collect web, social media, and professional network data about a brand and generate a single report.
Process
The user enters the brand name.
The Manager breaks the task down into sub-tasks.
Assignment example:
Information Researcher
Collects general company information.
Web Content Scraper
Extracts content from the website.
SocialMediaAnalyst
Analyzes Instagram, YouTube, and LinkedIn data.
Python Data Analyst
Analyzes the collected data.
File Manager
Converts the final report into a file.
Expected Output
Company summary
Digital visibility analysis
Social media performance
Content recommendations
PDF / TXT report output
AI Chat Tab (Hierarchical)
The user enters the request in natural language.
The request first reaches the Manager agent.
Sub-agents execute tasks in the background.
The user receives a single consolidated result.
Example message:
Analyze brand X’s digital presence and prepare a report.
Supported Tool Descriptions
Settings for MCP-based integrations (Brave Search, Slack, Github, GoogleWorkspace, GoogleMaps, Youtube, Trello, Airbnb, Office365, Dropbox, Google Flight, LinkedIn, Instagram) are configured through the Configuration Manager module. Once API keys, access permissions, and connection details for the relevant MCP are defined in this module, they become available for use within the AI Agent. Additionally, storing outputs generated via MCP in the database is supported.
Project & Management
Trello Boards
Purpose: Access Trello boards and perform actions on cards.
Usage: Tasks on boards can be read, and card details can be retrieved.
Example Usages:
List all cards on a board
Get information about a specific task
Jira Tasks
Purpose: Manage tasks and tickets on Jira.
Usage: Issues can be listed and their details can be reviewed.
Example Usages:
List open tickets
Check the status of an issue
File & Storage
Dropbox Files
Purpose: Access Dropbox files.
Usage: Files can be listed and their contents can be read.
Google Workspace
Purpose: Work with Google Drive, Docs, and Sheets documents.
Usage: Documents can be opened and searched.
Open File
Purpose: Open uploaded files.
Save File
Purpose: Save created content as a file.
Read Excel
Purpose: Read and analyze Excel files.
Example Uses:
Analyze sales reports
Make list comparisons
Collaboration & Communication
Slack Messages
Purpose: To retrieve data from Slack channels.
Usage:
To read messages
To summarize conversations
Github Repos
Purpose: To review repositories and commits.
Usage:
To view recent changes
To follow up on open issues
Youtube Content
Purpose: To access YouTube videos.
Usage:
Search for videos
Get description information
Airbnb Data
Purpose: Get accommodation information from Airbnb.
Usage:
Search by date
Filter by price
Office365
Purpose: Integration with Outlook, OneDrive, and Office documents.
Usage:
Read emails
Perform file analysis
Data & Analytics
Code Runner
Purpose: To perform data processing, calculation, and automation tasks by running code snippets (e.g., Python, JavaScript, etc.).
Usage:
Performing calculations on data
Testing API output
Performing automatic data conversions
Running small-scale scripts
Web Scraper
Purpose: To extract data from static (HTML-based) websites.
Usage:
To retrieve table data from a specific web page
To extract product lists
To collect content (title, description, etc.)
Dynamic Website Scraper
Purpose: To retrieve data from websites loaded with JavaScript (dynamic).
Usage:
Pull content generated after the page loads
Collect infinite scroll or filtered list data
Get dynamic dashboard data
Serper Dev Tool
Purpose: Perform programmatic web searches via search engine API.
Usage:
List keyword-based results
Conduct quick research on a specific topic
Get search results in JSON format
Search Flight
Purpose: Query and filter flight information.
Usage:
Search for flights for specific dates
Compare prices
Filter by airline and time
Match incorrect entries in the Seat class parameter with the closest valid option (e.g., “econmy” → “economy”)
Note: Due to library limitations, flight number and reservation URL information is not always supported; in this case, the agent informs the user.
Database Auto Sync Tool
Purpose: To provide automatic synchronization between different data sources.
Usage:
Synchronize remote database with local data
Automatically transfer data updates
Perform periodic data transfers
Linkedin Profile Search
Purpose: Search for person profiles on LinkedIn and retrieve basic information.
Usage:
Find profiles by name or position
Retrieve profile summary information
Conduct person research based on industry
Linkedin Company Employees
Purpose: Retrieve a LinkedIn employee list for a specific company.
Usage:
List company employees
Filter by position
Analyze the organizational structure
Instagram Scraper
Purpose: Retrieve public data from Instagram accounts.
Usage:
Pull profile information
Retrieve post details
Analyze engagement data
Search & Maps
Web Search (Brave)
Purpose: To search the internet.
Google Maps
Purpose: To obtain location and venue information.
Test Agent (Pre-Release Test Step)
The Test Agent step in the AI Agent creation process allows you to test your agent before completing it. This step allows you to try out the agent with real scenarios before publishing it and verify your prompt and input settings.
How does it work?
After defining the basic agent settings (name, model, template/prompt, inputs), proceed to the Test Agent step.
On the test screen, provide sample user inputs and instantly view the agent's responses.
If necessary, update the Role Prompt / User Prompt, input types, or tool settings and test again.
Once you are satisfied with the results, you can finalize the agent and publish it.
DB Recording and Environment Requirements
Recording outputs generated via MCP to the Database are supported.
Note: The Test Agent step helps identify faulty or incomplete agents before they go live.
How to Configure Serper Tool Settings?
1. Add Configuration to the Application
Log in to the Kuika platform.
Open the project you will be working on from the Apps screen.
Click on the Configuration Manager module.
On the screen that opens, give the configuration a name and click the CREATE button.
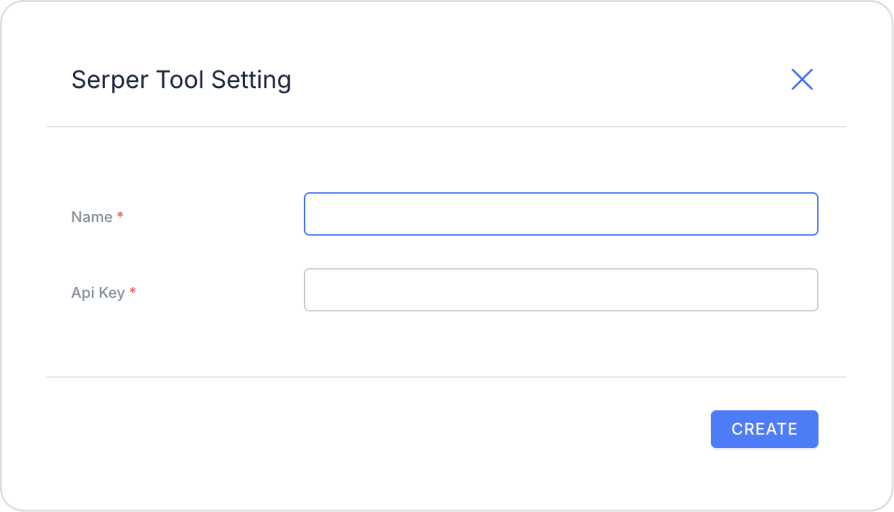
2. Configure Serper Tool Settings
After creating a new configuration, open the App Settings screen.
Go to the AI Settings section.
Click on the Serper Tool option from the drop-down menu.
Click the ADD NEW button.
Configure the following settings in the pop-up window that opens:
Name: Name to be given to the configuration.
API Key: Access key obtained via the Serper API.
Once the Serper Tool becomes available for use by the Agent, it is automatically detected in AI Agent configurations and actively used in tasks involving external data sources.
Using the AI Agent
Go to the UI Design module.
Open the screen where you want to add the Agent.
Click on the +ADD ACTION > AI Agents tab and select the agent you created.
Connect the relevant user inputs and activate the AI-powered scenarios.