User Manual

Screens

30/7/25
Screens

During the application development process with Kuika, you can extend and customize your application by creating new screens. To create a screen, click on the “+”  icon in the Screens Panel header and select New Screen from the drop-down menu. In the New Screen modal that appears, according to your needs:

  • You can create a blank screen (Blank).
  • You can make a quick start by using template screens.
  • With CRUD Wizard you can create screens connected to your database.
  • With the From Excel option, you can create screens from data in an Excel file.

With templates and tools, you can quickly implement your screen designs and streamline your development process. In this course, you will learn how to create screens that fit your needs.

This training content consists of the following topics:

  1. Tools for creating and managing screens,
  2. Screen templates and creation,
  3. Screen panel name/duplicate/delete operations.

Screen Creation and Management Tools

A. Blank Screen

Blank screen templates are basic screens that initially have no elements on them. These templates are available in three different variants:

  1. Blank
    • It is a completely blank screen; there are no elements on it.
    • You can set access controls to this screen with Anonymous Access or All Roles Access.
  2. Blank With Header
    • It is a screen template with only the Header element.
    • Only available in web applications.
  3. Blank With Header For Mobile
    • It is a screen template with only Header elements.
    • It is designed for mobile applications only.

How to Create a Blank Screen?

  1. After logging into the Kuika platform, open the project you will work on from the “Apps” screen.
  2. Open the Screens panel on the left side.
  3. Click on the “+” icon.
  4. Select the New Screen option from the menu that opens.
  5. Select one of the Blank screen types.
  6. Give your screen a name and click the CREATE button.

B. CRUD Wizard

CRUD Wizard is a tool that allows you to create screens in a few seconds, easily defining Create, Read, Update and Delete operations connected to your database. This structure is an ideal solution especially for fast development processes and standard CRUD operations.

How to Create a Screen with CRUD Wizard?

  1. After logging into the Kuika platform, open the project you will work on from the “Apps” screen.
  2. Open the Screens Panel.
  3. Click on the “+” icon.
  4. Select the New Screen option.
  5. Click on the CRUD Wizard option.
  6. Continue with the screen creation process by making the necessary settings.

CRUD Wizard Settings

1. Datasources

  • This is the section where you select which data source the screens will be connected to.
  • Here, the respective data source and data table are defined.

2. Screen Type

  • Determines how the screen to be created will be displayed.
    • Drawer: The screen animates from the right, left, top or bottom edge of the page.
    • Modal Box: The screen appears as a pop-up in the center of the current page.
    • Current Page: The screen closes the current page and opens as a new page.

3. Layout Design

  • You set how the screen appears on devices such as desktop, tablet or phone.
  • The column layout can be selected to suit different device types.

4. Choose Screen and Properties

  • Select the functions and properties of the screen to be created:
    • List Screen: Creates a screen with a Table element to list the data table.
    • Search: Adds a search field to the list screen.
    • Pagination: Adds a pagination control to the list screen.
    • Create: Creates a form screen for inserting new data.
    • View: Allows the details of an item in the table to be displayed (add an eye icon).
    • Update: Adds a form screen for updating data (Pen icon is added).
    • Delete: Adds a button and function to delete data from the list screen.

5. Screen Name

  • Set a name for the created screen.
  • After making all the settings, you can create the screen by clicking the “CREATE” button.

A “Navigate” action is automatically added to the Header of screens created with CRUD. This action opens the Left Menu screen when the menu icon is clicked. CRUD screens can then be added to the Left Menu as independent items.Thanks to CRUD Wizard, it is both fast and easy to create user-friendly screens that are fully compatible with database operations.

C. From Excel

The From Excel feature allows you to import data directly into the database by importing Excel files from your device into the Database section of your application. Each page of the Excel file you upload is considered as a table and each column header is considered as a table column. The data under the column is added to the specified table. In this way, you can easily create CRUD screens with the data in the Excel file.

How to Create From Excel Screen?

  1. After logging into the Kuika platform, open the project you will work on from the “Apps” screen.
  2. Go to the Screens panel.
  3. Click on the “+” icon.
  4. Select the Screen option.
  5. Click From Excel.

From Excel Settings

1. Datasources

  • Click Choose from computer to select the data to be used for the screens.
  • You can import your data by selecting the Excel file on your device.

2. Screen Name

  • Set a name for the created screen.
  • After making all settings, click the CREATE button to create the screen.

By integrating data from your Excel file directly into your application, you can quickly perform CRUD operations with this data.

D. Image To Screen

  1. After logging into the Kuika platform, open the project you will work on from the “Apps” screen.
  2. Open the Screens Panel.
  3. Click on the “+” icon.
  4. Select the New Screen option.
  5. Click on Image to Screen.
    • Drag & drop here or: This is where you can drag and drop images. Alternatively, buttons can be used to upload files.
    • SELECT: Used to select an image in .jpg or .png format from the computer.
    • PASTE FROM CLIPBOARD: Allows you to upload by pasting an image copied to the clipboard.
    • Enter image URL: Allows you to upload an image from the internet by entering the URL directly.
    • Screen name: Enter a name for the screen to be created.
  6.  With the CREATE button, you can start creating the screen according to the uploaded image.

Create Screen Templates

Dashboard Templates

  1. Dashboard
    • There is a ready Header structure.
    • The remaining area contains 1 Row and 1 Table element.
    • There are two columns in Row.
    • The first column contains Bar Chart and Donut Chart chart elements, and the second column contains a table.
  2. Card and List
    • There is a ready Header structure.
    • The remaining area contains 1 Row and 1 Table element.
    • The Row element has the structure of a single column.
  3. Two Col
    • There is a ready-made Header structure.
    • The remaining field consists of two columns.
    • The first column contains a Table element, while the second column contains two Rows.
      • The first Row contains a Bar Chart.
      • The Donut Chart is located on the second row.
  4. Three Columns
    • There is a ready Header structure.
    • The remaining area contains 1 Row and 1 Table element.
    • There are three columns in Row.
  5. Marketing Dashboard
    • There is a ready-made Header structure.
    • The remaining area contains various graphical and tabular elements to visualize marketing data. Components such as Bar Charts, Line Charts and KPI Cards are often used.
  6. Marketing Dashboard with Left Menu 
    • There is a ready-made Header structure and a menu on the left side.
    • The menu provides quick access to different marketing metrics. The main area includes a layout suitable for analyzing marketing performance with graphs, metric cards and tables.
  7. Sales Dashboard
    • There is a ready-made Header structure.
    • The remaining area consists of components such as Bar Chart, Line Chart, Donut Chart and sales charts to analyze sales data. Includes indicators such as sales performance, product trends and revenue tracking.
  8. Sales Dashboard with Left Menu 
    • There is a ready-made Header structure and a menu on the left side.
    • The menu provides access to different sales metrics and reports. The main area is enriched with tables, graphs and KPI cards for sales analysis.

Screen Creation

  1. Specify a Screen Name for the screen to be created.
  2. After making all the settings, you can create the screen by clicking the CREATE button.

These templates are ideal for user-friendly and organized data visualization, allowing you to easily create flexible screen structures for various needs.

Form Templates

  1. Single Column
    • The form structure is a single column.
  2. Two Columns
    • The form structure consists of two columns.
  3. Image Gallery
    • The form structure consists of two columns.
    • The second column contains the Image Gallery element.
  4. Location Picker
    • The form structure consists of two columns.
    • The second column contains the Google Maps element.

Screen Creation

  1. Specify a Screen Name for the screen to be created.
  2. After making all settings, create the screen by clicking the CREATE button.

List Templates

  1. Two Columns
    • The form structure consists of two columns.
    • The first column contains the table element.
  2. Detailed
    • Form structure consists of table, search and selectbox elements.
  3. Detailed and Search
    • Form structure consists of table and selectbox elements.
  4. Detailed with Location Picker
    • The form structure consists of table and Google Maps elements.

Screen Creation

  1. Specify a Screen Name for the screen to be created.
  2. After making all the settings, click the CREATE button to create the screen.

These templates help you quickly create functionality such as listings and searches and offer different layout options.

Authentication Templates

Kuika offers various Authentication screen templates to speed up the application development process. These templates facilitate common authentication processes such as user login, registration, password reset and verification processes. You can use and edit these templates according to the needs of the application you are developing.Adding a Template Authentication ScreenYou can follow the steps below to add and edit the Authentication screen template in your app:

  1. Open the Screens panel.
  2. In the Screens panel, click the +New Screen icon.
  3. In the pop-up window that opens, click Authentication in the left menu.

Authentication Screen TemplatesAuthentication screen templates are available in different types. You can choose the one that suits your application's needs and make the necessary edits. Each template comes with default text contents, but these contents can be updated specifically for your application.

1. Progressive User

  • Provides a ready-made template with a list of users.

2. Reset Password

  • Provides ready-made templates to enable users to reset their passwords.

3. Sign In

  • Provides a ready-made Sign In screen template for users to log in.

4. Sign Up

  • Provides a ready-made Sign Up screen template where users can register.

5. User Template

  • Provides a template from which the required information can be extracted from the user.

6. Verification Code

  • Allows to receive a verification code in Reset Password operation.

Screen Creation

  1. Screen Name: Set a name for the screen you are creating.
  2. After making all settings, create the screen by clicking the CREATE button.

Authorization Templates

  • Access Role: Used to define specific access permissions for users. You can define different access roles in accordance with the security requirements of your application. 
  • Access Delegation: Allows a user's roles to be temporarily delegated to another user within a defined time range. This template enables the automatic generation of screens related to the delegation system, such as listing, adding, editing delegations, and logging in with delegated access.

Screen Group Templates

  1. Grid Card with Search
    • It is a template with grid card structure and search function.
  2. Personal Grid Card with Search
    • It is a template with Personal Grid Card structure and search function.

Screen Creation

  1. Screen Name: Set a name for the screen you are creating.
  2. After making all the settings, click the CREATE button to create the screen.

Screens Panel Name/Duplicate/Delete

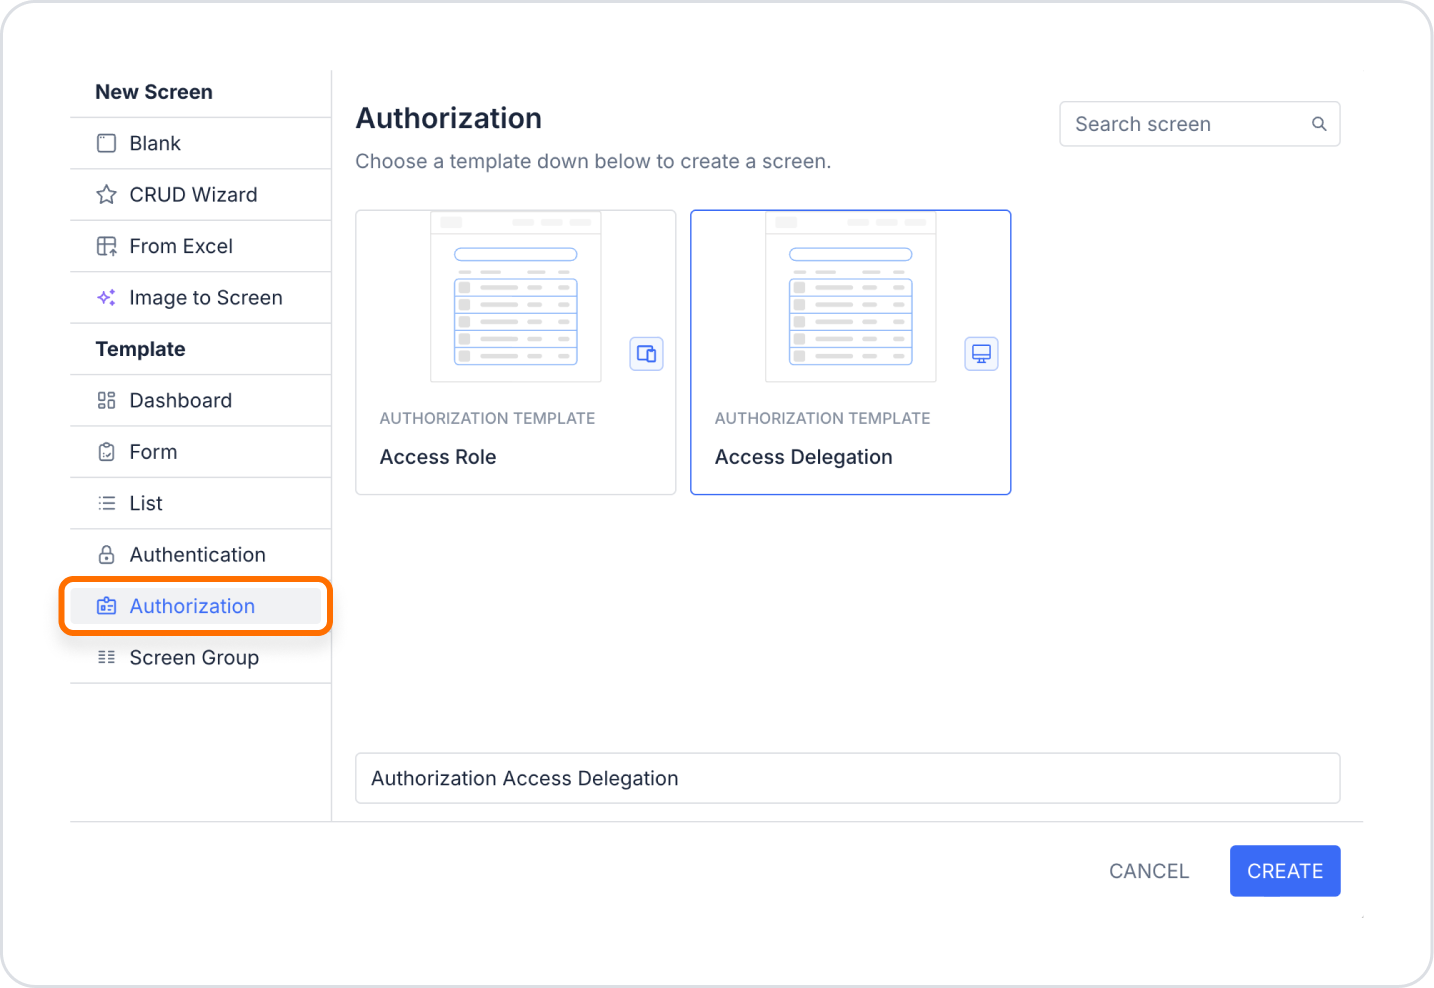
To create a screen on the Kuika platform, click on the “+” icon in the Screens Panel heading in the UI Design module and select “New Screen” from the drop-down menu.

In the New Screen modal, you can create a blank screen or create template screens or screens with a few clicks using tools such as CRUD Wizard and From Excel. After creating a screen, give your screen a name.

Screen Naming and Administration:

You can perform the following operations by clicking the ellipsis icon opposite the name of the screen you created:

  • Rename: You can change the name of the screen.
  • Duplicate: You can create a new screen by duplicating the screen.
  • Delete: You can delete the screen.

These operations facilitate screen management and provide a more organized development process.

Other Related Content

No items found.

Glossary

No items found.

Alt Başlıklar