The Kanban Board element is a project and workflow management tool that allows you to visually manage tasks and work items using columns and cards. It enables tasks to be grouped by different stages and makes it easy to track their progress.
The Kanban Board makes workflows more intuitive and transparent by allowing users to move tasks to different statuses using the drag-and-drop method. This structure increases efficiency, particularly in applications requiring internal team task tracking and process management.
The Kanban Board element presents information such as task status, priority, or assignee on a card-based interface, making it easier for users to get an overview of the project.
The Kanban Board element is supported only in web applications.
1.1. Common Use Cases
Project and task management screens
Internal team task distribution and progress tracking
Process and status-based workflows
CRM, support, or operations dashboards
2. Key Features
Column and card-based structure: Tasks are displayed as cards under columns representing different statuses.
Drag-and-drop support: Users can quickly update task statuses by dragging cards between columns.
Status-based workflow management: Stages such as “To Do,” “In Progress,” and “Completed” can be clearly distinguished.
Working with dynamic data sources: Card and column contents can be generated from static or dynamic data sources.
Real-time visual feedback: The board status updates instantly as cards are moved.
Displaying task details on cards: Information such as title, description, tags, priority, or assignee can be displayed on cards.
2.1. Kanban Board Element Features
Kuika’s Kanban Board element’s customizable features make it easier to manage data connections and workflows. It enables the dynamic arrangement of tasks (cards) and categories (lanes).
To configure the Kanban Board element’s features, you must create SQL actions and tables in the Datasources module.
Go to the Datasources module.
Click the “+” icon next to the Tables field under the Sources heading and select New Table.
Then create the sample tables shown above.
Next, click the “+” icon next to the Actions field under the Sources heading and select New SQL Actions.
The following sample SQL actions can be used to add, update, and delete data on the Kanban Board, or you can create your own actions:
2.1.1. Lane Options Actions:
GetKanbanLanesAll: Retrieves all lane data.
SELECT * FROM KanbanLane;
CreateKanbanLane: Used to add a new lane.
INSERT INTO KanbanLane (Id, laneIndex, title, description)
VALUES (
NEWID(),
(SELECT COALESCE(MAX(laneIndex), -1) + 1 FROM KanbanLane),
@title,
@description
);
DeleteKanbanLane: When a lane is deleted, it also deletes all tasks within it and updates the lane indexes.
DELETE FROM KanbanCard
WHERE laneId = @Id;
DECLARE @DeletedLane TABLE (
Id UNIQUEIDENTIFIER,
laneIndex INT
);
DELETE FROM KanbanLane
OUTPUT DELETED.Id, DELETED.laneIndex INTO @DeletedLane
WHERE Id = @Id;
UPDATE KanbanLane
SET laneIndex = laneIndex - 1WHERE laneIndex > (SELECT laneIndex FROM @DeletedLane);
DragKanbanLane: Used to reorder lanes.
UPDATE KanbanLane
SET laneIndex = laneIndex + 1WHERE laneIndex >= @newLaneIndex
AND laneIndex < @draggedLaneIndex
AND id != @draggedElementId;
UPDATE KanbanLane
SET laneIndex = @newLaneIndex
WHERE id = @draggedElementId;
UPDATE KanbanLane
SET laneIndex = laneIndex - 1WHERE laneIndex > @draggedLaneIndex
AND laneIndex <= @newLaneIndex
AND id != @draggedElementId;
2.1.2. Card Options Actions:
GetKanbanCardsAll: Retrieves all task data.
SELECT * FROM KanbanCard;
CreateKanbanCard: Used to add a new task.
INSERT INTO KanbanCard (Id, laneId, cardIndex, title, description)
VALUES (
NEWID(),
@laneId,
(SELECT COALESCE(MAX(cardIndex), -1) + 1 FROM KanbanCard WHERE laneId = @laneId),
@title,
@description
);
DeleteKanbanCard: Ensures the index is updated when deleting a task.
DECLARE @DeletedCard TABLE (
laneId UNIQUEIDENTIFIER,
cardIndex INT
);
DELETE FROM KanbanCard
OUTPUT DELETED.laneId, DELETED.cardIndex INTO @DeletedCard
WHERE Id = @Id;
UPDATE KanbanCard
SET cardIndex = cardIndex - 1WHERE cardIndex > (SELECT cardIndex FROM @DeletedCard)
AND laneId = (SELECT laneId FROM @DeletedCard);
DragKanbanCard: Enables tasks to be dragged and moved to different lanes or rows.
SET laneId = @targetLaneId,
cardIndex = @targetCardIndex
WHERE id = @draggedCardId;
UPDATE KanbanCard
SET cardIndex = cardIndex - 1WHERE laneId = @currentLaneId
AND cardIndex > @currentCardIndex
AND id != @draggedCardId;
UPDATE KanbanCard
SET cardIndex = cardIndex + 1WHERE laneId = @targetLaneId
AND cardIndex >= @targetCardIndex
AND id != @draggedCardId;
The actions above allow you to integrate your Kuika Kanban Board with an SQL database. This enables you to dynamically manage your tasks and categories, update your data, and create a workflow tailored to your system’s needs.
You can then make the following adjustments in the UI Design module’s Properties panel for the Kanban Board element.
Lane Options
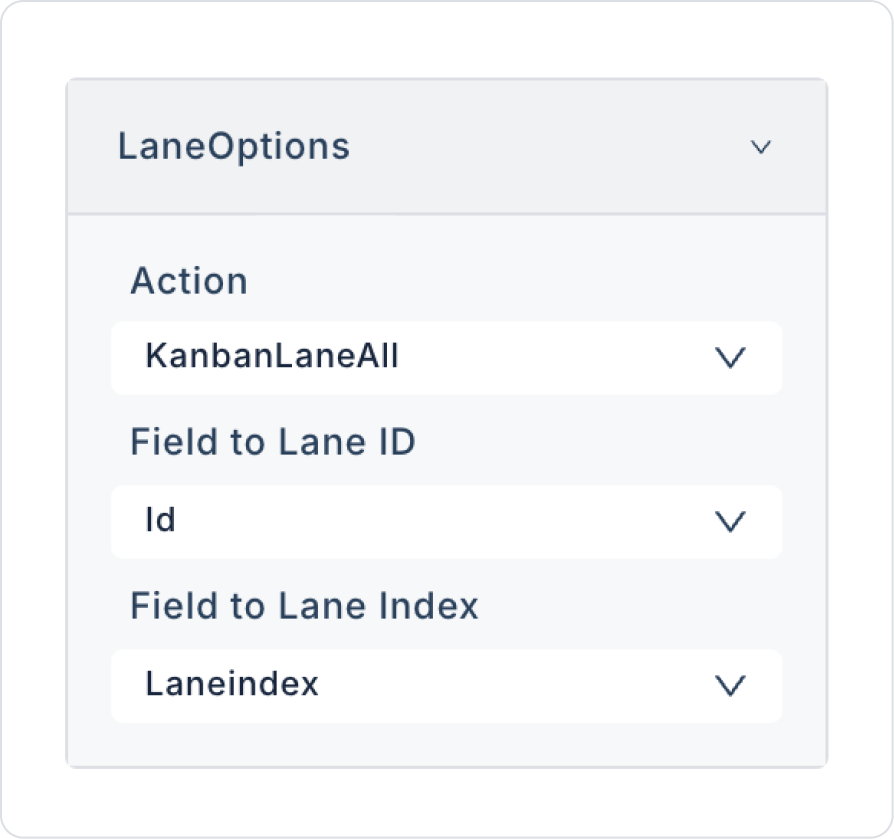
Action: A datasource property used to link lane (category) data in the Kanban Board. It establishes a connection to the source providing data for each lane.
Field to Lane ID: The key-value pair of the ID property in the lane data retrieved via the datasource. It ensures that lanes are uniquely identified. A property key of type String or Guid must be bound.
Field to Lane Index: This is the key-value pair for the sorting (index) property in the lane data retrieved via the datasource. It ensures lanes are sorted, and a property key of type Number must be bound.
Card Options
Action: This is the datasource property used to link card (task) data to the Kanban Board. It establishes a connection to the source that provides data for each task.
Field to Card ID: This is the key-value pair for the ID property in the card data retrieved via the datasource. It ensures that each card is uniquely identified. A property key of type String or Guid must be bound.
Field to Card Lane ID: This is the key-value pair for the property indicating which lane the cards retrieved via the datasource belong to. A property key of type String or Guid must be bound.
Field to Card Index: This is the key-value pair for the sorting (index) property in the card data retrieved via the datasource. It ensures that cards are sorted within their lanes, and a property key of type Number must be bound.
Field to Card Sort Key: This ensures that cards retrieved via the datasource are sorted within their lanes based on the selected property key. For example, alphabetical sorting can be performed based on a property such as “title.” This property is optional, and sorting can be performed based on the selected property key.
Events
onCardDragged: An event triggered when a card (task) is dragged. It provides relevant information when tasks are moved to new locations.
cardId: The unique ID of the moved card.
cardIndex: The card’s old index number.
cardLaneId: The ID of the lane the card is associated with.
cardTargetIndex: The card’s new index number.
cardTargetLaneId: The ID of the lane the card is now associated with.
onLaneDragged: An event triggered when a lane (category) is dragged. It tracks the new order and positions of lanes.
laneId: The unique ID of the moved lane.
laneIndex: The lane’s old index number.
laneTargetIndex: The lane’s new index number.
2.2. Actions That Can Be Added to an Element
The Kanban Board element supports the definition of event-based actions based on user interactions with columns (lanes) and cards on the board. Actions are not tied to the Kanban Board element itself but are linked to events triggered by drag-and-drop interactions.
Actions for the Kanban Board element can be added via the following events through the Properties > Add Action section.
Supported Action Triggers
onLaneDragged: Triggered when a user drags a column (lane) on the board to change its position.
Use cases:
Save the column order to state or a data source
Save a user-specific board layout
Send lane reordering changes to the backend
Example scenario:When the user moves the “In Progress” column in front of the “To Do” column, the new column order is saved to state.
onCardDragged: Triggered when the user drags a card within the same column or to a different column.
Usage scenarios:
Update the card’s status
Save the task’s current stage to the backend
Trigger a workflow
Example scenario: When a user moves a task from the “In Progress” column to the “Completed” column, the task status is updated and the process is completed.
Basic Rules Regarding Actions
The Kanban Board element triggers actions via drag-and-drop-based events.
Multiple actions can be defined for the same event.
Card and lane movements are typically used in conjunction with dynamic data sources.
Since drag-and-drop operations impact the user experience, actions should be designed to execute as quickly as possible.
The Kanban Board element offers a powerful and flexible management experience, especially in status-based workflows and task management scenarios, when used with these events.
3. How to Use the Kanban Board Element?
In this section, we will cover the end-to-end usage of the Kanban Board element through an example scenario.
Scenario: Task Management with the Kanban Board
In this scenario, the user uses the Kanban Board element to manage project tasks. When the application opens, tasks are listed under lanes such as “Todo,” “In Progress,” and “Completed.”
In the scenario:
You can add a new lane using the “Create Kanban Lane” field to create a new workflow
You can add tasks to existing lanes using the “Create Kanban Card” form
You can move cards between different lanes using the drag-and-drop method
You can remove related records from the system using the delete icons on the lane or card
Step 1 - Creating a Data Source
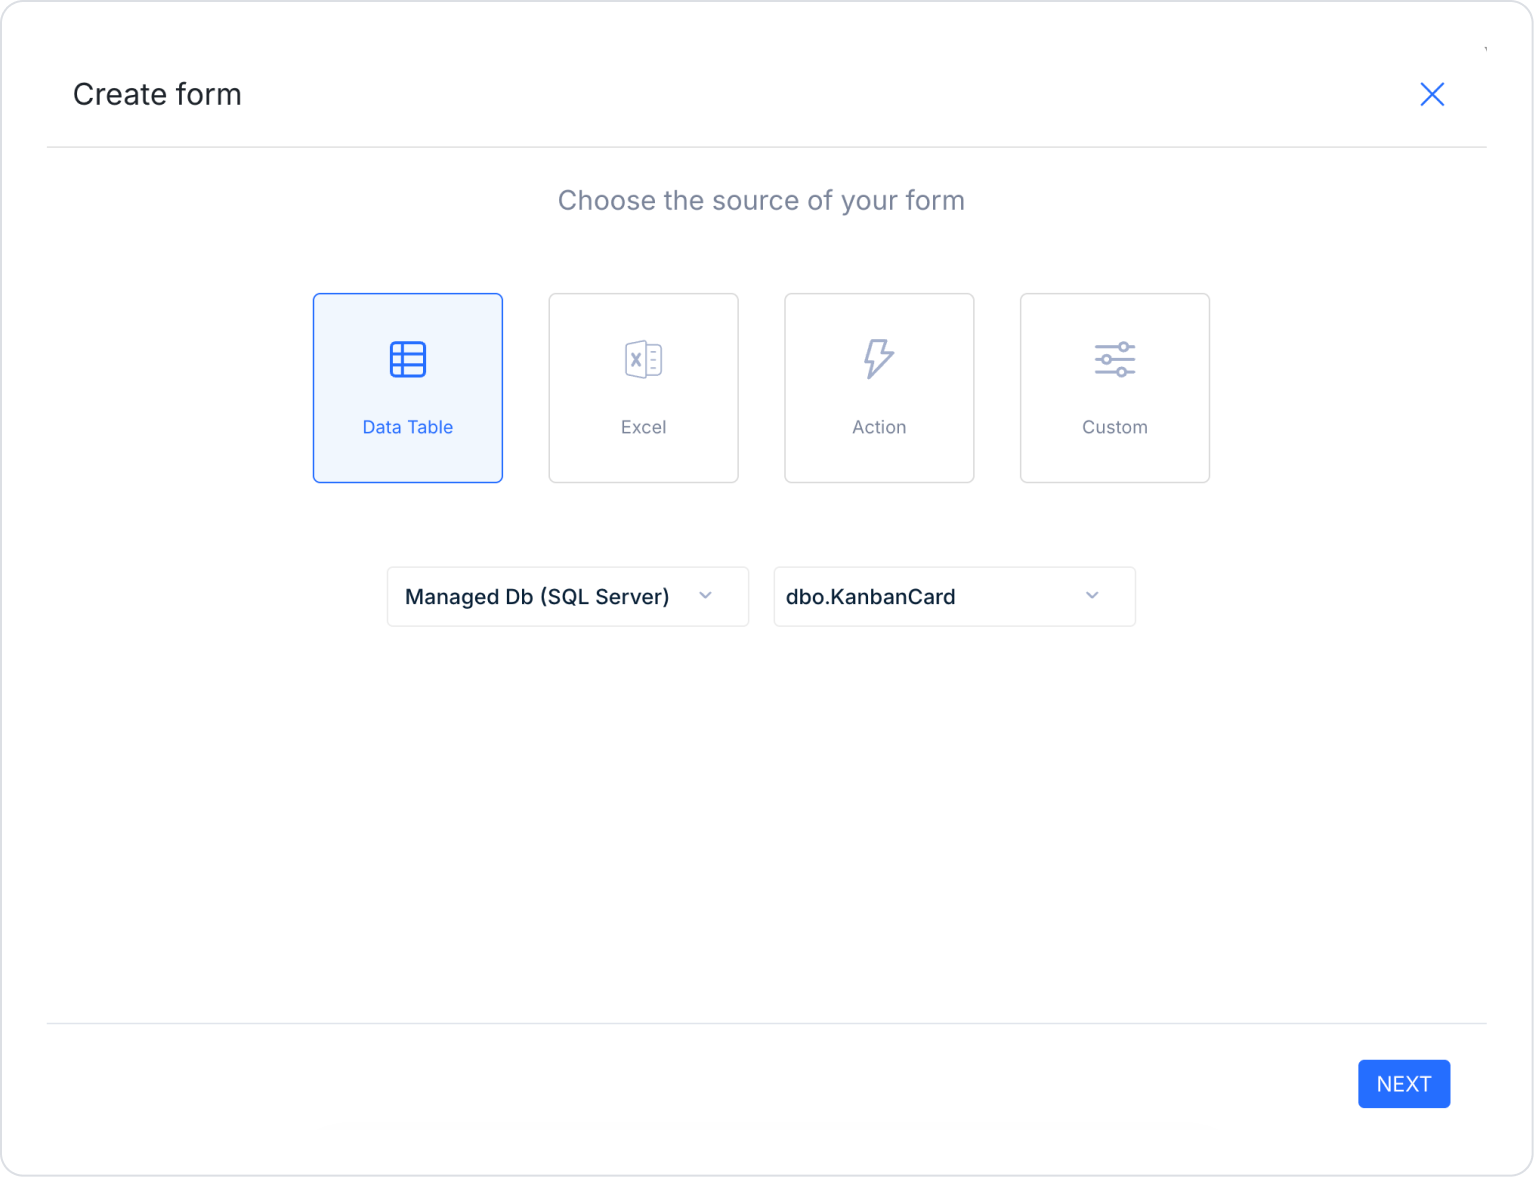
Creating a table in the DataSources module:
Go to the DataSources module.
Then go to the Tables tab.
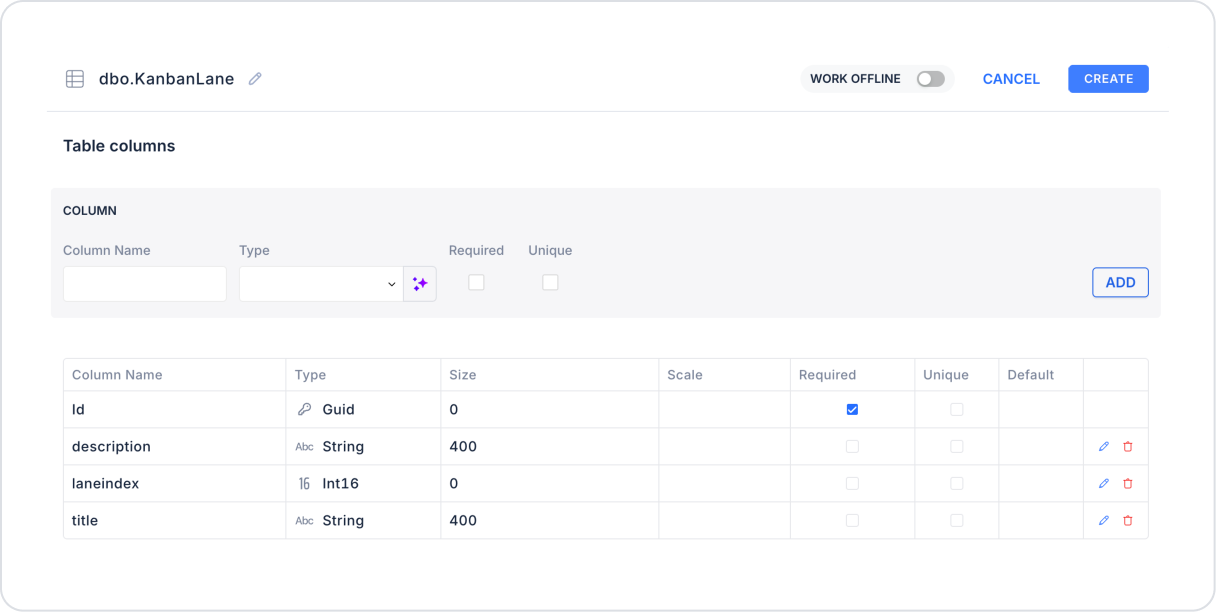
Create a new table named “KanbanLane”.
The required table structure is as follows:
Important Field Names:
Id: A unique identifier for each lane.
title: Represents the lane title (e.g., Todo, In Progress).
description: Holds descriptive information about the lane.
laneIndex: Determines the order of lanes on the board.
Create another new table named “KanbanCard”.
The table structure to be created is as follows:
Important Field Names:
Id: A unique identifier for each card.
title: Represents the card title.
description: Holds the card content or description.
laneId: Indicates which lane the card belongs to.
cardIndex: Determines the card’s position within its lane.
Step 2 - Defining the Required Action
To use the Kanban element with all its features:
You need to define eight sample actions.
Add a new action from the Actions > New SQL Action tab within the Datasources module.
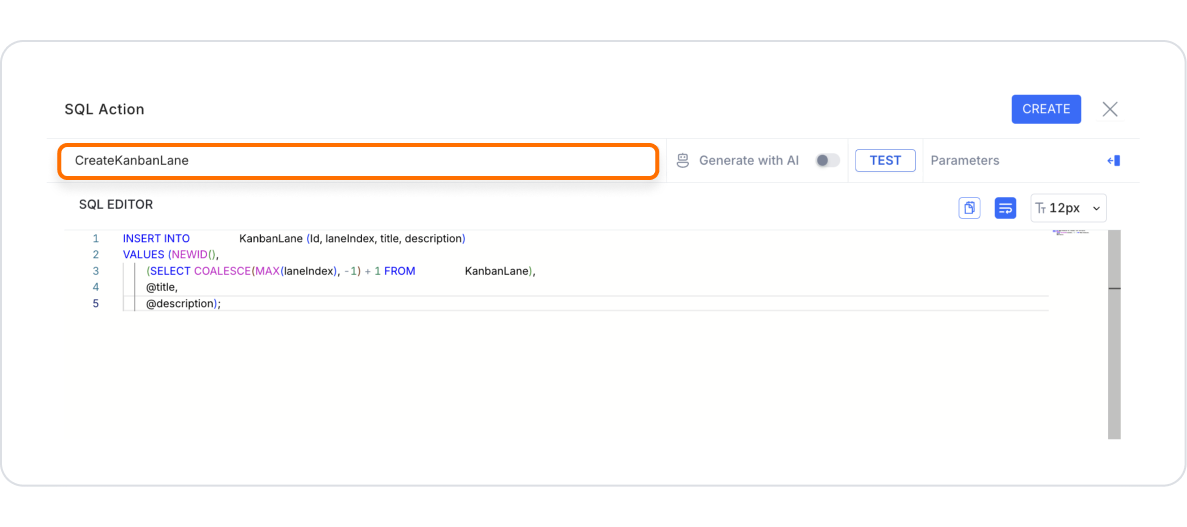
Action that Creates a Kanban Lane (Todo, In Progress, ...) (CreateKanbanLane):
INSERT INTO KanbanLane (Id, laneindex, title, description)
VALUES (NEWID(),
(SELECT COALESCE(MAX(laneindex), -1) + 1 FROM dbo.KanbanLane),
@title,
@description);
When applying, delete the KanbanLane part, type KanbanLane again, and press Enter. This will ensure the correct schema name is prepended to the table name.
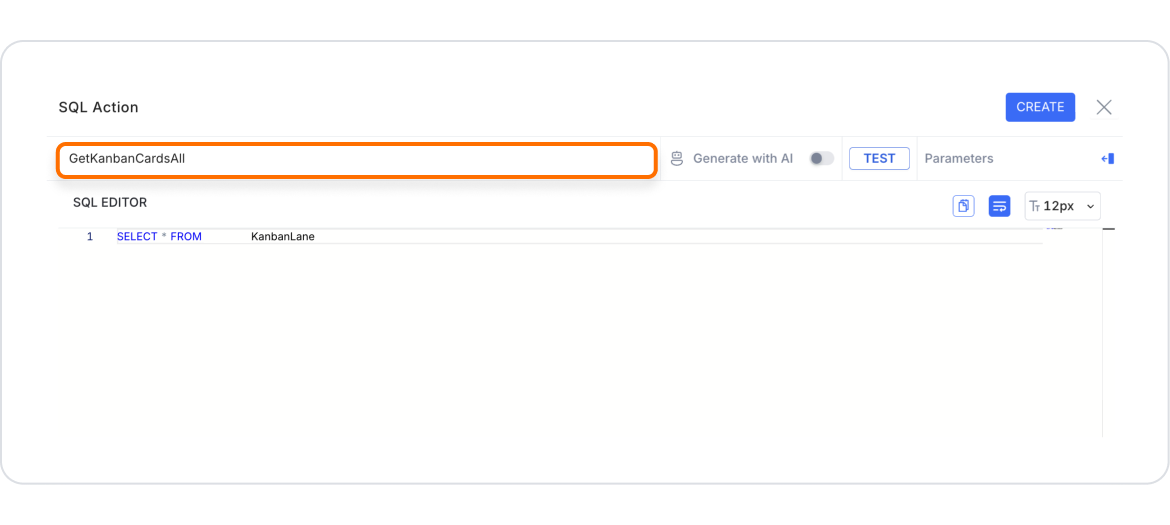
Action to List All Kanban Lanes (KanbanLaneAll):
SELECT *
FROM KanbanLane
ORDER BY laneIndex;
When running this, delete the “KanbanLane” part, type “KanbanLane” again, and press Enter. This will add the correct schema name before the table name.
Action to Delete the Relevant Kanban Lane (DeleteKanbanLane):
DELETE FROM KanbanCard WHERE laneId = @Id
DECLARE @DeletedLane TABLE ( Id UNIQUEIDENTIFIER, laneIndex INT)
DELETE FROM KanbanLane OUTPUT DELETED.Id, DELETED.laneIndex INTO @DeletedLane WHERE Id = @Id
UPDATE KanbanLane SET laneIndex = laneIndex - 1 WHERE laneIndex > (SELECT laneIndex FROM @DeletedLane)
When applying, delete the KanbanLane and KanbanCard sections, then rewrite KanbanLane and KanbanCard and press Enter. This will ensure the correct schema names are prepended to the table names.
Action to Move the Relevant Kanban Lane (DragKanbanLane):
BEGIN TRANSACTION;
IF @newLaneIndex < @draggedLaneIndex
BEGIN
UPDATE KanbanLane
SET laneIndex = laneIndex + 1WHERE laneIndex >= @newLaneIndex
AND laneIndex < @draggedLaneIndex
AND Id <> @draggedElementId;
END
ELSE IF @newLaneIndex > @draggedLaneIndex
BEGIN
UPDATE KanbanLane
SET laneIndex = laneIndex - 1WHERE laneIndex > @draggedLaneIndex
AND laneIndex <= @newLaneIndex
AND Id <> @draggedElementId;
END
UPDATE KanbanLane
SET laneIndex = @newLaneIndex
WHERE Id = @draggedElementId;
COMMIT TRANSACTION;
(When applying, delete the KanbanLane section, type KanbanLane again, and press Enter. This will ensure the correct schema name is added before the table name.
Action to Add a Kanban Card (CreateKanbanCard):
INSERT INTO KanbanCard (Id, laneId, cardIndex, title, description) VALUES ( NEWID(), @laneId, (SELECT COALESCE(MAX(cardIndex), -1) + 1 FROM KanbanCard WHERE laneId = @laneId), @title, @description);
When applying, delete the “KanbanCard” part, type “KanbanCard” again, and press Enter. This will add the correct schema name before the table name.
Action to List All Kanban Cards (KanbanCardAll):
SELECT Id, laneId, cardIndex, title, description
FROM KanbanCard
ORDER BY cardIndex;
When executing, delete the KanbanCard part, type KanbanCard again, and press Enter. This will add the correct schema name before the table name.
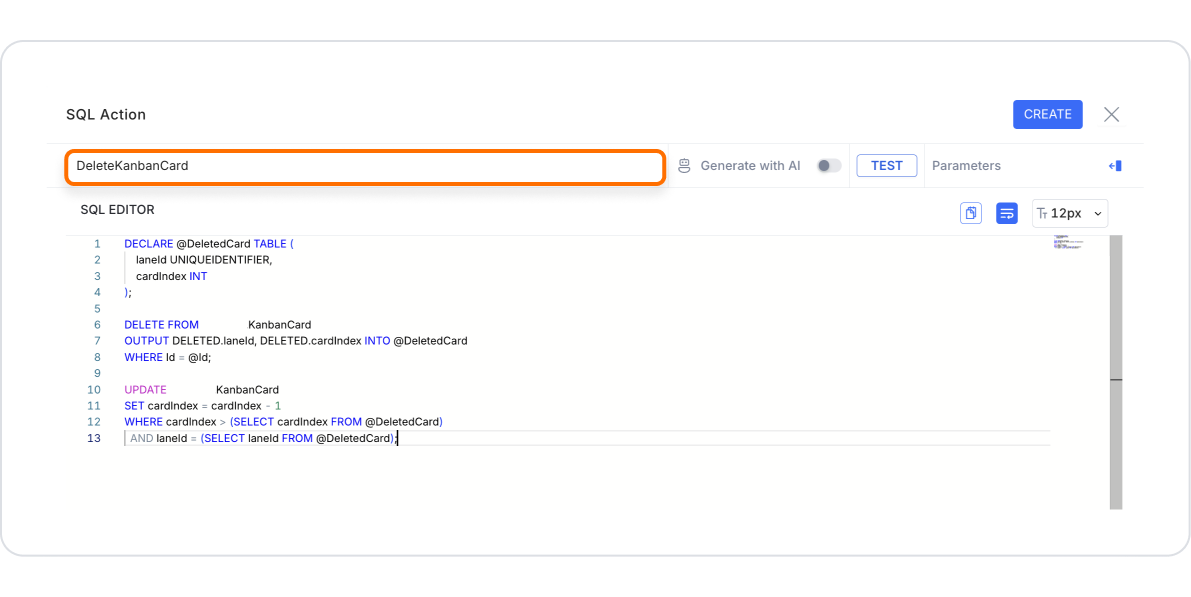
Action to Delete the Relevant Kanban Card (DeleteKanbanCard):
DECLARE @DeletedCard TABLE (laneId UNIQUEIDENTIFIER, cardIndex INT)
DELETE FROM KanbanCard OUTPUT DELETED.laneId, DELETED.cardIndex INTO @DeletedCard WHERE Id = @Id
UPDATE KanbanCard SET cardIndex = cardIndex - 1 WHERE cardIndex > (SELECT cardIndex FROM @DeletedCard) AND laneId = (SELECT laneId FROM @DeletedCard);
When executing, delete the KanbanCard part, type KanbanCard again, and press Enter. This will add the correct schema name before the table name.
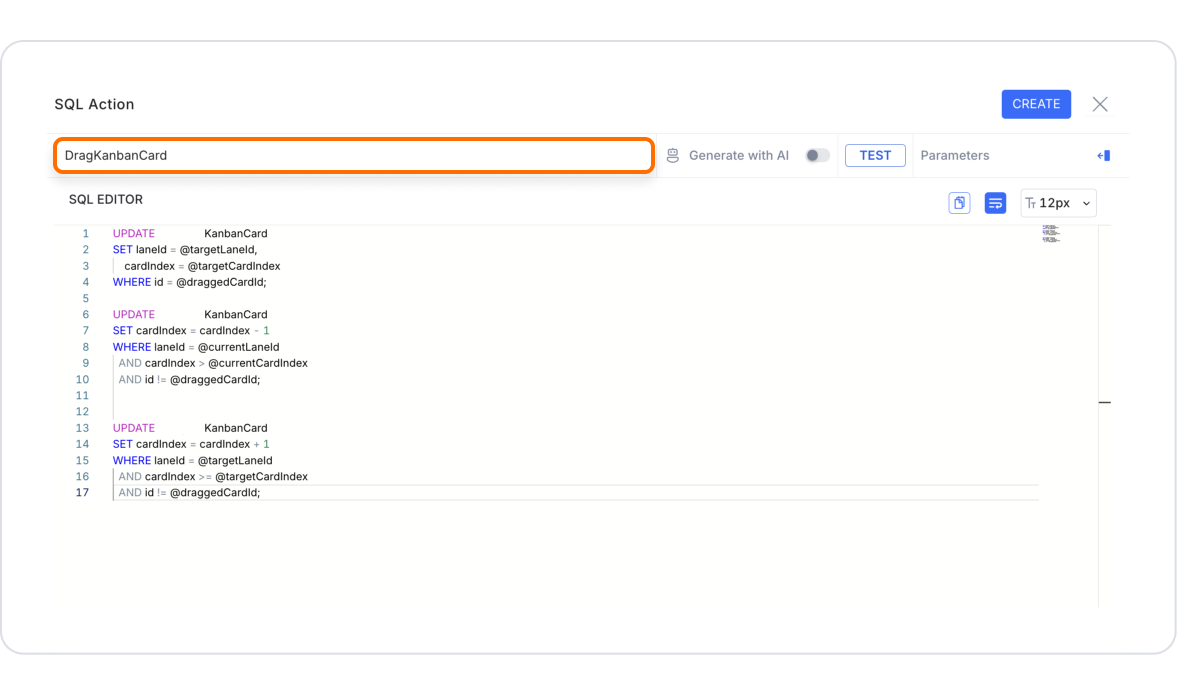
Action to Move the Relevant Kanban Card (DragKanbanCard):
BEGIN TRY
BEGIN TRANSACTION;
IF @currentLaneId = @targetLaneId
BEGIN
IF @targetCardIndex < @currentCardIndex
BEGIN
UPDATE KanbanCard
SET cardIndex = cardIndex + 1WHERE laneId = @currentLaneId
AND cardIndex >= @targetCardIndex
AND cardIndex < @currentCardIndex
AND Id <> @draggedCardId;
END
ELSE IF @targetCardIndex > @currentCardIndex
BEGIN
UPDATE KanbanCard
SET cardIndex = cardIndex - 1WHERE laneId = @currentLaneId
AND cardIndex > @currentCardIndex
AND cardIndex <= @targetCardIndex
AND Id <> @draggedCardId;
END
UPDATE KanbanCard
SET cardIndex = @targetCardIndex
WHERE Id = @draggedCardId;
END
ELSE
BEGIN
UPDATE KanbanCard
SET cardIndex = cardIndex - 1WHERE laneId = @currentLaneId
AND cardIndex > @currentCardIndex
AND Id <> @draggedCardId;
UPDATE KanbanCard
SET cardIndex = cardIndex + 1WHERE laneId = @targetLaneId
AND cardIndex >= @targetCardIndex
AND Id <> @draggedCardId;
UPDATE KanbanCard
SET laneId = @targetLaneId,
cardIndex = @targetCardIndex
WHERE Id = @draggedCardId;
END
COMMIT TRANSACTION;
END TRY
BEGIN CATCH
ROLLBACK TRANSACTION;
THROW;
END CATCH
When applying, delete the KanbanCard section, type KanbanCard again, and press Enter. This will ensure the correct schema name is prepended to the table name.
Step 3 - Adding an Initial Action
On the home page:
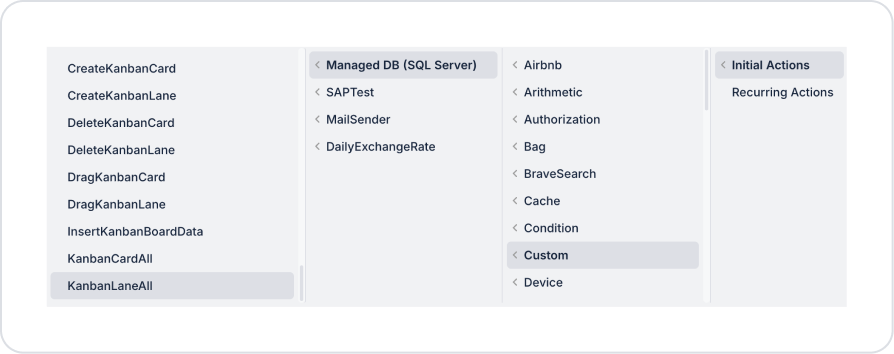
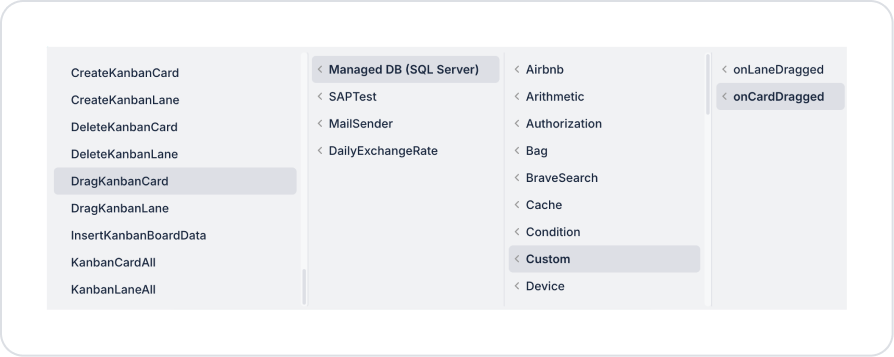
To display the currently uploaded files on the list, add the Add Action > Initial Action > Custom > Managed DB > KanbanCardAll action.
To display the currently uploaded files on the list, add the Add Action > Initial Action > Custom > Managed DB > KanbanLaneAll action.
Step 4 - Adding and Customizing the Kanban Board Element
On the home page:
Drag and drop the Elements > Display > Label element from the left sidebar onto the page.
Update the text to Label > Properties > Value > “Kanban Board”.
Set the text style to Label > Styling > Text > Style > Normal Text and Heading 2.
To add a new task, drag and drop the Elements > Navigation > Button element onto the page.
Set the Button element’s text to Button > Properties > Label > “Add Task”.
Select the Button > Properties > Icon > “add” icon for the Button element.
Set the button color to Button > Styling > Fill > Color > “5ABFC1”.
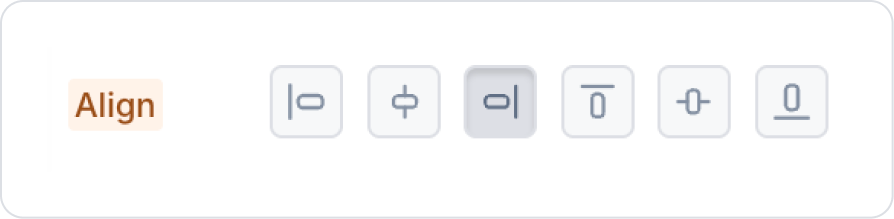
To align the Button element to the right, set it to Col > Styling > Align > Right Align.
From the left sidebar, drag and drop the Elements > Special > KanbanBoard element onto the page.
To link lane data to the Kanban Board, select the KanbanLaneAll action from the KanbanBoard > Properties > LaneOptions > Action field and configure the following field definitions.
To link card data to the Kanban Board, select the KanbanCardAll action from the KanbanBoard > Properties > CardOptions > Action field and configure the following field definitions.
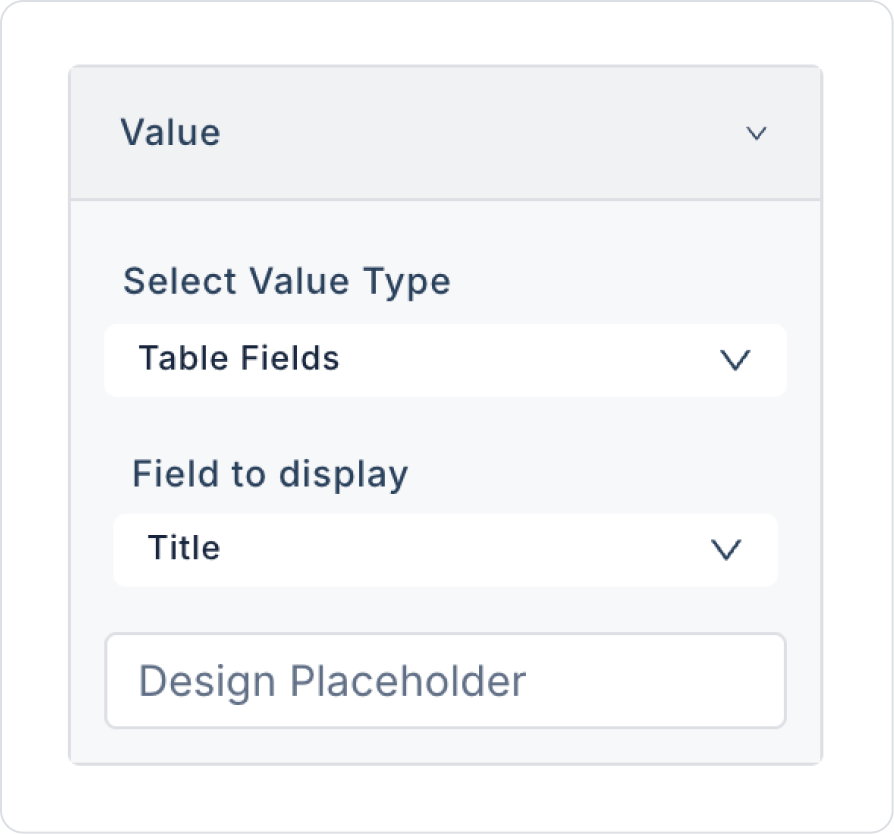
Click on the Lane Header within the Kanban Board. Configure the Lane Header > Value > Field to display > Title setting.
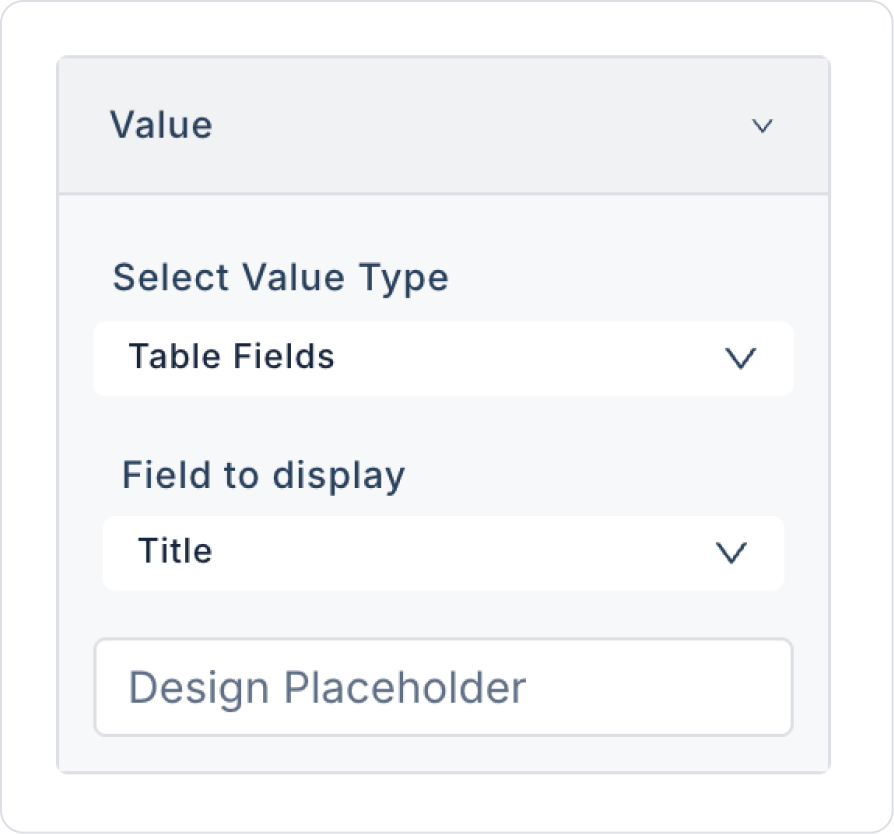
Click on the Card Title within the Kanban Board. Configure the Card Title > Value > Field to display > title setting.
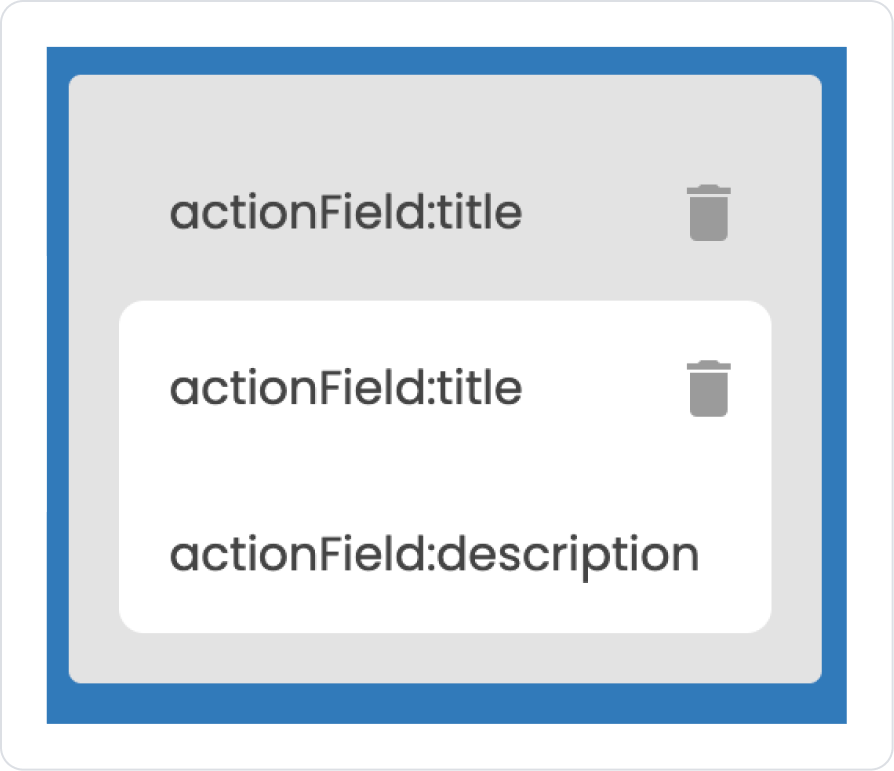
Click on the Card description within the Kanban Board. Configure the Card description > Value > Field to display > description setting.
After these configurations, the Kanban Board content appears as follows.
Set the Kanban Board background color to KanbanBoard > Styling > Fill > “5ABFC1”.
Click the KanbanBoard > Properties > KanbanBoardLane field to configure the Kanban Lane style. Set KanbanBoardLane > Styling > Fill > “D9D9D9” and transparency as shown below.
Step 5 - Adding an Action to the Kanban Board Element
For lane operations:
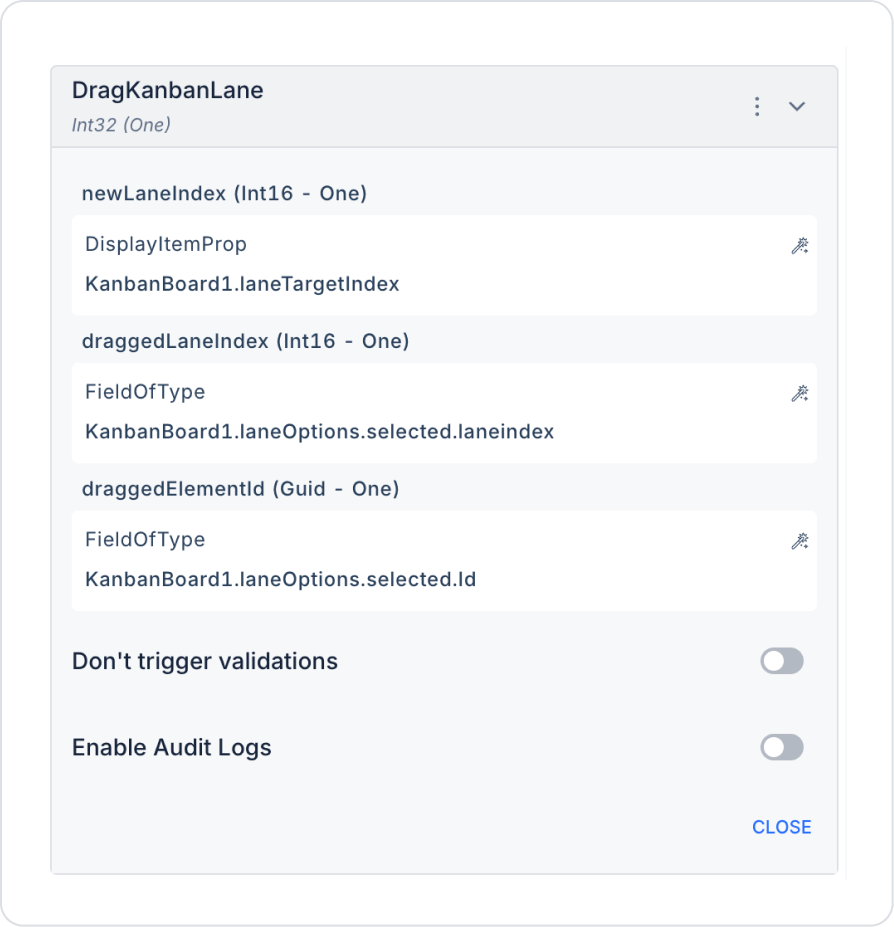
To enable drag-and-drop lane editing on the Kanban Board, add the KanbanBoard > Properties > Add Action > onLaneDragged > Custom > Managed DB > DragKanbanLane action.
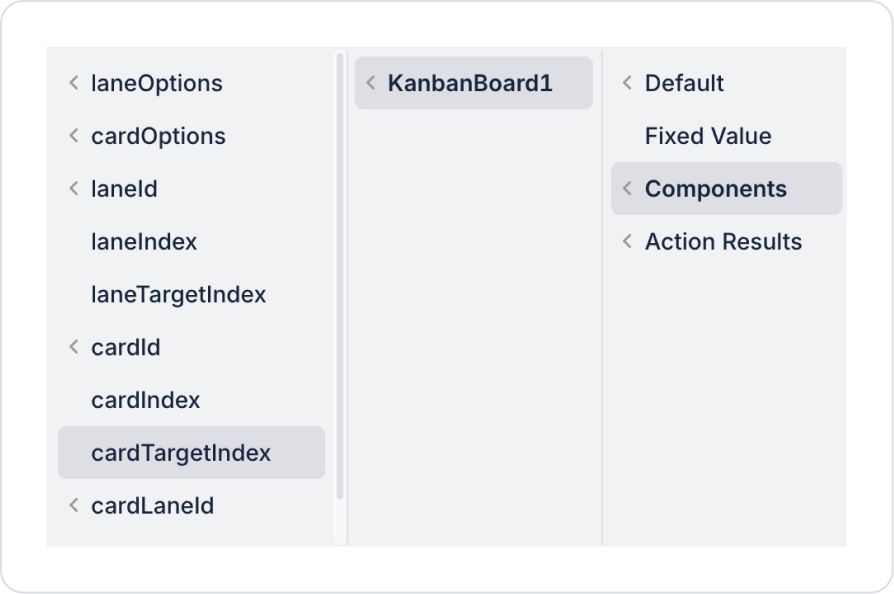
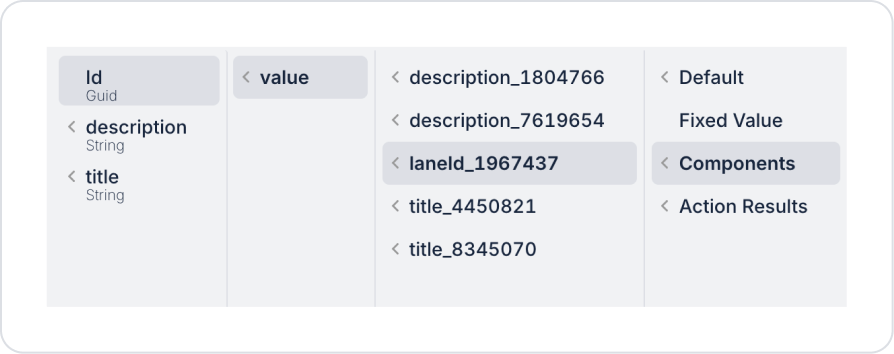
Within the DragKanbanLane action, define newLaneIndex > Components > KanbanBoard > laneTargetIndex.
Set the DraggedElementId field to Components > KanbanBoard > laneOptions > Selected > Id.
In the final step, the DragKanbanLane action connections are as follows.
To retrieve updated information after lane dragging operations, add the KanbanBoard > Properties > Add Action > onLaneDragged > Custom > Managed DB > KanbanLaneAll action.
For card operations:
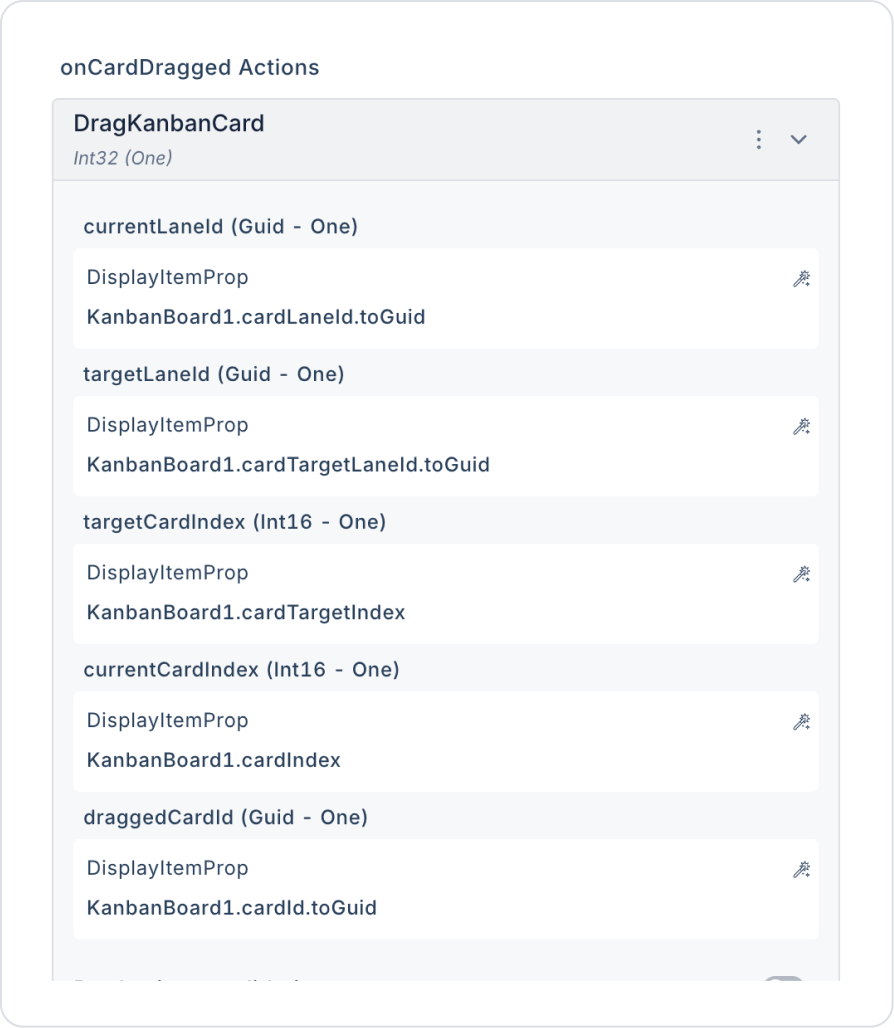
To enable card dragging and editing on the Kanban Board, add the KanbanBoard > Properties > Add Action > onCardDragged > Custom > Managed DB > DragKanbanCard action.
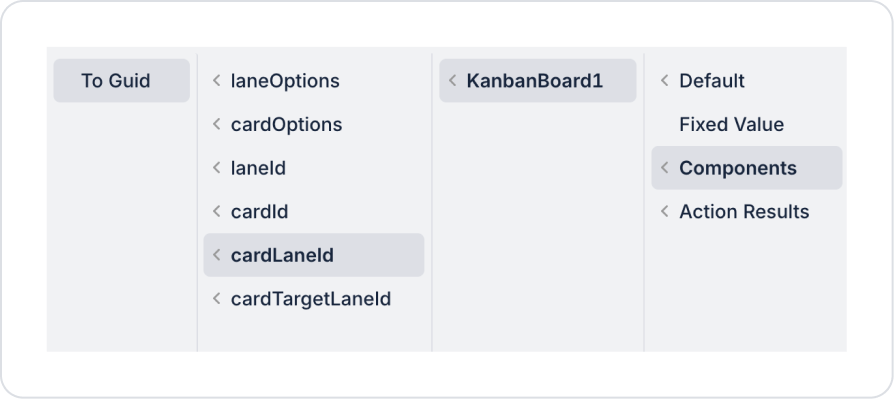
Within the action, define the currentLaneId field as Components > KanbanBoard > cardLaneId > To Guid.
Define the targetLaneId field as Components > KanbanBoard > cardTargetLaneId > To Guid.
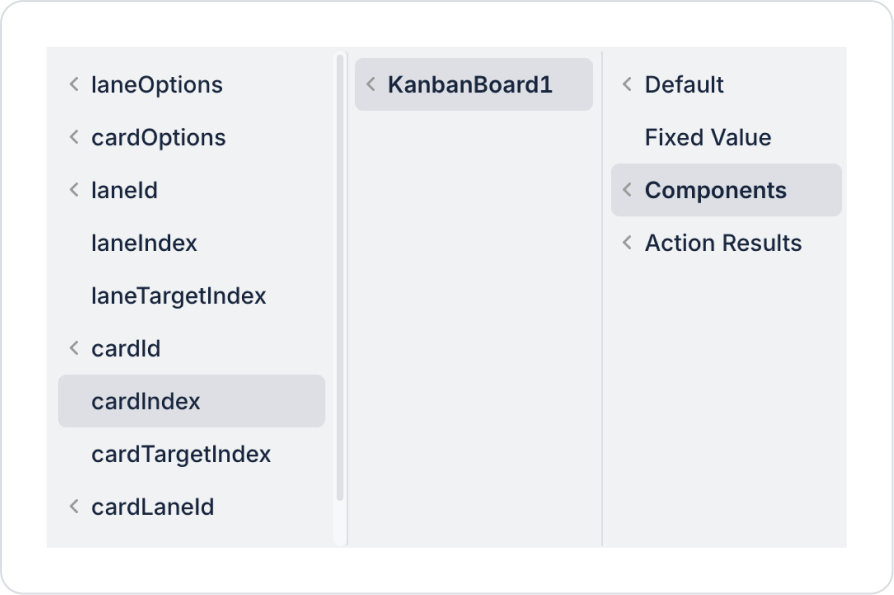
Define the targetCardIndex field as Components > KanbanBoard > cardTargetIndex.
Define the currentCardIndex field as Components > KanbanBoard > cardIndex.
Set the draggedCardId field to Components > KanbanBoard > cardId > to Guid.
In the final step, the DragKanbanCard action links are as follows.
To retrieve updated information after card drag operations, add the KanbanBoard > Properties > Add Action > onCardDragged > Custom > Managed DB > KanbanCardAll action.
All actions on the Kanban Board element should be as follows.
Step 6 - New Item Addition Page
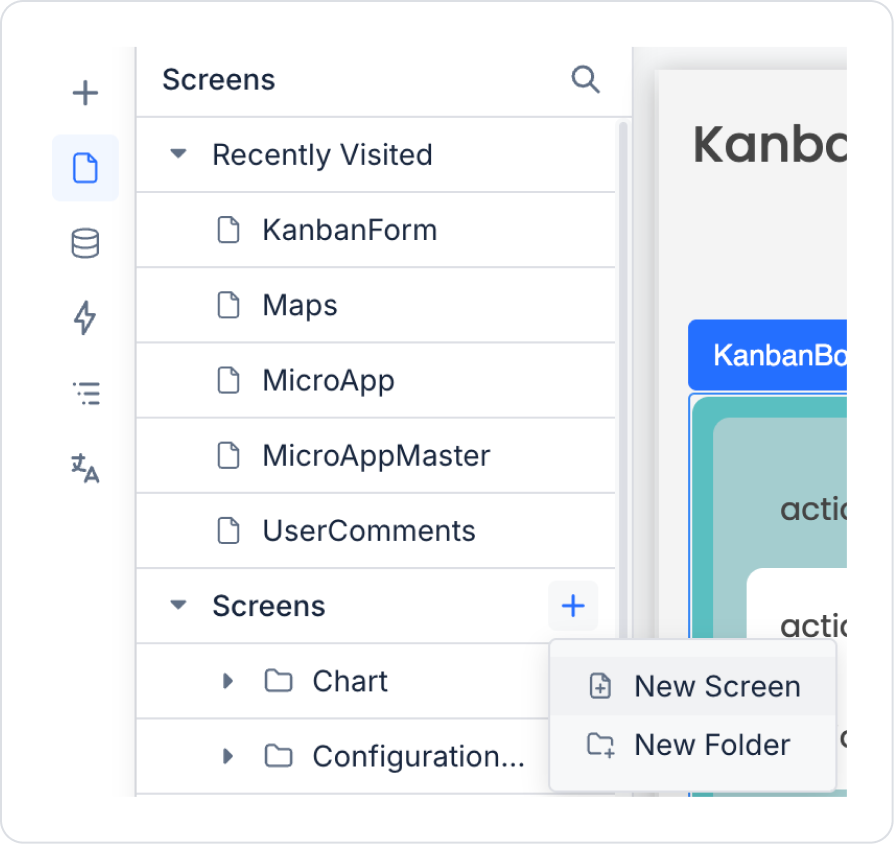
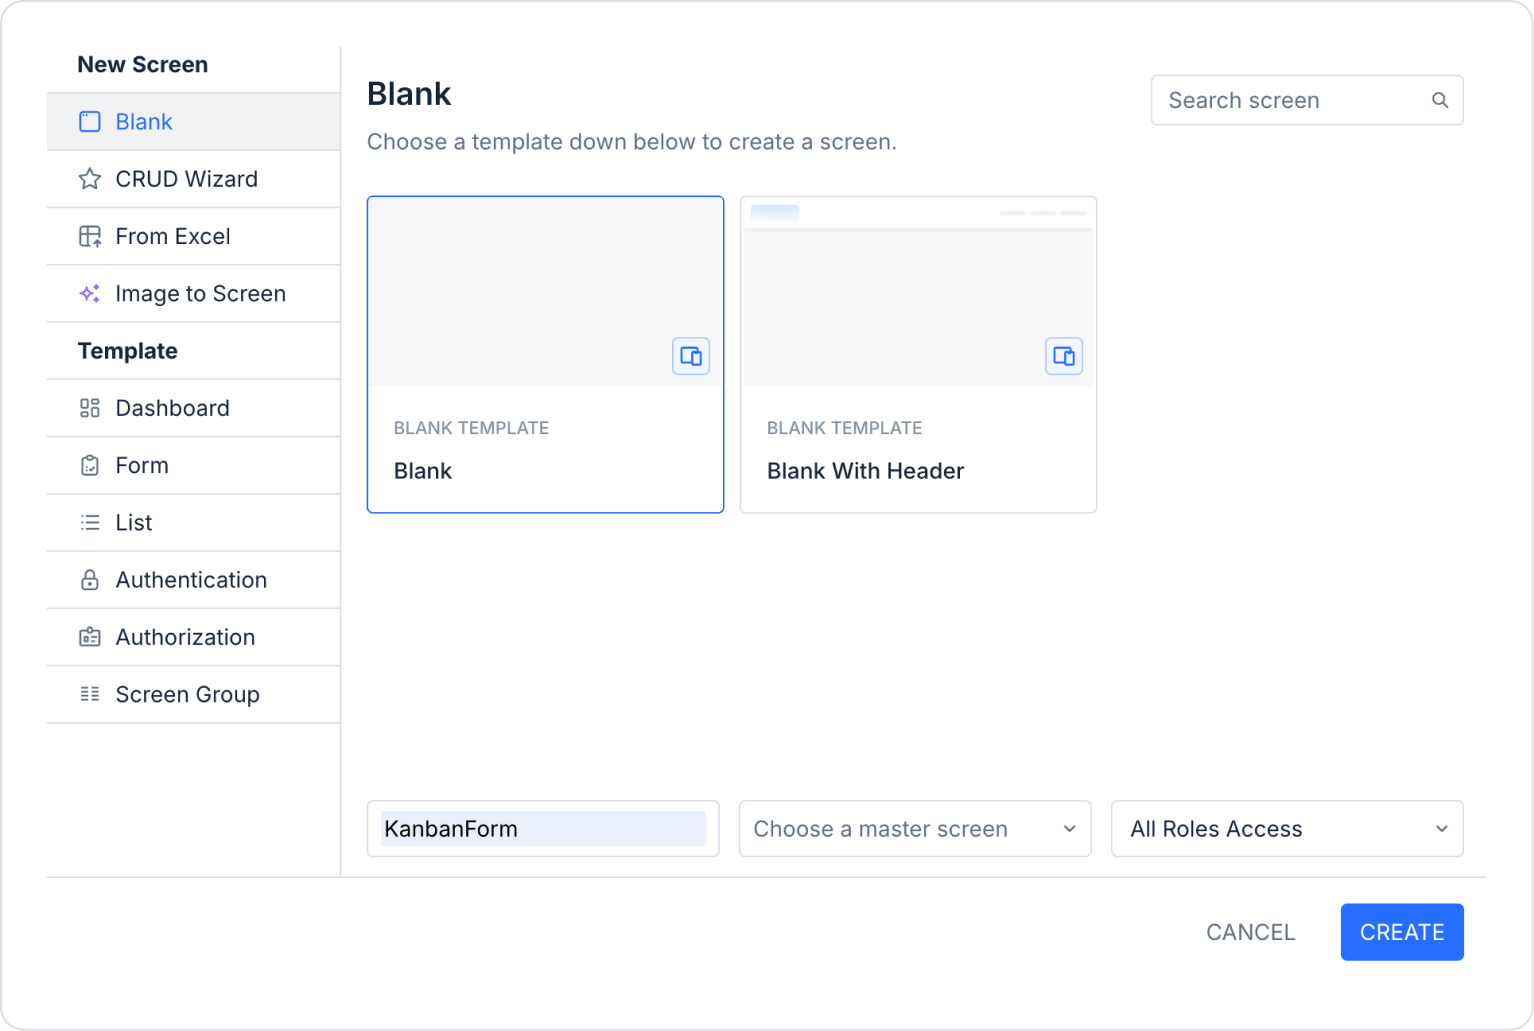
To add a new item to the Kanban Board element, create a new page named KanbanForm from the left-hand panel under Screens > New Screen.
To allow selection when adding a new card within a lane, add the KanbanForm Page > Properties > Add Action > Initial Action > Custom > Managed DB > KanbanLaneAll action.
Creating a Kanban Lane:
Drag and drop the Elements > Container > Form element into the page. Enter the following definitions in the fields that appear.
On the next page, remove the selected laneindex field and save.
Drag and drop the Elements > Navigation > Button element below the Form element.
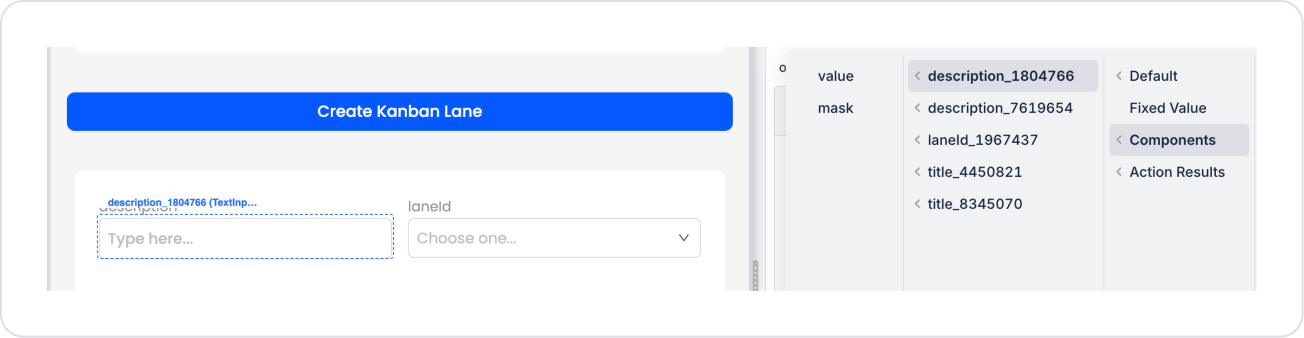
Update the Button element’s name to Button > Properties > Label > “Create Kanban Lane”.
Add the Button > Properties > Add Action > onClick > Custom > Managed DB > CreateKanbanLane action to the button for registration purposes.
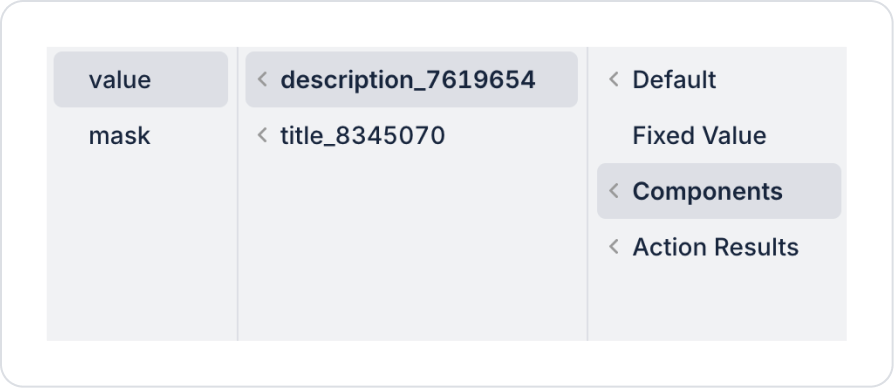
Set the title field in the CreateKanbanLane action to Components > title > value.
Set the description field to Components > description > value.
To return to the previous page after creating the lane, add the Button > Properties > Add Action > Navigation > Go Back action.
Creating a Kanban Card:
Drag and drop the Elements > Container > Form element onto the page. Enter the following definitions in the fields that appear.
On the next page, remove the selected cardIndex field and save.
Drag and drop the Elements > Navigation > Button element below the form element.
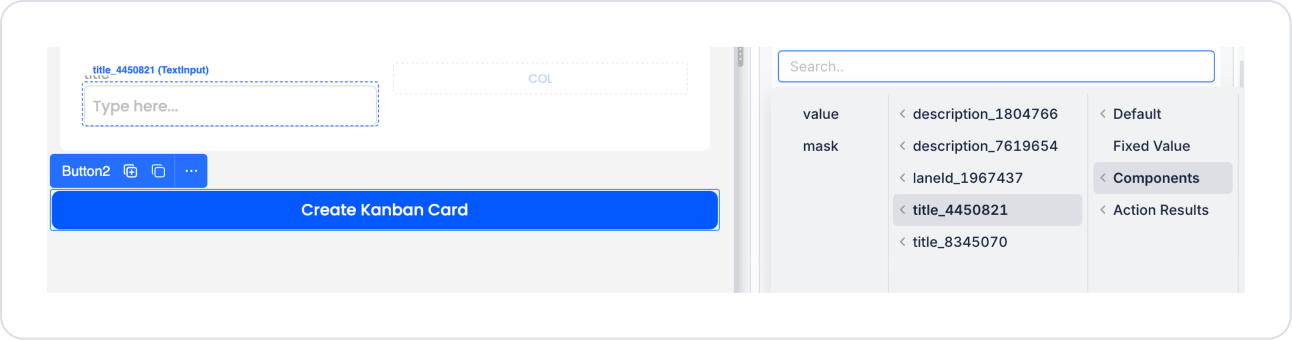
Update the button element’s name to Button > Properties > Label > “Create Kanban Card”.
Add the Button > Properties > Add Action > onClick > Custom > Managed DB > CreateKanbanCard action inside the button for the registration process.
Set the laneId field in the CreateKanbanCard action to Components > title > value.
Set the title field to Components > title > value.
Set the description field to Components > description > value.
To return to the page after saving the lane, add the Button > Properties > Add Action > Navigation > Go Back action.
To make a selection in the LaneId field, click the Select Box element labeled LaneId, select the Options > KanbanLaneAll action, and configure the following settings.
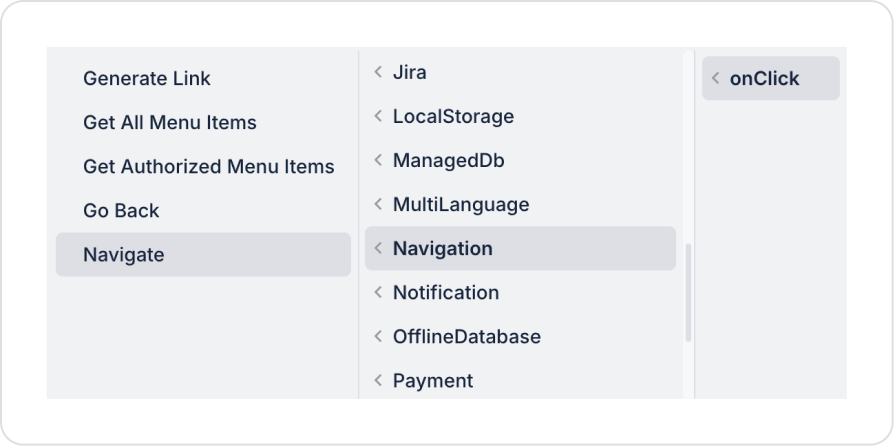
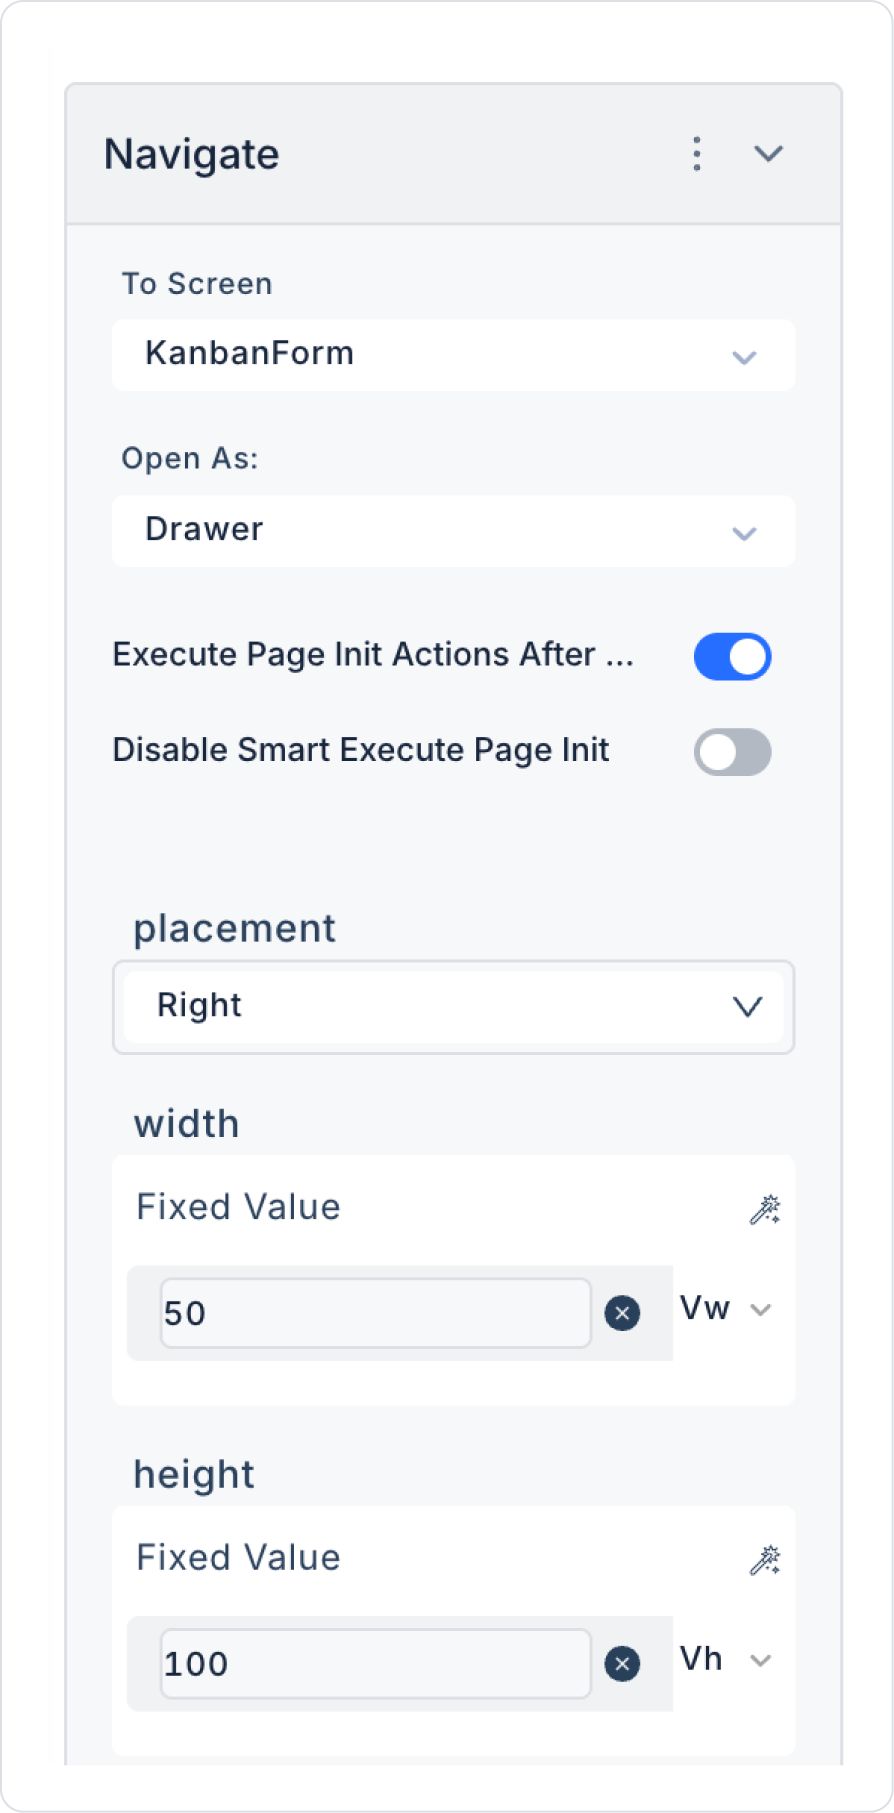
After completing all steps, navigate from the left-hand panel’s Screens section to the page where the Kanban Board element was created. Add the Add Task Button element > Properties > Add Action > onClick > Navigation > Navigate action to the button on the page.
Set the Navigate action parameters to To Screen > KanbanForm, Open As > Drawer, and Width > 50 Vw.
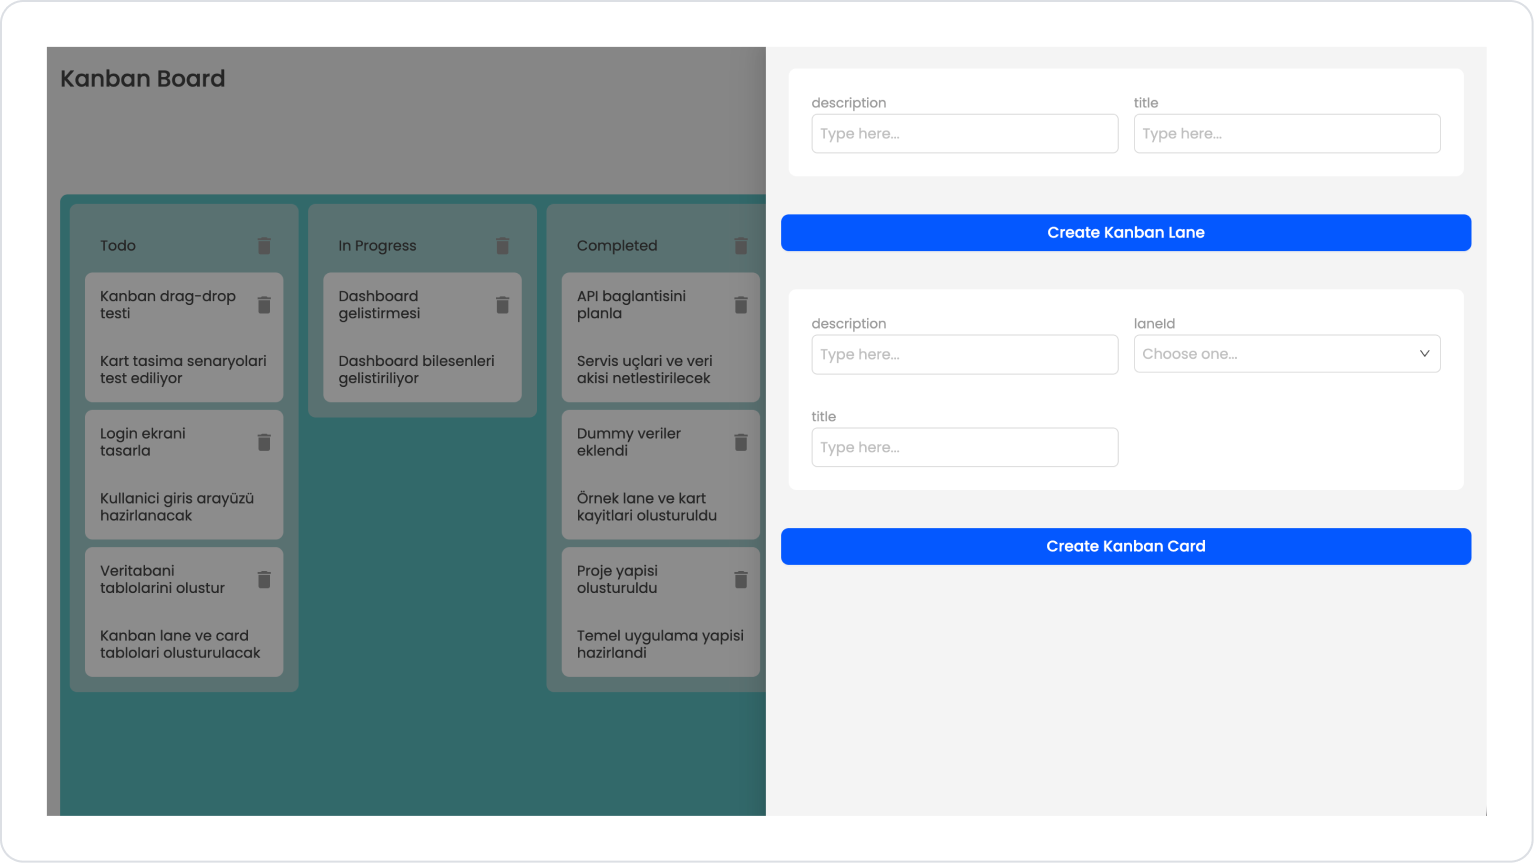
Preview:
The Kanban Board element provides a task tracking structure where cards are listed under Lanes and can be managed via drag-and-drop. Users can add new lanes and cards, move cards between different lanes, or reorder them within the same lane. Additionally, records can be deleted using actions on lanes and cards, and the process can be dynamically managed.
4. Common Properties
Some fields on the Kanban Board element are shared across all UI elements. Therefore, detailed descriptions of the following properties can be found in the relevant general guide pages: