Play Store Settings contain the configurations needed to link and publish your Android app to the Google Play Store. To configure these settings, you’ll need to retrieve some information from your Google Play Developer account and the Google Play Console. You can configure the Play Store Settings through Kuika’s Config Manager module.
In this guide, you’ll first learn how to create a mobile app, and then how to configure the Play Store Settings step by step.
Creating a Mobile App
Log in to the Kuika platform.
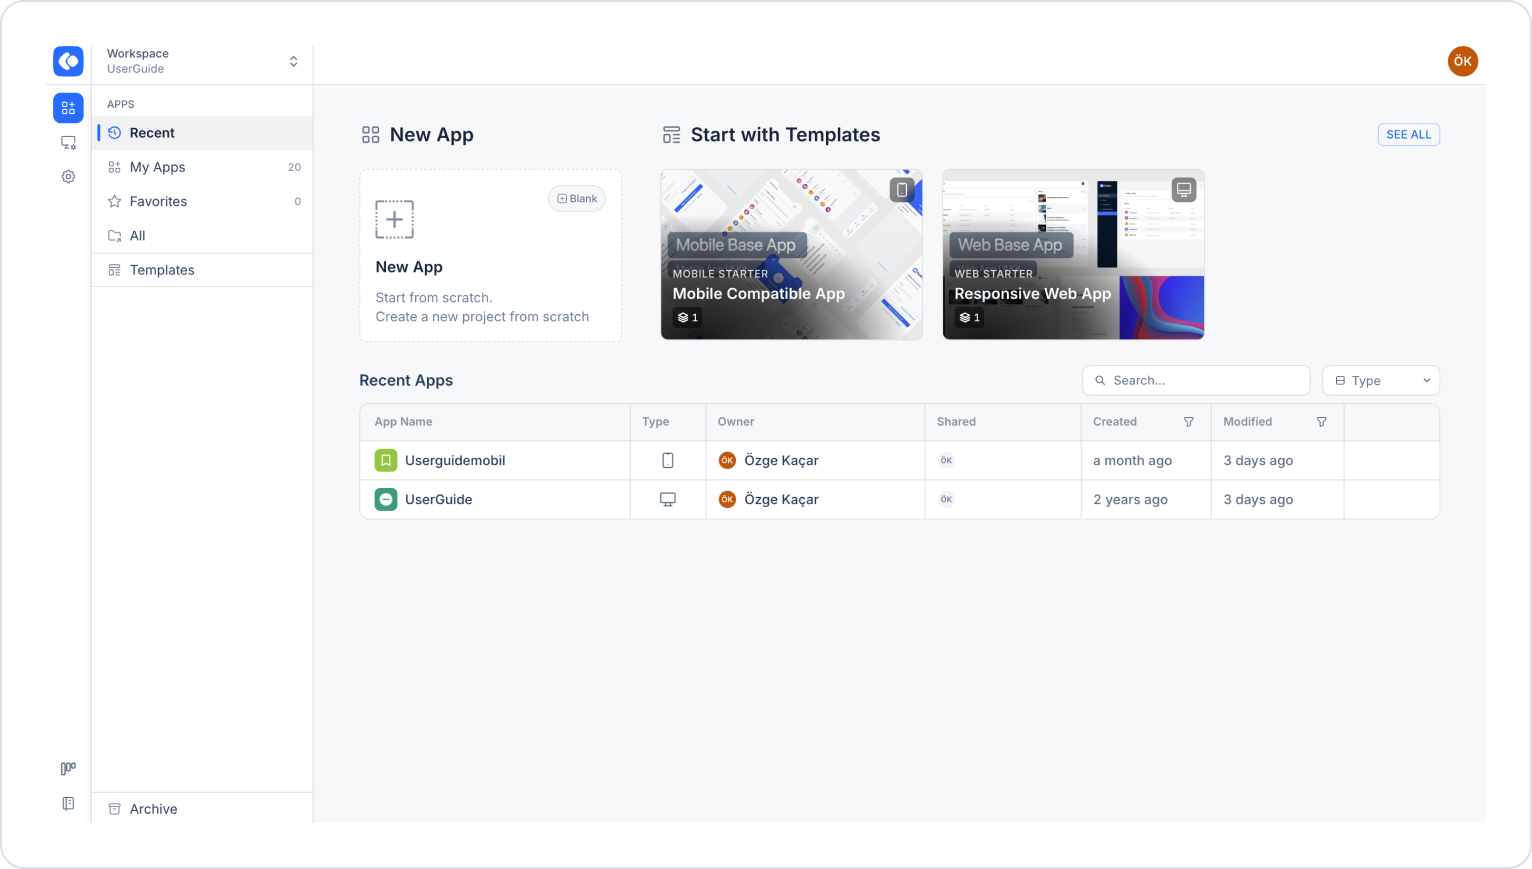
On the Apps screen, click the New App card.
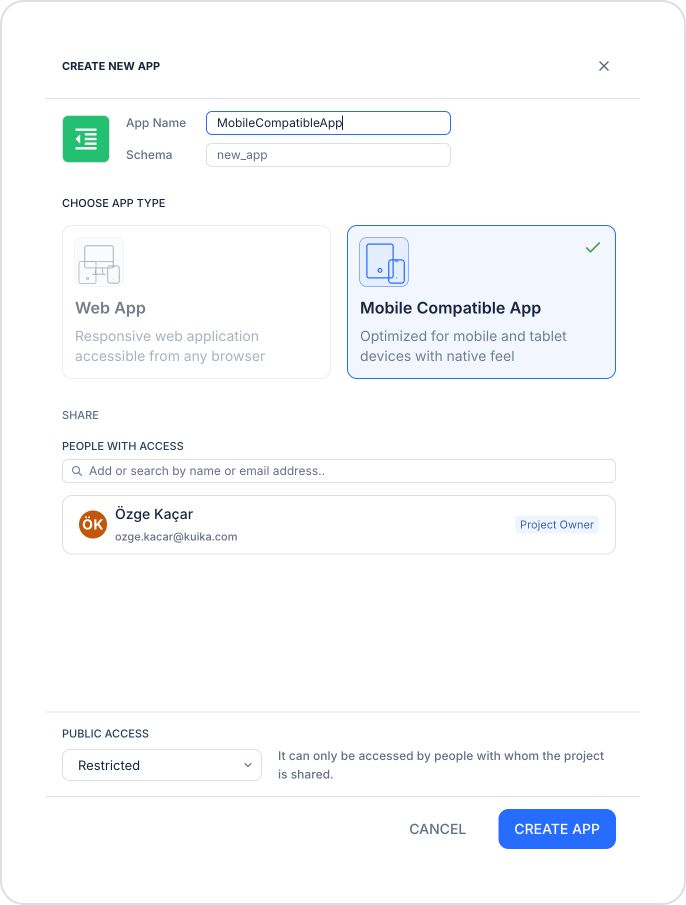
In the CREATE NEW APP window that opens, enter a name for your app in the App Name field.
In the CHOOSE APP TYPE section, select the Mobile Compatible App option.
Click the CREATE APP button to complete the process.
How to Set Up Play Store Settings?
1. Open or Create a Configuration
Open your mobile app from the Apps screen.
Click the Config Manager module in the top menu.
To create a new configuration, click the Create a blank configuration card, give the configuration a name, and complete the creation process. If you want to use an existing configuration, click its name in the list.
2. Go to Play Store Settings
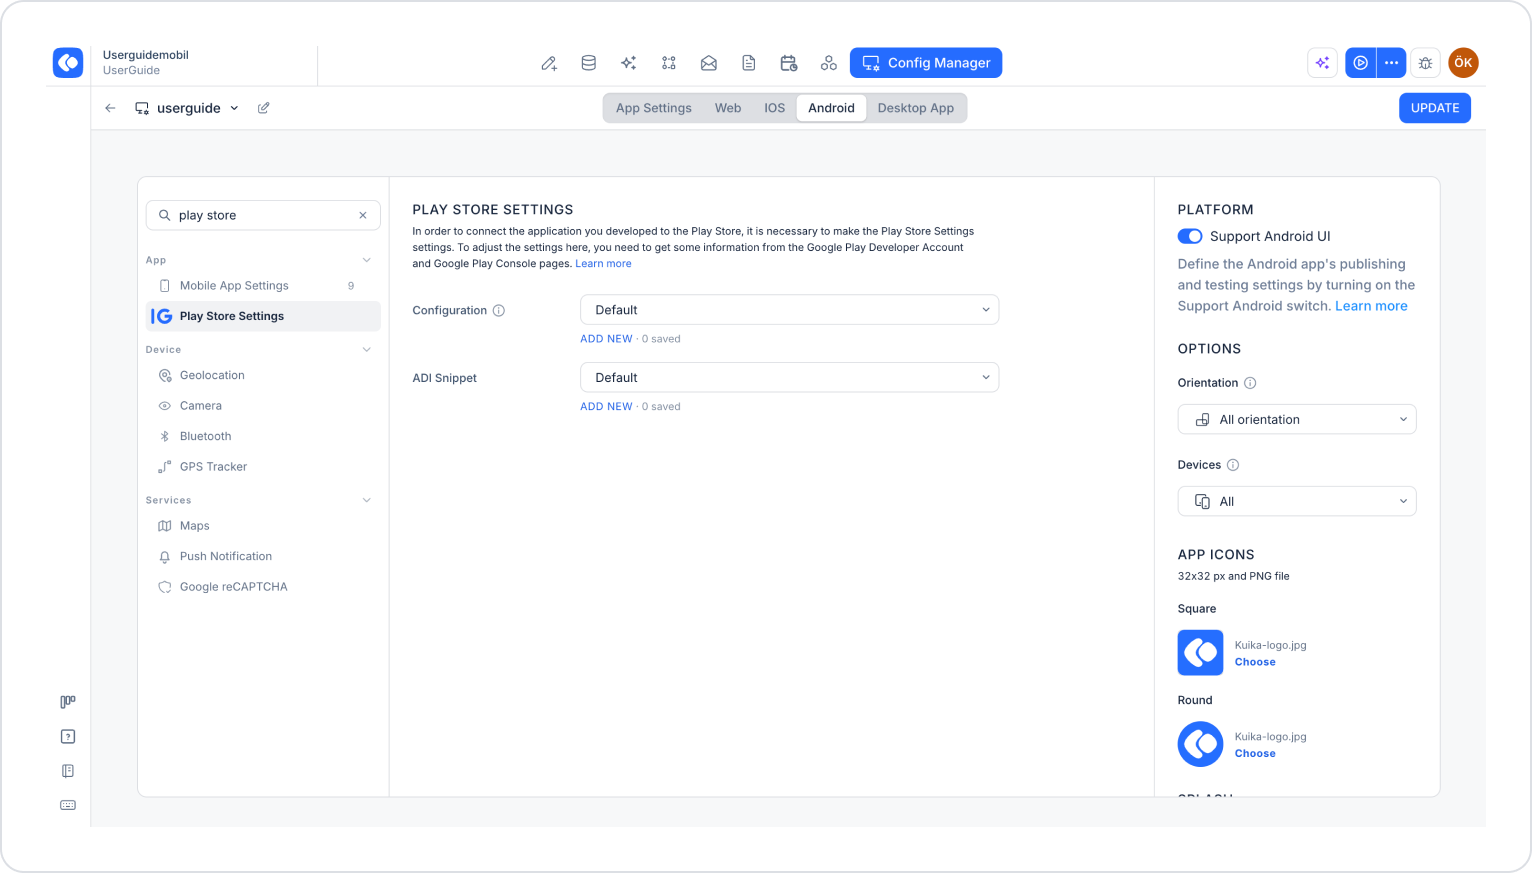
From the tabs at the top of the configuration screen, select the Android tab.
In the PLATFORM section on the right, make sure the Support Android UI toggle is enabled.
Under the App heading in the left menu, select the Play Store Settings option. You can also use the Search settings field in the top-left corner to find the setting.
There are two fields on the screen:
Configuration: The publishing configuration that determines how the app will be published to the Google Play Store.
App Name Snippet: The snippet information provided by the Google Play Console.
Settings such as the app name, Bundle ID, version information, and minimum Android version are configured in the Mobile App Settings, not in Play Store Settings. For details, please review the Mobile App Settings documentation.
3. Add a Publication Configuration
Click the ADD NEW link under the Configuration section.
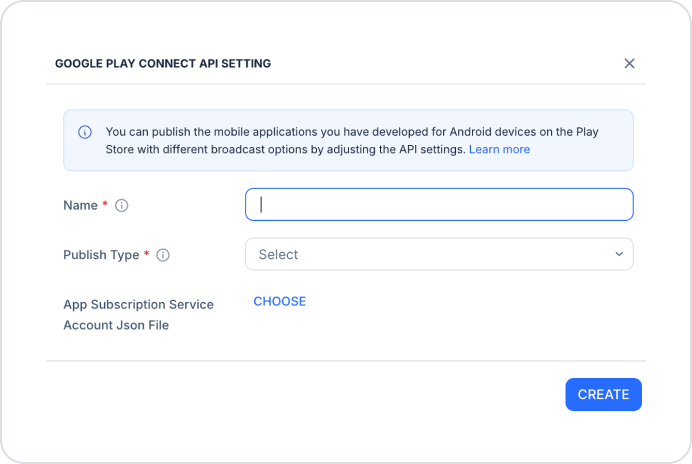
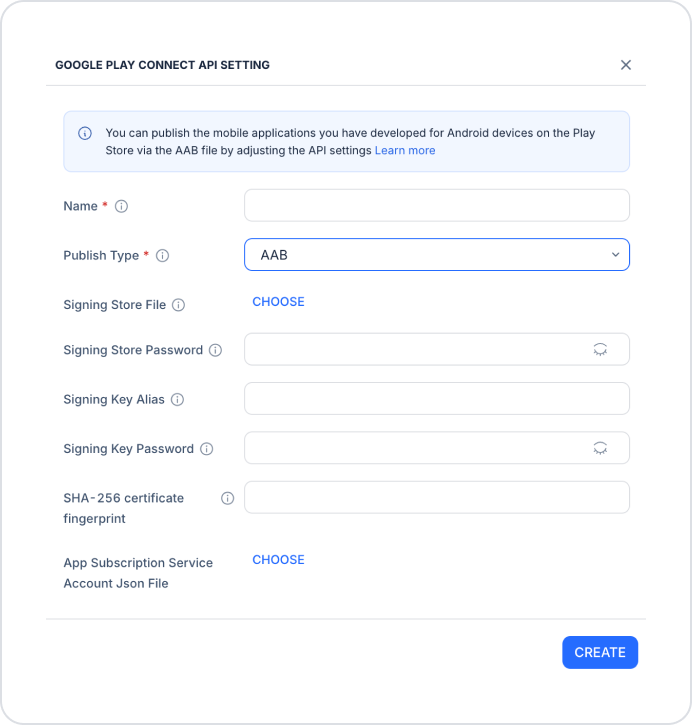
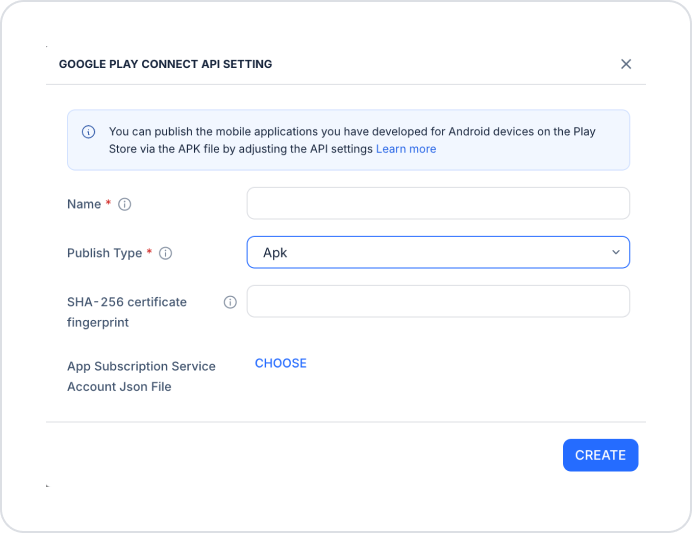
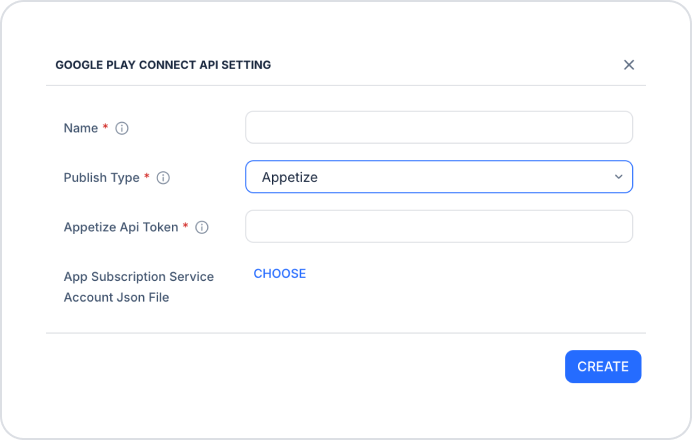
In the GOOGLE PLAY CONNECT API SETTING window that opens, fill in the following fields:
Name (required): The name of the configuration.
Publish Type (required): Publication type. Select one of the options—AAB, Apk, or Appetize—from the drop-down menu. Different fields will appear in the window depending on the type you select.
App Subscription Service Account JSON File: The JSON file associated with the Service Account created via the Google Cloud Console. Click the CHOOSE link to upload it. This file enables secure communication with the Google Play Developer API. It is required for subscription verification, purchase verification, and tracking payment statuses. For details, see the Billing System Settings documentation.
The App Subscription Service Account JSON File field is required for apps with subscription and payment scenarios.
AAB (Android App Bundle)
AAB allows you to publish your app to the Google Play Store as an Android App Bundle file. When AAB is selected in the Publish Type field, the following fields appear:
Signing Store File: The keystore file (.jks) used to sign the app. Click the CHOOSE link to upload it.
Signing Store Password: The password for the keystore file.
Signing Key Alias: The alias of the signing key.
Signing Key Password: The password for the signing key.
SHA-256 certificate fingerprint: The SHA-256 fingerprint of the signing certificate.
App Subscription Service Account JSON File: The Service Account JSON file.
APK (Android Package Kit)
APK allows you to publish your app to the Google Play Store as an APK file. When Apk is selected in the Publish Type field, the following fields appear:
SHA-256 certificate fingerprint: The SHA-256 fingerprint of the signing certificate.
App Subscription Service Account JSON File: The Service Account JSON file.
Appetize
When Appetize is selected in the Publish Type field, the following fields appear:
Appetize API Token (required): The API token obtained from your Appetize account.
App Subscription Service Account JSON File: Service Account JSON file.
After filling in the fields, click the CREATE button.
Select the configuration you created from the Configuration dropdown menu.
4. Add an ADI Snippet
Click the ADD NEW link below the ADI Snippet field.
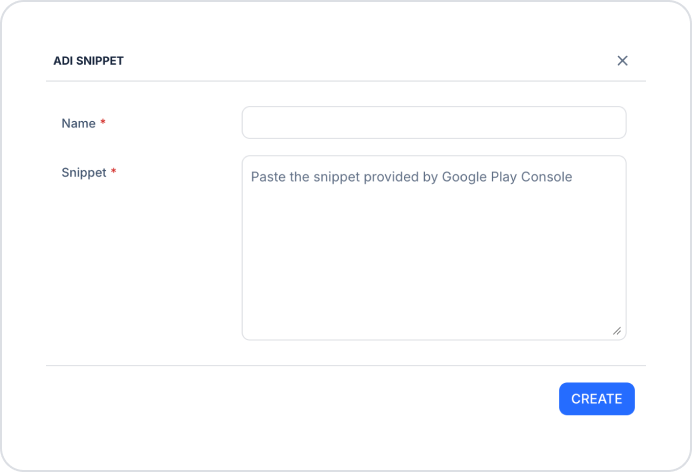
In the ADI SNIPPET window that opens, fill in the following fields:
Name (required): The name of the snippet.
Snippet (required): The snippet provided by the Google Play Console. Paste the snippet into this field.
Click the CREATE button.
Select the snippet you created from the ADI Snippet drop-down menu.
5. Save the Settings
Make sure you have filled out all required (*) fields completely and correctly.
Click the UPDATE button in the upper-right corner to save your changes.
6. Test the Settings
Click the three dots next to the Preview button in the top-right corner of the screen.
From the dropdown menu, click the RUN option.
Once the process is complete, verify that the settings you specified have been applied correctly.
Important Tips
The Google Play Store requires new apps to be uploaded in AAB format. If you’re publishing your app for the first time, select the AAB publication type.
Store your keystore file and passwords in a secure location. If you lose this information, you won’t be able to sign your app’s updates with the same key.
You can verify the SHA-256 fingerprint on the app signing page in the Google Play Console. Make sure the fingerprint matches your signing certificate.
You can create separate configurations for different environments (test, production) and select the one you need from the Configuration menu.
Once you’ve completed these steps, your Play Store Settings configuration will be ready, and you can publish your Android app to the Google Play Store.