User Manual

AI Actions

22/9/26
AI Actions

With Kuika’s AI Functions module, you can integrate artificial intelligence (OpenAI and Gemini models) into the applications you develop as data sources. You can either build a structure from scratch to suit your needs or use ready-made templates. However, ready-made templates cannot be customized; therefore, custom configurations should be preferred for more specific needs.

For example:

  • With CV Reader, you can read resume data;
  • with Create Image, you can generate AI-powered images;
  • with Text to Speech, you can convert written text into spoken speech.
  • With Sentiment Analysis, you can analyze the emotional tone of text;
  • with Text Summary, you can summarize long texts;
  • with Grammar Corrector, you can correct grammar errors.

In this training, you’ll learn how to use AI Functions to add AI as a data source and how to effectively use templates.

Creating an AI Connection as a Data Source

  1. Log in to the Kuika platform and open the project you’ll be working on from the Apps screen.
  2. Go to the AI Functions module from the top menu.

When you enter the AI Functions screen, you’ll see the following items:
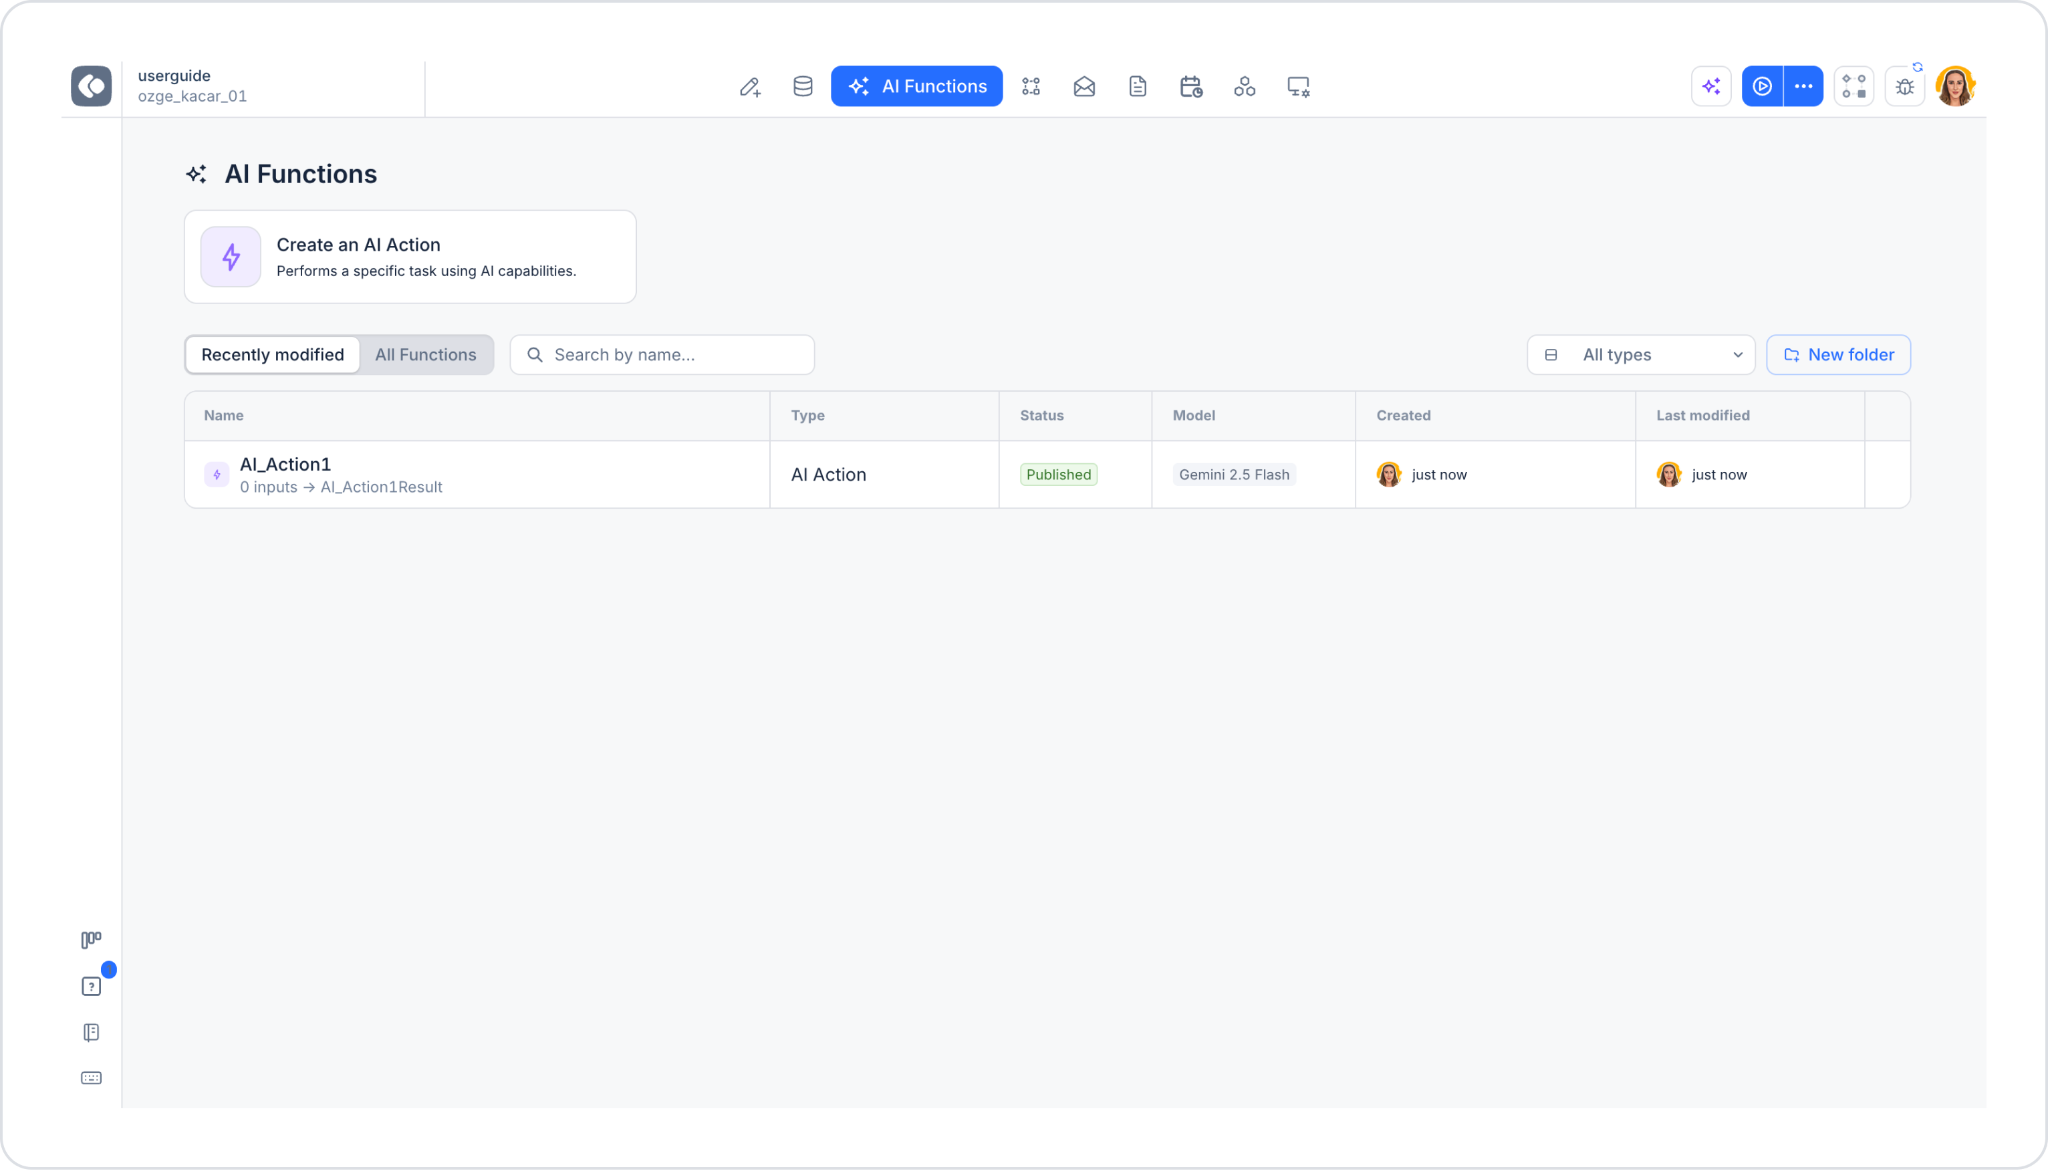
  • Create an AI Action card: Allows you to start creating a new AI action.
  • Previously created actions are listed in the table below the card. This table consists of two views: Recently modified and All Functions; you can search by action name using the search box on the right (Search by name...), filter by type using the All types dropdown list, and create folders to organize actions using the New folder button.
  • Table columns: Name (action name and input/output summary, e.g., “0 inputs → AI_Action1Result”), Type (e.g., AI Action), Status (e.g., Published), Model (AI model used), Created (creator and date), Last modified (last modifier and date).

When you click the “Create an AI Action” card, the “Add AI Action” screen opens:
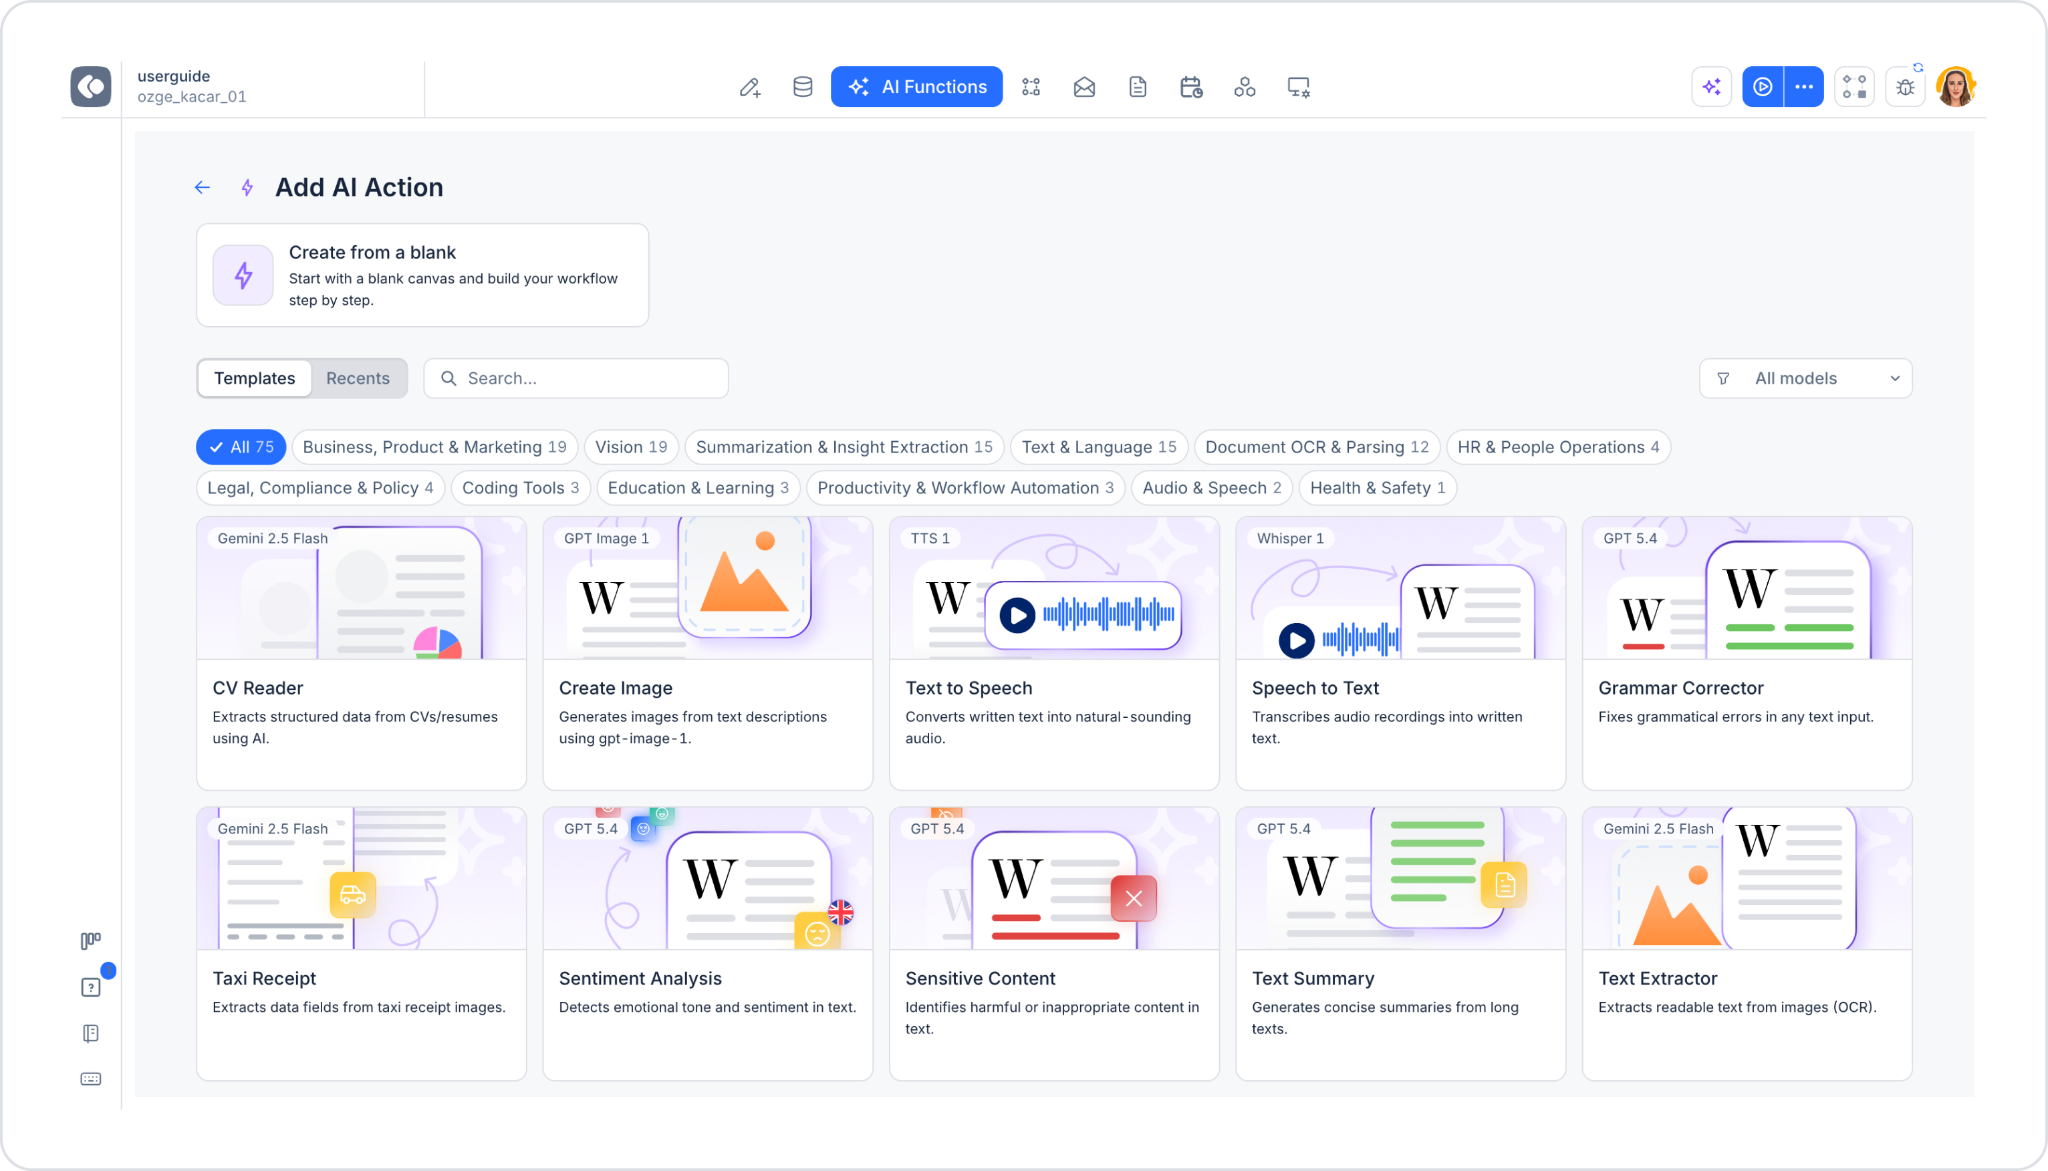
  • At the top is the “Create from a blank” card. This allows you to create a custom action from scratch.
  • Below that are two tabs—“Templates” and ‘Recents’—a search box, and the “All models” filter on the right.
  • Templates can be filtered by category tags: All, Business, Product & Marketing, Vision, Summarization & Insight Extraction, Text & Language, Document OCR & Parsing, HR & People Operations, Legal, Compliance & Policy, Coding Tools, Education & Learning, Productivity & Workflow Automation, Audio & Speech, Health & Safety. The number of templates in each category is displayed next to it.
  • Each template card includes the AI model it uses (e.g., Gemini 2.5 Flash, GPT Image 1, TTS 1, Whisper 1, GPT 5.4), a visual icon, the template’s name, and a short description.

Smart Templates Powered by AI

You can quickly perform your tasks using the pre-built templates on the “Add AI Action” screen:

  • Speech To Text English: Convert spoken English to text.
  • Taxi Receipt: Read and process taxi receipts.
  • Sensitive Content: Detect sensitive content.
  • Receipt Reader Multiple: Read different types of receipts.
  • Capture Image From Camera: Take a photo with the device’s camera.
  • Detect Object Count From Image: Count objects in an image.
  • Split Image: Splitting an image into parts.
  • Fashion Labeling: Labeling fashion products.
  • Analyze Security Camera Footage: Analyzing security camera footage.
  • Custom: Configurable to meet a specific need.
  • CV Reader: Reading and interpreting information from resumes.
  • Create Image: Generating AI-powered images.
  • Text to Speech: Convert written text into spoken speech.
  • Speech to Text: Transcribe speech into text.
  • Grammar Corrector: Correct grammar errors.
  • Sentiment Analysis: Analyze the emotional tone in text.
  • Text Summary: Summarize long texts.
  • Text Extractor: Extract text from images or PDFs.
  • Image Analyzer: Analyzing images to provide information about their content.
  • Article Writer: Creating articles on specific topics.
  • Brand Generator: Generating brand names or concept suggestions.
  • Exam Creator: Designing exam questions and answers.
  • Survey Creator: Creating surveys.
  • Text Translator: Translating text into different languages.
  • PDF Translator: Translate PDF files into different languages.
  • Receipt Reader: Read and analyze information on receipts.
  • Edit Image: Edit, correct, or apply visual effects to uploaded images.
  • Generate Video: Create AI-powered video content from text, images, or templates.
  • Product Description Generator: Automatically generates product descriptions tailored to the target audience.
  • Customer Feedback Analyzer: Analyzes customer feedback to identify trends and issues.
  • Executive Summary Generator: Summarizes long reports or documents for executives.
  • Refund Policy Explainer: Simplifies refund policies and explains them in a user-friendly way.
  • Meeting Availability Summarizer: Summarizes meeting dates and availability information.
  • Emotional Tone Detector: Detects the emotional tone in text.
  • Table Data Cleaner: Cleans up and formats errors in table data.
  • Gift Recommender: Provides gift recommendations based on recipient characteristics.
  • Conflict Resolution Advisor: Offers constructive solutions in conflict situations.
  • Legal Clause Simplifier: Simplifies legal texts.
  • Code Bug Explainer: Analyzes faulty code segments and explains the cause of the problem.
  • Visual Prompt Booster: Enhances prompts for generating visuals.
  • Persona Tone Styler: Provides tone suggestions appropriate for the target persona.
  • Text Tag Suggester: Suggests appropriate tags for texts.
  • Auto Section Namer: Generates appropriate headings for content sections.
  • User Feedback Categorizer: Categorizes user feedback.
  • Question Rephraser: Rewrites questions to make them clearer and more effective.
  • Content Expander: Expands short texts into detailed versions.
  • Performance Review Interpreter: Interprets performance review texts.
  • Intent Classifier: Classifies user intent.
  • Symptom to Prediagnosis: Analyzes symptoms to provide a preliminary diagnosis.
  • Policy Document Simplifier: Simplifies policy documents.
  • Financial Briefing Generator: Generates summaries of financial reports.
  • Text Summarizer: Summarizes long texts concisely and meaningfully.
  • Task Brief to Checklist: Converts task descriptions into to-do lists.
  • Tone Analyzer and Suggester: Analyzes the tone of the text and offers suggestions for improvement.
  • Knowledge Base Answer Generator: Generates appropriate responses based on the knowledge base.
  • Instruction Generator: Creates step-by-step instructions.
  • Form Auto Filler: Automatically fills out form fields based on content analysis.
  • Product Review Analyzer: Analyzes product reviews and provides a summary.
  • Blog Post Outline Creator: Generates title and subheading suggestions for blog posts.
  • Resume Bullet Point Optimizer: Professionally optimizes bullet points on resumes.
  • Data Insight Summary Generator: Generates brief summaries from data analyses.
  • Competitor Analysis Summary: Summarizes competitor analyses.
  • Social Post Sentiment Forecaster: Predicts the emotional impact of social media posts.
  • Feature Priority Ranker: Ranks product features by priority.
  • Code Complexity Analyzer: Measures code complexity and offers suggestions for simplification.
  • Sustainability Action Advisor: Generates sustainability-focused strategy recommendations.
  • Event Marketing Idea Generator: Generates creative ideas for event marketing campaigns.
  • Code Optimization Advisor: Provides recommendations to improve code performance.
  • Brand Voice Translator: Adapt content to align with the brand’s tone of voice.
  • Product Bundle Suggester: Suggests product combinations that can be sold together.
  • Investment Portfolio Advisor: Provides analysis and recommendations for investment portfolios.
  • SEO Product Description Generator: Creates SEO-optimized product descriptions.
  • Task Checklist Generator: Converts task descriptions into actionable checklists.
  • Pharmacode Scanner: Reads medication barcodes in images and decodes Pharmacode values.
  • Inspect Box and Hologram: Detects GTIN, serial number, expiration date, and lot information from boxes, as well as the security hologram.
  • Inspect Blister Front Face: Detects the number of tablets, their color, shape, and any damage on the blister pack.
  • Inspect Blister Expiry: Reads the expiration date on the blister pack.
  • Inspect Blister Back Face: Compares the back of the production blister pack against a reference design.

‍

When you click on a template card (or click the “View Detail” field), a preview window titled “Continue With This Template” opens. In this window, you can view the AI model used by the template, a brief description, Parameters (input parameters and data types), and Return Type (output data structure and fields).

  • You can customize the template using the EDIT button to proceed to the editing screen.
  • You can start using the template as is by clicking the START WITH THIS TEMPLATE button.

For example, in the CV Reader template:
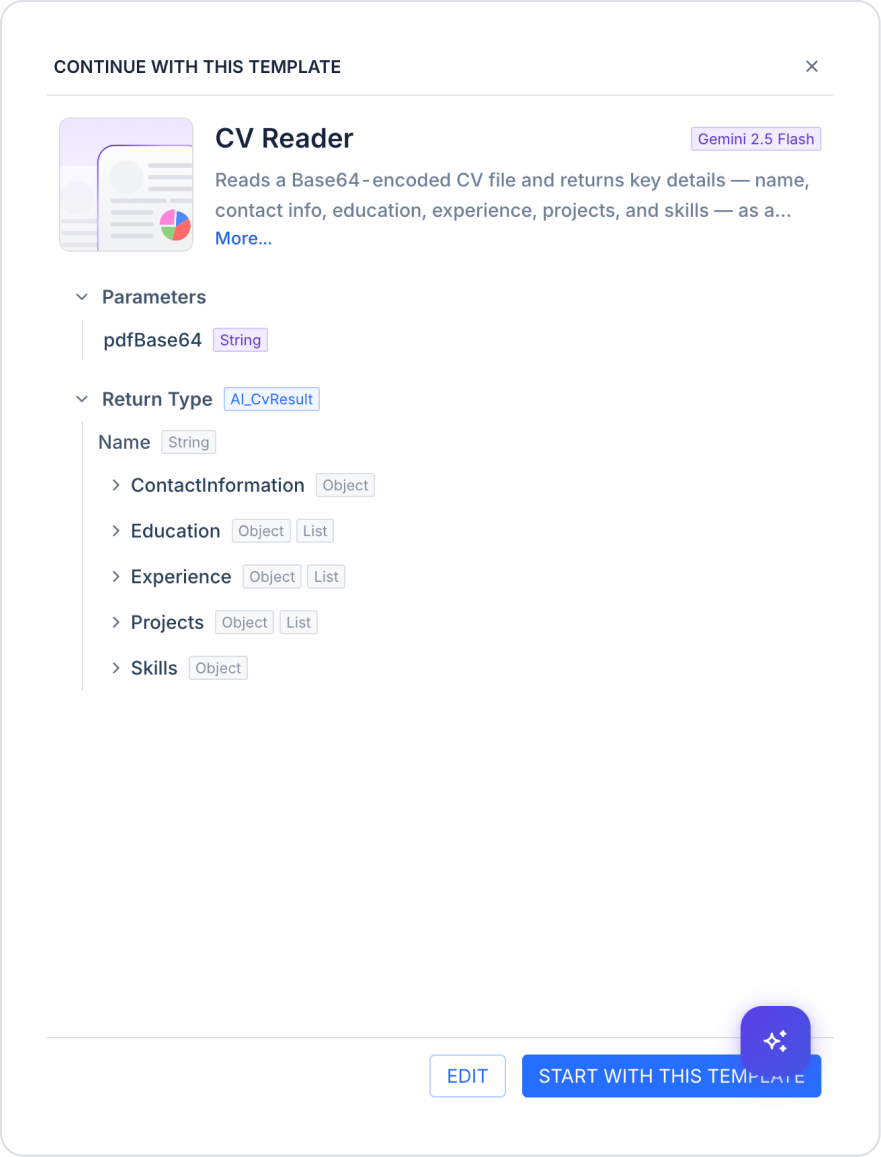
  • Parameter: pdfBase64 (String) — The CV file is submitted in Base64 format.
  • Return Type: AI_CvResult — Returns a structured output consisting of the following fields: Name (String), ContactInformation (Object), Education (Object, List), Experience (Object, List), Projects (Object, List), and Skills (Object).

Creating Actions Using AI

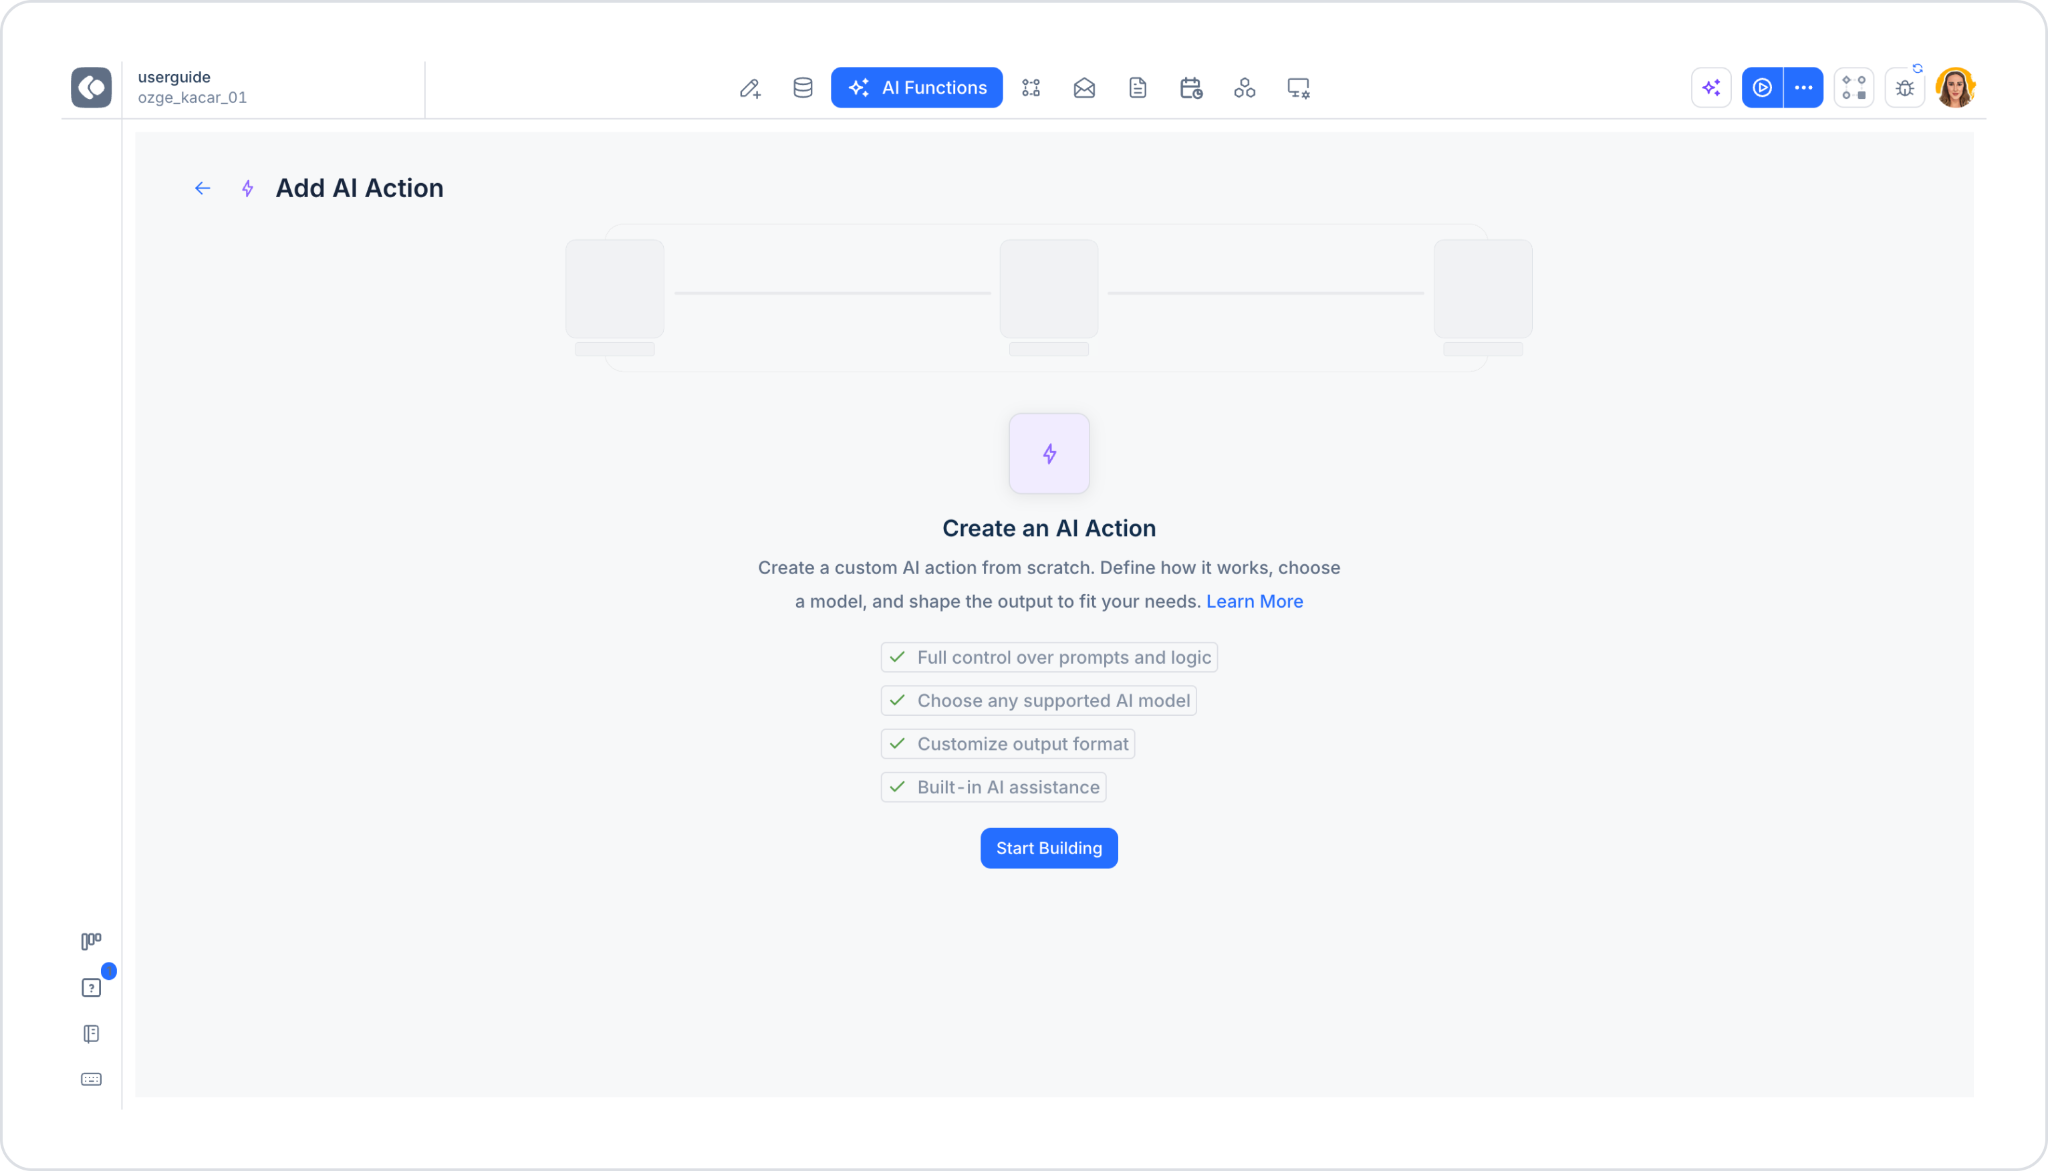
When you click the “Create from a blank” card, the “Create an AI Action” intro screen opens. On this screen:

  • There is a three-step visual diagram summarizing the workflow.
  • Click the “Start Building” button to proceed to the editing screen.

You can create personalized AI actions using the “Custom” template. When you enter a description of the desired AI template, a template is quickly generated based on that description, and the necessary prompts are automatically filled in.

Editing Screen
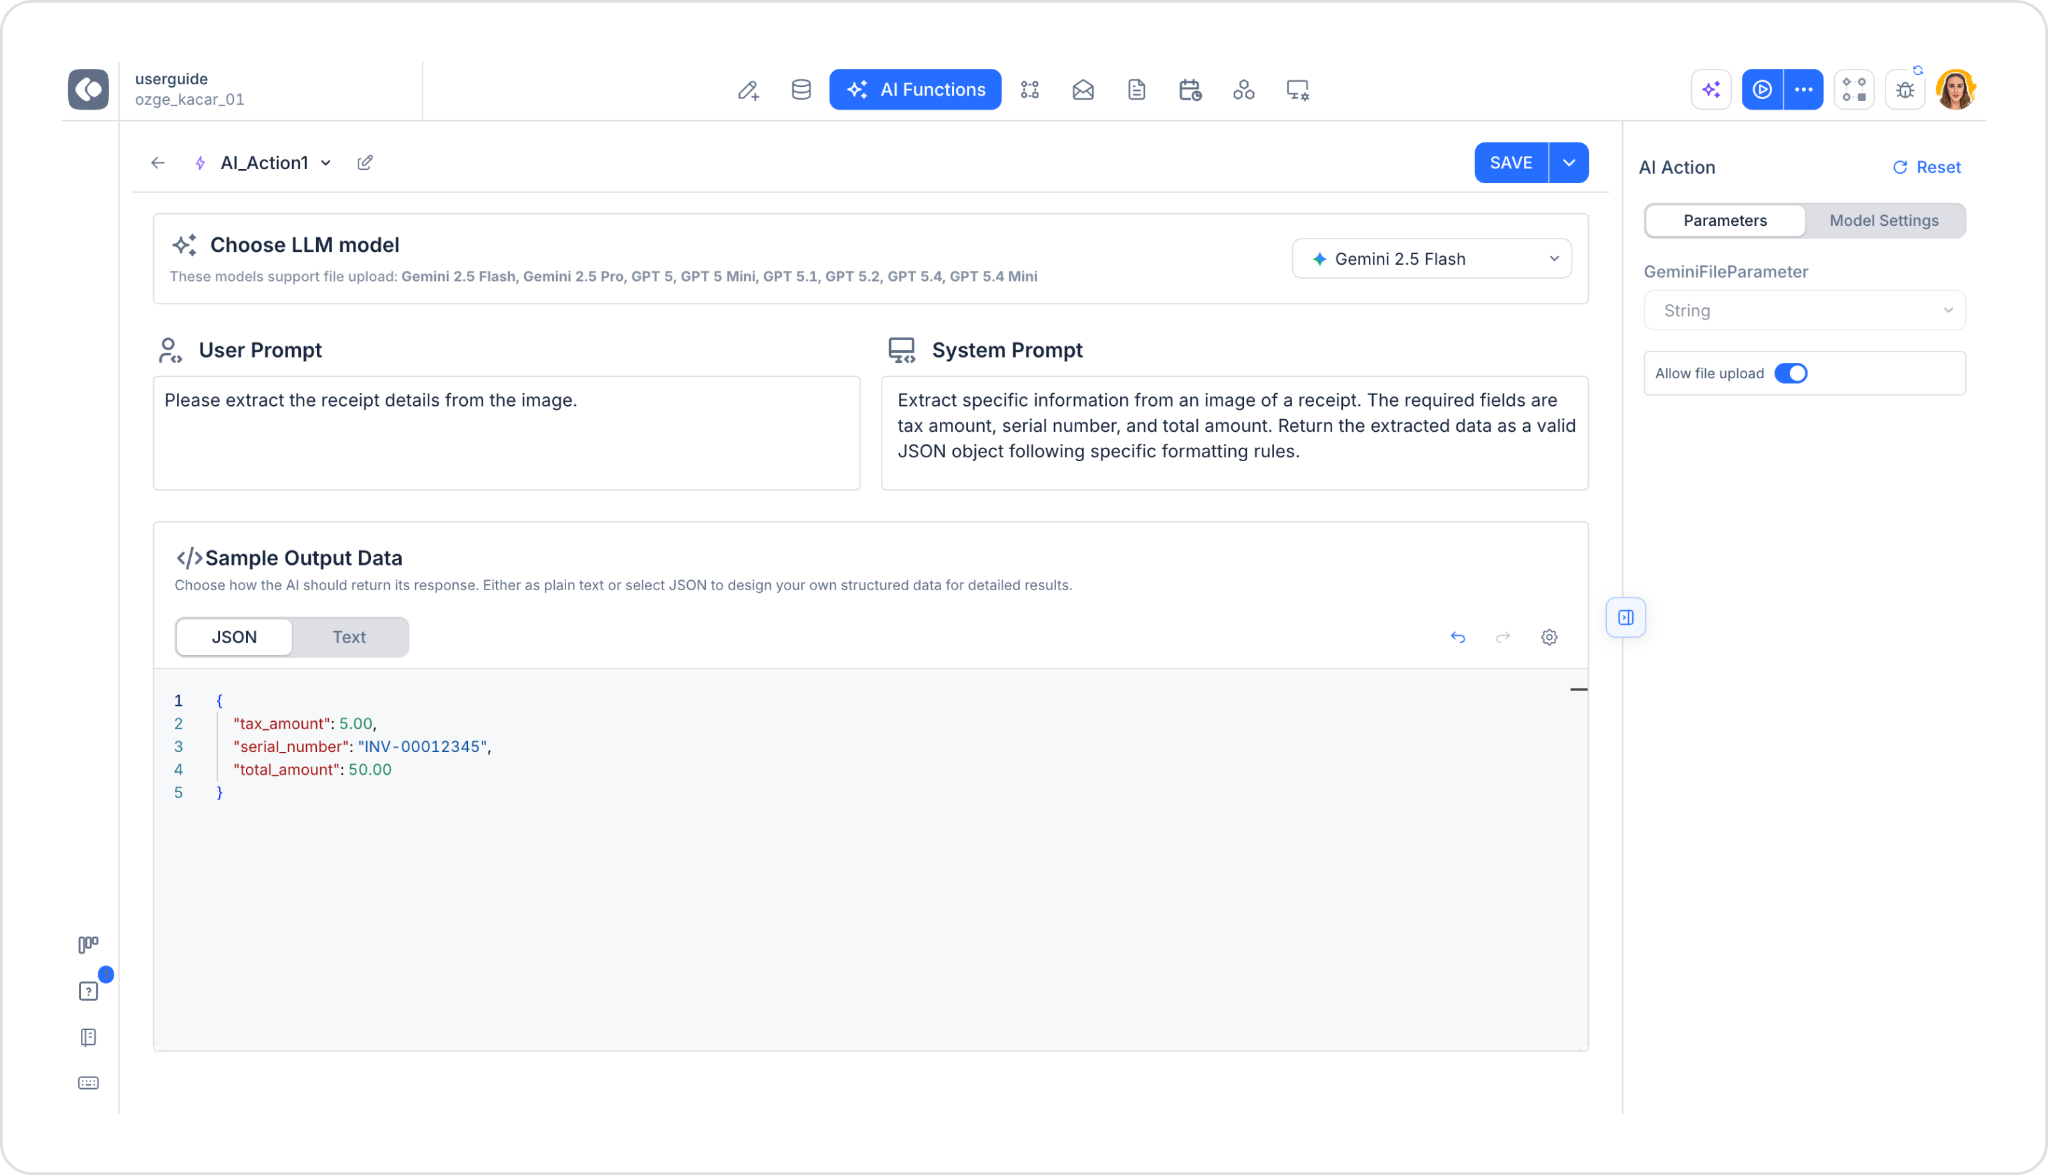
On the screen that opens after clicking “Start Building” (or when a template is opened via “EDIT”):

  • In the top-left corner, you’ll find a back arrow, the action’s name (which can be changed via a dropdown list), and an editing (pencil) icon next to it.
  • In the top right corner is the SAVE button (with an arrow next to it for additional options).
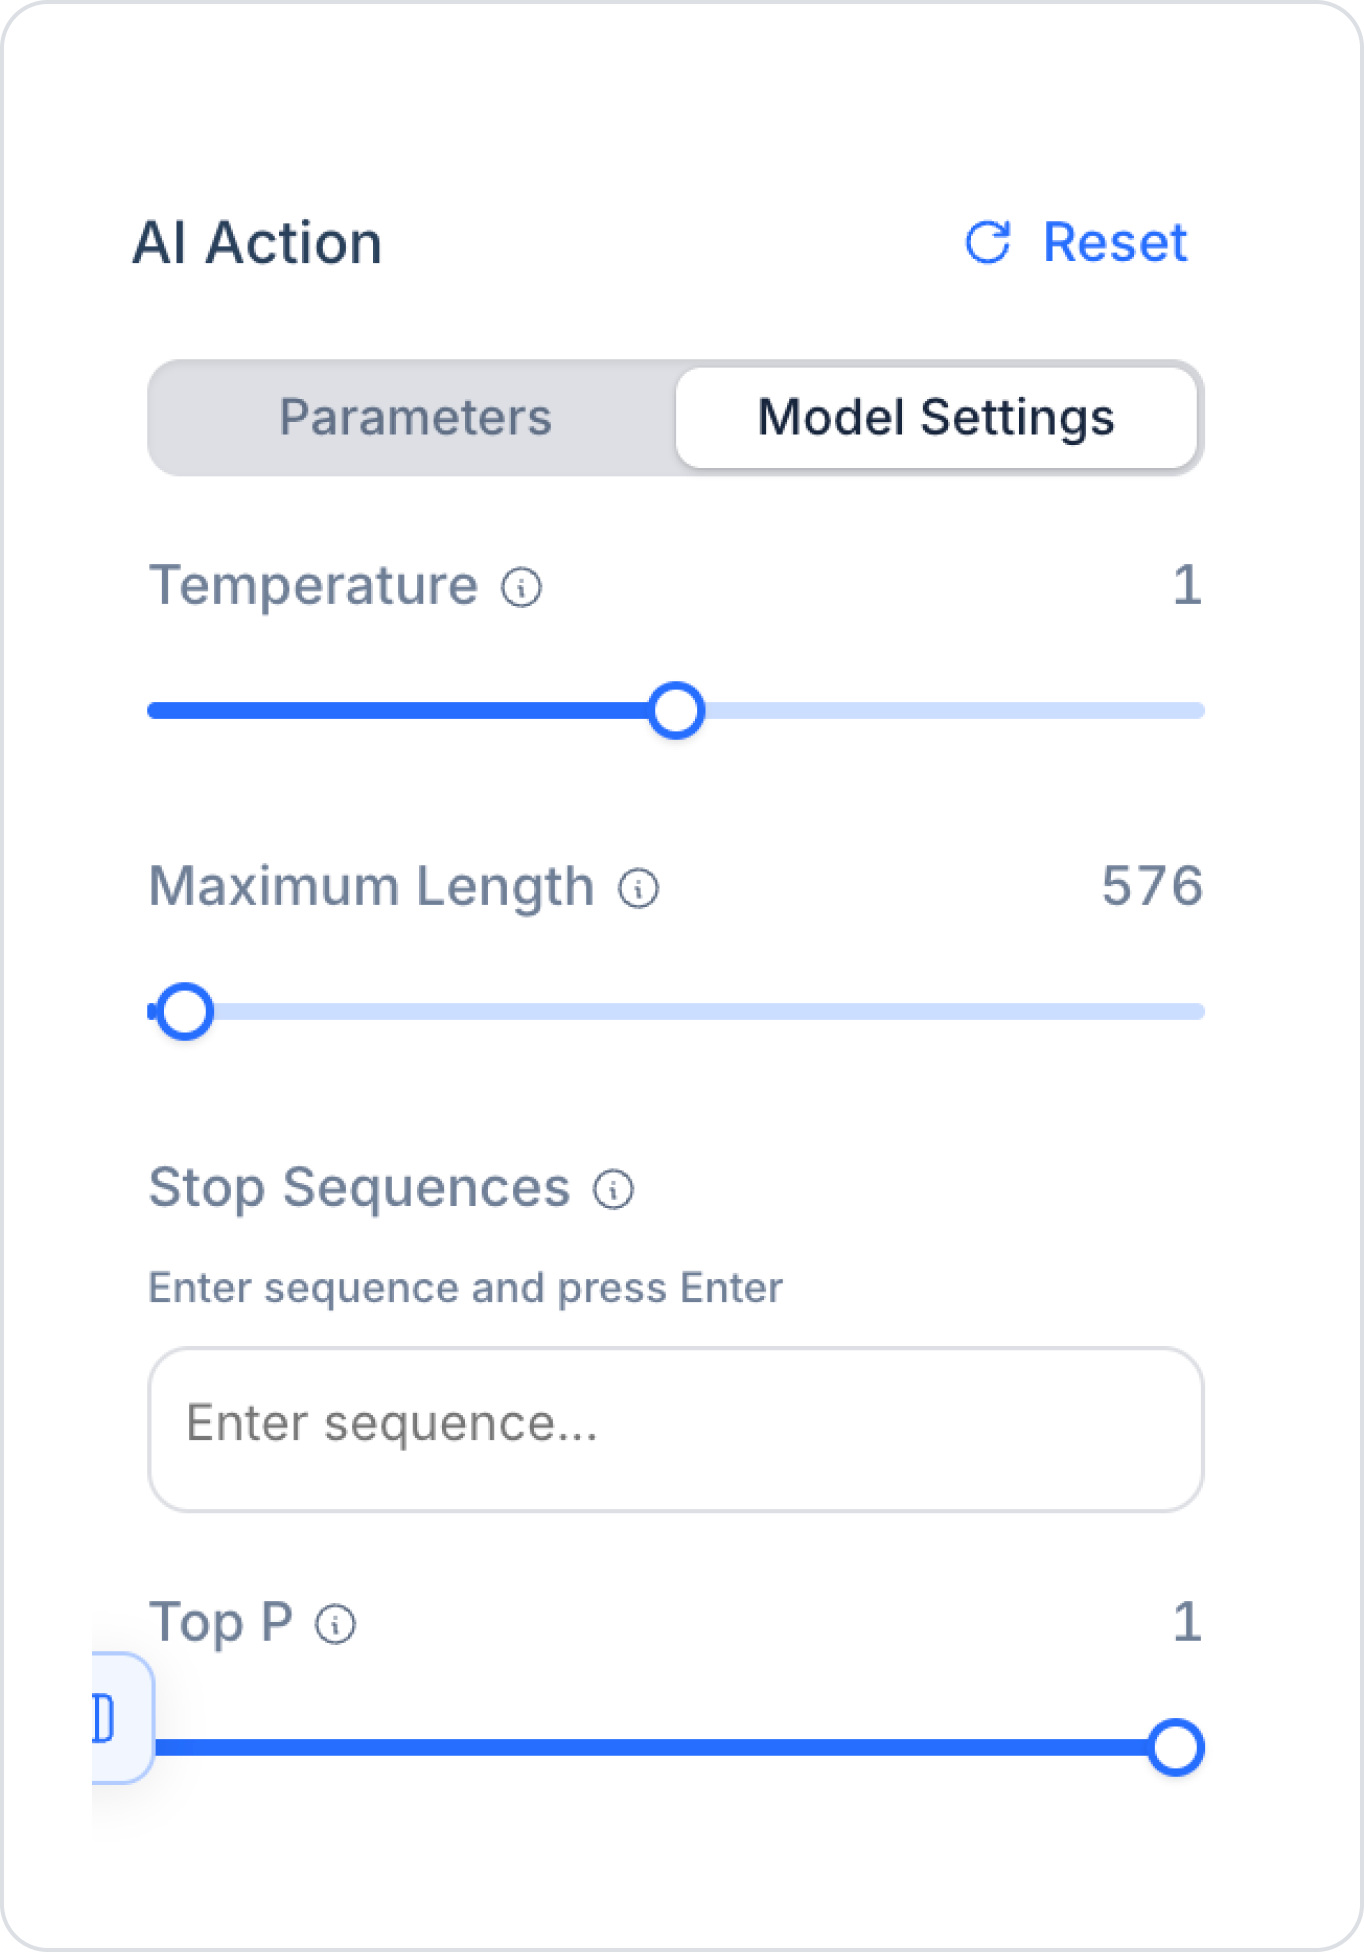
  • In the right panel, under the AI Action heading, there are two tabs: Parameters and Model Settings; changes can be undone using the Reset link in the top right corner.

Choose LLM Model

Located at the very top of the screen. A note indicates which models support file upload: “These models support file upload: Gemini 2.5 Flash, Gemini 2.5 Pro, GPT 5, GPT 5 Mini, GPT 5.1, GPT 5.2, GPT 5.4, GPT 5.4 Mini.” On the right side is the model selection dropdown list (default: Gemini 2.5 Flash). The AI Actions data source includes GPT-5, GPT-5 Mini, GPT-5 Nano, GPT-5.1, GPT-5.2, GPT-5.4, GPT-5. 4 Mini, GPT-5.4 Nano, Gemini 2.5 Flash, Gemini 2.5 Flash Image, Gemini 2.5 Flash Lite, Gemini 2.5 Pro, GPT Image 1, and Veo 3.1.

User Prompt and System Prompt

These two fields are positioned side by side (User Prompt on the left, System Prompt on the right):

  • User Prompt: Represents the input to be received from the user. This field specifies what the user wants to ask the AI. For example:
You are an AI Action assistant working in a low-code development environment (Kuika).Your task is to analyze the receipt/invoice image uploaded by the user, extract specific fields, and return them in a structured (JSON) format.Task Type: Information Extraction — Image-based structured data extractionInput:* {{receipt_image}} — The receipt/invoice image uploaded by the user (base64 or file reference)Fields to Extract:* tax_amount — The total tax/VAT amount specified on the receipt (numeric value only, without a currency symbol)* serial_number — The receipt’s serial number, invoice number, or financial document number on the receipt* total_amount — The final total amount paid (numeric value only, without a currency symbol)Rules:* Return only a valid JSON object; do not include any explanations, introductory text, or Markdown formatting (such as ```json).* If a field is not present on the receipt, set its value to null.* Return the `tax_amount` and `total_amount` fields as numbers (not strings), with a maximum of 2 decimal places.* Return the `serial_number` field as a string exactly as it appears on the receipt (including letters, hyphens, and leading zeros).* If the receipt contains multiple tax lines (e.g., different VAT rates), sum them into a single `tax_amount` value; however, if there is already a combined “Total Tax” line, use that value directly.* Do not make estimates or assumptions. Use `null` for unreadable or missing fields.Output Format:{“tax_amount”: <number or null>,‘serial_number’: “<string or null>”,“total_amount”: <number or null>}Sample Output:{“tax_amount”: 18.45,‘serial_number’: “FS-2026-004821”,“total_amount”: 205.00}Input/Output Format Description:* Input: A single image of a receipt or invoice (as a JPEG, PNG, or PDF page).* Output: A single-level JSON object containing three fields (tax_amount, serial_number, total_amount). It contains no additional fields, text, or descriptions; it is ready to be passed directly to the next AI Action step or data source.
  • System Prompt: This is the background instruction provided to the AI. This field defines how the model should behave (for example: “You are a legal expert.”). In other words, it determines the AI’s role. For example: “Extract specific information from an image of a receipt. The required fields are tax amount, serial number, and total amount. Return the extracted data as a valid JSON object following specific formatting rules.”

Sample Output Data

With the explanation “Choose how the AI should return its response. Either as plain text or select JSON to design your own structured data for detailed results,” the output format is selected from the JSON or Text tabs:

  • JSON: Select this if structured data is expected from the AI. When this option is used, a line-numbered code editor opens, and the expected JSON structure and fields can be predefined (e.g., tax_amount: 5.00, serial_number: “INV-00012345”, total_amount: 50.00), so that the model generates the output according to the specified schema. Undo/Redo and settings icons are located in the top-right corner of the editor.
  • Text: Used for free-form (natural language) outputs.

Right Panel — Parameters Tab

Parameters automatically provided based on the selected model are listed here:
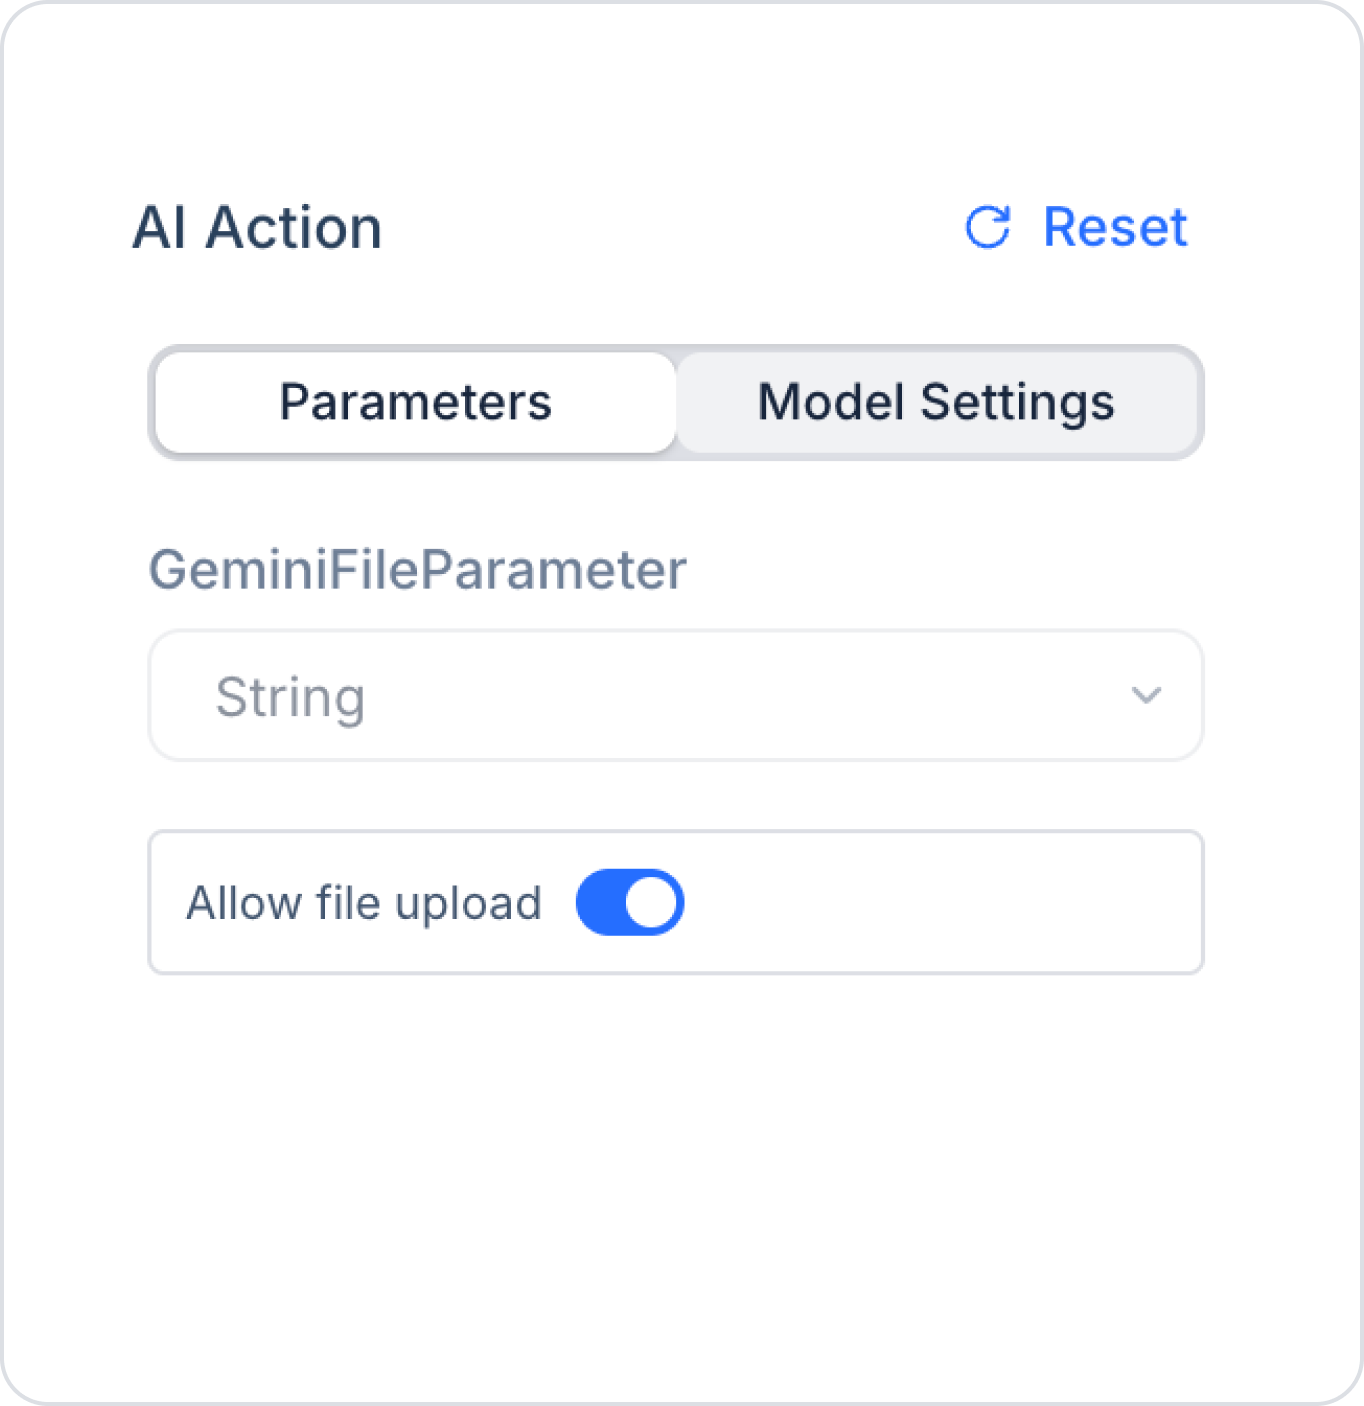
  • GeminiFileParameter: Used to provide file-based input. The data type is selected from the drop-down list (e.g., String). When “Allow file upload” is enabled, an image or file can be uploaded from a device and sent to the model in Binary (Bytea) format. When disabled, only text-based (String) parameters are used.
  • Unknown: Unknown or unspecified data type.
  • Boolean: True/false value.
  • Bytea: Binary data (e.g., image, file, etc.).
  • Byte: Integer value between 0 and 255.
  • DateTimeOffset: Date and time information.
  • Decimal: A decimal number.
  • Double: A larger decimal number.
  • Guid: A unique identifier (UUID).
  • Int16: A small integer value.
  • Int32: A medium-sized integer.
  • Int64: A large integer.
  • Single: A small decimal number.
  • String: A text value.

Right Panel — Model Settings Tab

  • Temperature: Set the AI’s creativity (0 = consistent, 1 = random responses).
  • Maximum Length: Set the length of the content the AI will generate in tokens.
  • Stop Sequences: Add a word or sequence of words to make the response stop at a specific point.
  • Top P: Controls the breadth of the word pool the model will use when generating output. Takes a value between 0 and 1. Low values ensure the model selects only from the most likely and reasonable words; high values allow selection from a broader and more diverse word pool.
  • Frequency Penalty: Used to reduce the repetition of words.
  • Presence Penalty: Encourages the creation of new content.
  • Reset to Defaults: Restores modified parameters to their original default values.

Finally, click the SAVE button in the top-left corner to create your AI action.

Using AI Actions

  1. Open the UI Design module.
  2. Select the screen where you want to add the action.
  3. In the Properties panel, use +ADD ACTION to add the AI Actions found in the Custom category.

After completing these steps, you can integrate AI-powered processes into your applications using Kuika AI Functions.

Glossary

No items found.

Alt Başlıklar