The offline mode feature on the Kuika platform allows the mobile app to run specific screens and data via a local database even when there is no internet connection.
Offline configuration consists of two steps:
Defining Offline Screens in the UI Designer module
Configuring Offline Tables in the Datasources module
Both modules must be configured for the offline scenario to work correctly.
1. Defining Offline Screens via the UI Designer
The first step in the offline scenario is to determine which screen will open when there is no connection. This is done in the UI Designer module.
Step 1: Open the Screen That Will Run Offline
Go to the UI Designer module.
Select the screen you want to open in offline mode.
Step 2: Define the Screen Role
Open the Properties tab in the right panel.
Find the Role field.
Select the Default Offline Screen option from the drop-down list.
What Does the Default Offline Screen Do?
This role:
Automatically opens when the application has no internet connection.
Determines the main screen to be displayed to the user in offline mode.
It should be the screen where offline tables are displayed.
If “Default Offline Screen” is not defined, the application may display a blank screen when the connection is lost.
Recommendations for Defining the Offline Screen
This screen should be designed as simply as possible.
Only tables supported in offline mode should be used.
Critical buttons (such as actions that call online services) should be disabled.
2. Configuring Offline Tables via Datasources
After the UI has been defined, the tables to be used offline must be configured. This is done in the Datasources module. You can configure offline settings when creating a new table or editing an existing one.
Step 1: Open the Table
Go to the Datasources module.
In the left panel, expand the Managed DB → Tables heading. Tables are grouped by schema (e.g., dbo).
Open the table you want to use offline, or create a new table using the + icon next to Tables.
Step 2: Enable the WORK OFFLINE Feature
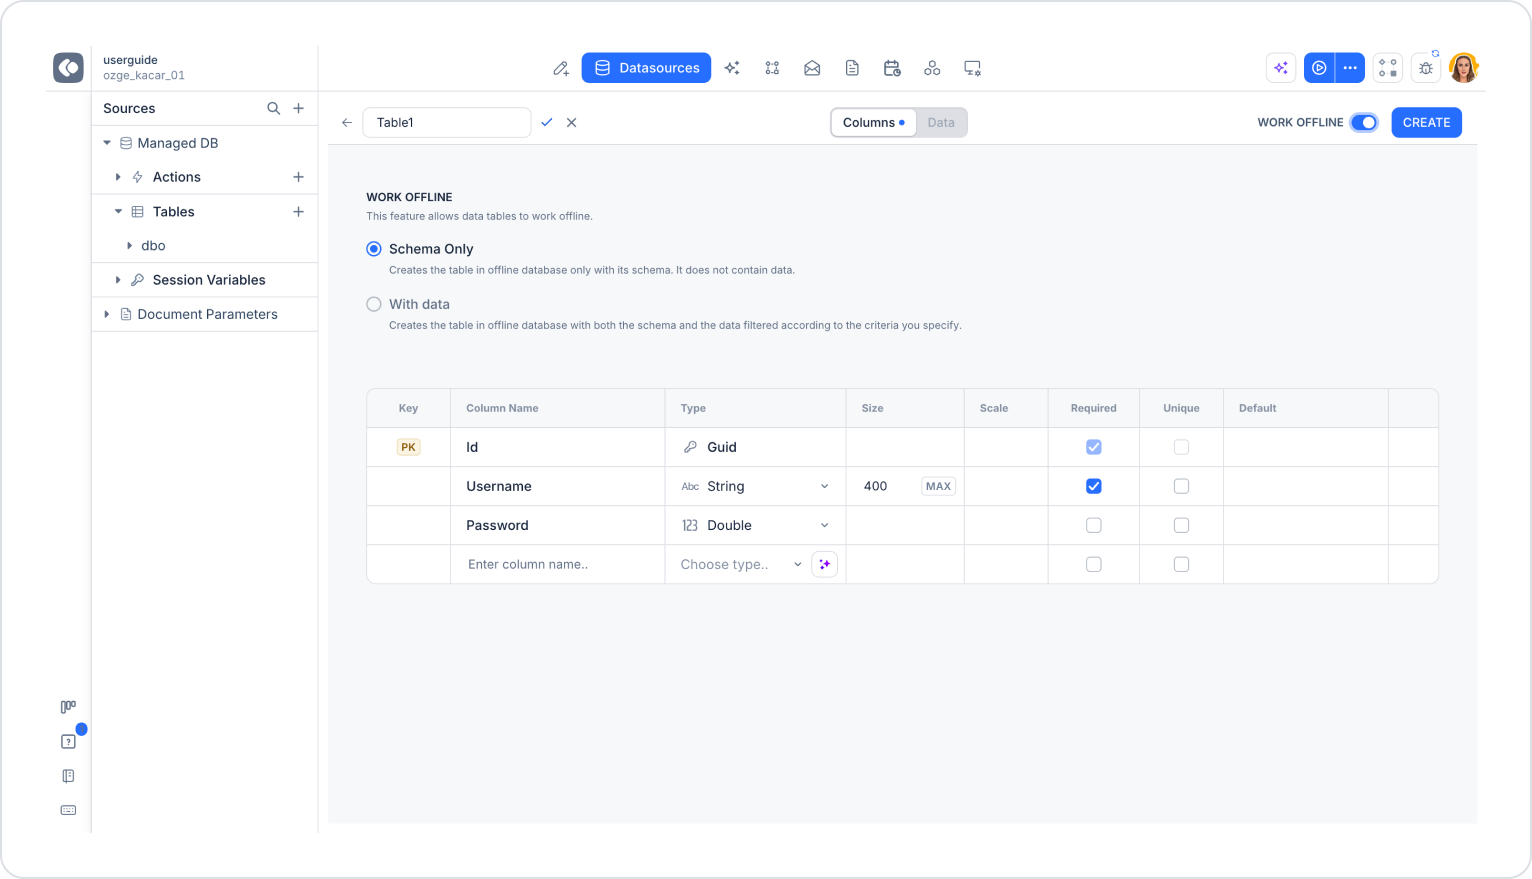
In the top-right corner, next to the CREATE button, enable the WORK OFFLINE toggle.
When the toggle is enabled, the WORK OFFLINE section appears above the table, offering two options.
Schema Only
This option:
Creates the table in the offline database with its structure only.
It does not contain data; only the table schema is present in the offline environment.
Intended use: Scenarios where data does not need to be downloaded from the server, and only new data will be written to the device.
With data
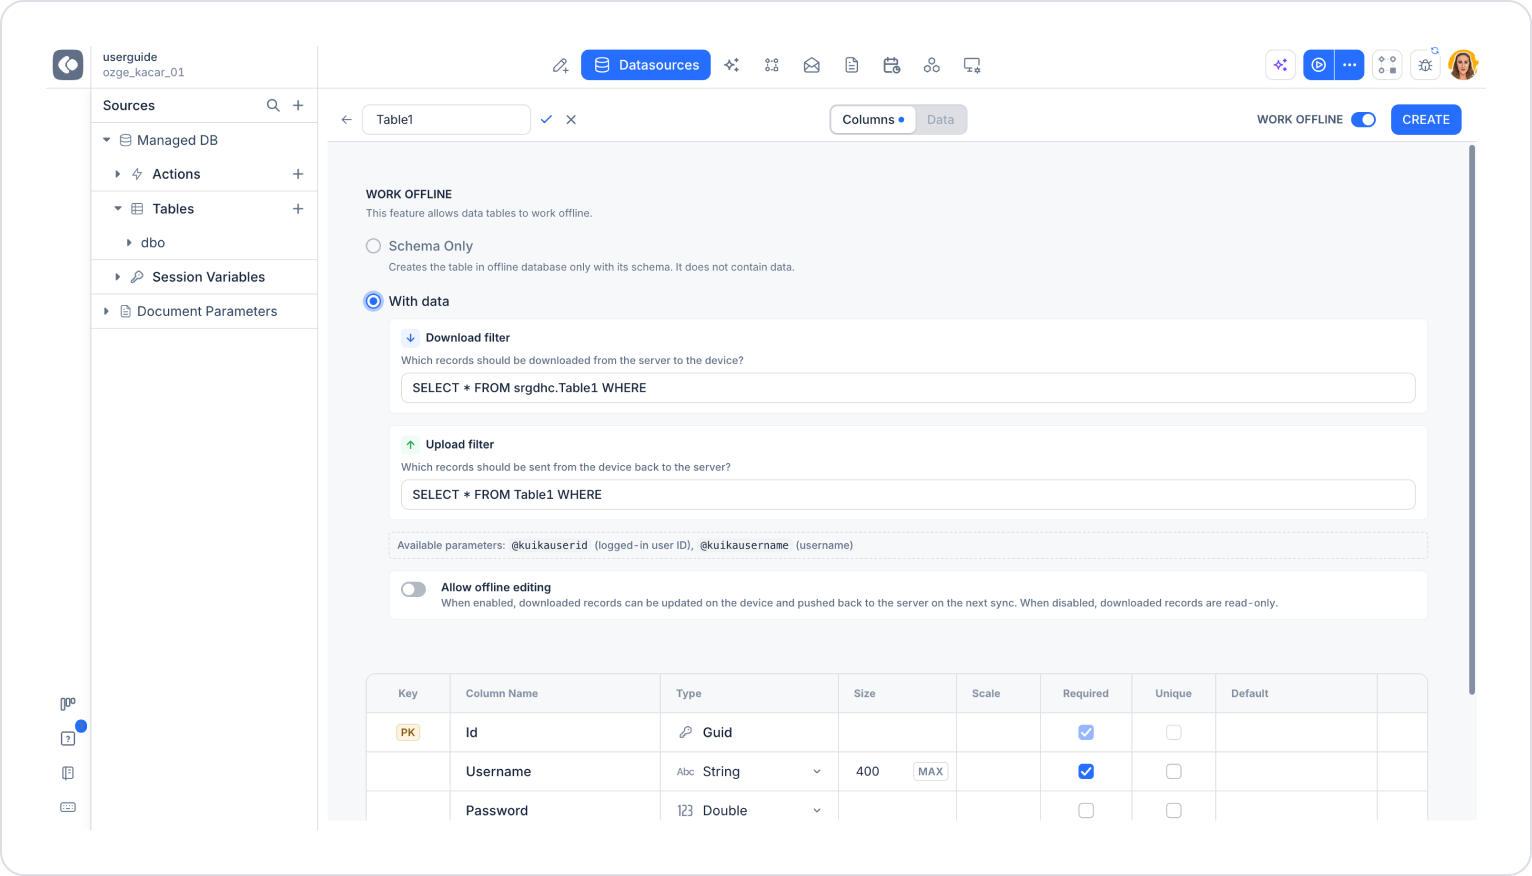
This option creates the table in the offline database with both its schema and data filtered according to the criteria you specify. When selected, the following settings appear:
Download filter: Specifies which records will be downloaded from the server to the device.
Upload filter: Specifies which records will be sent back from the device to the server.
Both fields are pre-populated with the SELECT * FROM [TableName] WHERE statement; you only need to complete the WHERE condition.
Example Download filter: SELECT * FROM Table1 WHERE UserId = @kuikauserid
Parameters available for use in filters:
@kuikauserid: The ID of the logged-in user
@kuikausername: The username of the logged-in user
Thanks to these filters, each user downloads only their own data offline.
Allow offline editing
This setting, located under the “With data” option:
When enabled: Downloaded records can be updated on the device and are sent to the server during the next synchronization.
When disabled: Downloaded records are read-only.
Step 3: Save the Table
After completing the settings, click the CREATE button.
Offline Workflow
The application launches.
The system checks for an internet connection.
If there is no connection:
The Default Offline Screen opens.
Offline tables are loaded from the local database.
If there is a connection:
The online data source is used.
Sample Scenario
Scenario: The user should be able to view and edit their own records offline.
Configuration:
UI Designer:
A list screen is created.
Role → Default Offline Screen is selected.
Data Sources:
WORK OFFLINE is enabled for the table.
With data is selected.
Download filter: SELECT * FROM Table1 WHERE UserId = @kuikauserid
Upload filter: SELECT * FROM Table1 WHERE UserId = @kuikauserid
If you want to allow offline editing of records, enable Allow offline editing.
Result:
The user views and edits their own data while offline.
When a connection is established, the changes are synchronized to the server.
Important Notes
The offline table must have a defined primary key. By default, every newly created table starts with an Id primary key column of type Guid; do not delete this column.
Large data sets should not be taken offline; narrow down the data downloaded via the “Download filter” as much as possible.
Actions that call online services do not work on the offline screen.