This tool allows you to determine the conditions and order of operations in a workflow. The purpose of the Gateway is to select and execute only one of multiple possible paths based on defined conditions. This allows the process to branch according to different scenarios.
Parameters defined in the parameter panel can be called and used in conditions using the Symbol Picker located under the “None” option. These variables can be of different data types, such as string, number, boolean, or datetime. The parameter selected via the Symbol Picker is evaluated using a comparison operator (e.g., equals, not equals, greater than, less than, contains) specified in the Select Box. If the condition is true, the output path associated with that condition is executed.
Multiple outputs can be defined on an Exclusive Gateway. One of these outputs must be designated as the default path using the “Will execute otherwise” option. This path is activated if none of the other conditions listed above are met. If, for example, ‘Yes’ is selected for this field, the first path checked in the workflow is evaluated as “No.” Ordering is important because the system evaluates conditions from top to bottom and does not check paths after the first true condition. Conditions can be reordered using drag-and-drop.
The order of condition truth directly affects process behavior. The most general condition should be placed at the bottom, and the most specific condition at the top. Otherwise, an unexpected path may run when all conditions are not met. It is recommended to add a condition to each exit path. However, at least one path must be set to “Will execute otherwise” so that the path the process will take when all conditions fail is clearly defined.
Used to branch the workflow in parallel when multiple conditions can be met simultaneously. Unlike the Exclusive Gateway, the Inclusive Gateway triggers all paths associated with the conditions if more than one condition is true at the same time.
Independent conditions can be defined for each output path. Conditions are created using variables located in the parameter panel via the Symbol Picker tool. During the evaluation process, the system examines all conditions independently of each other. Therefore, if multiple conditions return “true,” all of these paths are executed simultaneously.
At least one path on the Inclusive Gateway must be designated as “Will execute otherwise”. This option ensures that the process continues without interruption if none of the other defined conditions are met.
Inclusive Gateway provides flexible parallel execution in workflow scenarios. For example, in an order process, if both the “Update Invoice” and “Return Request” conditions are met at the same time, the system can start both processes simultaneously.
Create Inclusive Gateway enables business processes to branch dynamically based on conditions and start multiple processes at the same time.
This tool is the step where automatic tasks to be executed by the system on the Kuika platform are defined. It is typically used to model processes that do not require user interaction. For example, tasks such as making API calls, integrating with external services, updating system parameters, or preparing data in the background are performed in this step.
The Create Task step contains two main structures: Actions and Step Outputs. The Actions section is where the system actions that will be triggered when this step is executed are defined. Here, one or more previously defined actions can be executed in sequence. These actions can be, for example, a REST API call or sending data to a previously defined Custom Action and receiving a response.
The Step Outputs section is where the data obtained as a result of the action is mapped to parameters that will be used in the workflow. In this section, the “+SELECT WF PARAMS TO MAP” option is used to determine which variables the values returned by the action will be transferred to. This way, values obtained from external systems or calculated in the background can be used in the workflow for conditions, notifications, or other tasks.
This task type does not display any forms or notifications to the user. It manages processes that occur entirely in the background. When properly positioned, it automates the workflow and eliminates the need for manual intervention. Each Create Task step can be configured not only to perform a single action but also to execute multiple automated steps in sequence.
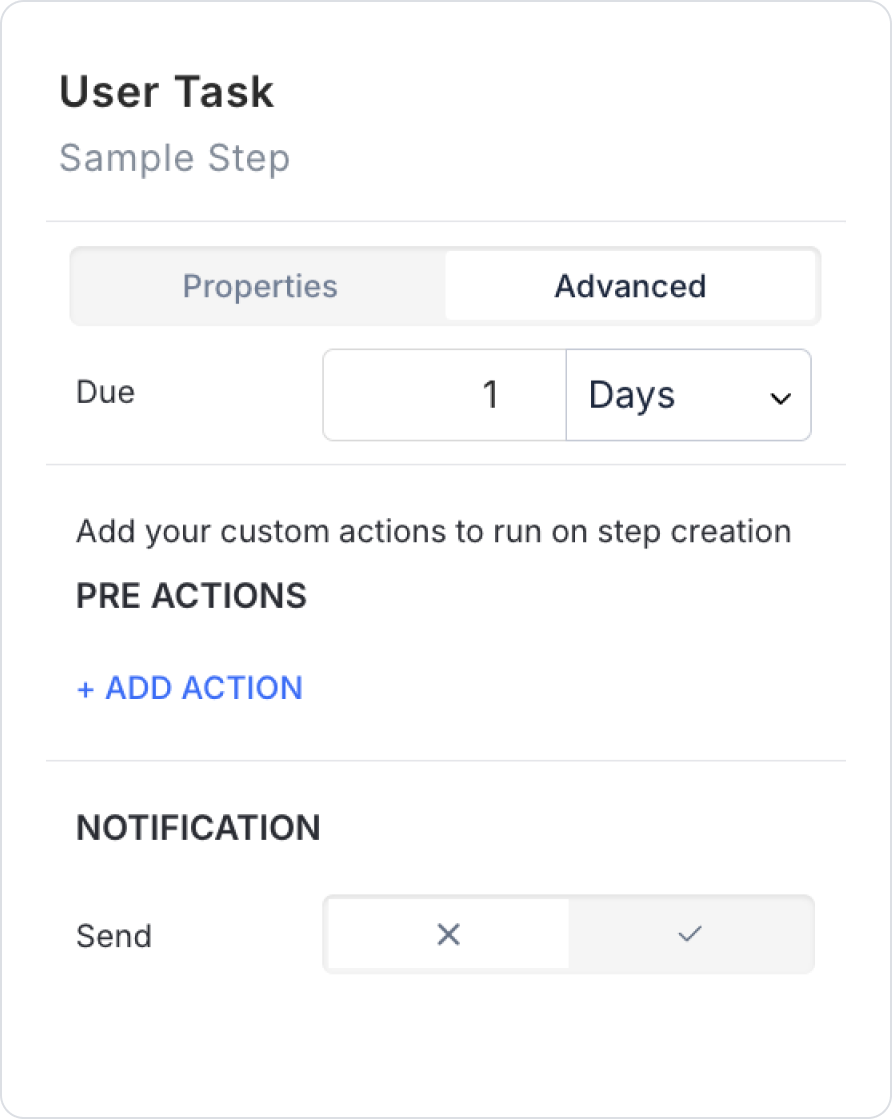
This tool is used to identify tasks in the workflow that require manual data entry and approval from the user. It is used in situations where the user needs to perform a specific action, enter data, fill out a form, or make a decision. The process does not proceed to the next step until the user completes the assigned task. Therefore, User Task steps function as critical decision points or data collection areas in the process.
Create User Task offers flexible configuration options for designing interactive processes with users in the system. This step can be associated with a form to collect data from the user and can be customized with various fields such as user-specific assignments, notifications, descriptions, deadlines, and buttons.
Properties Panel:
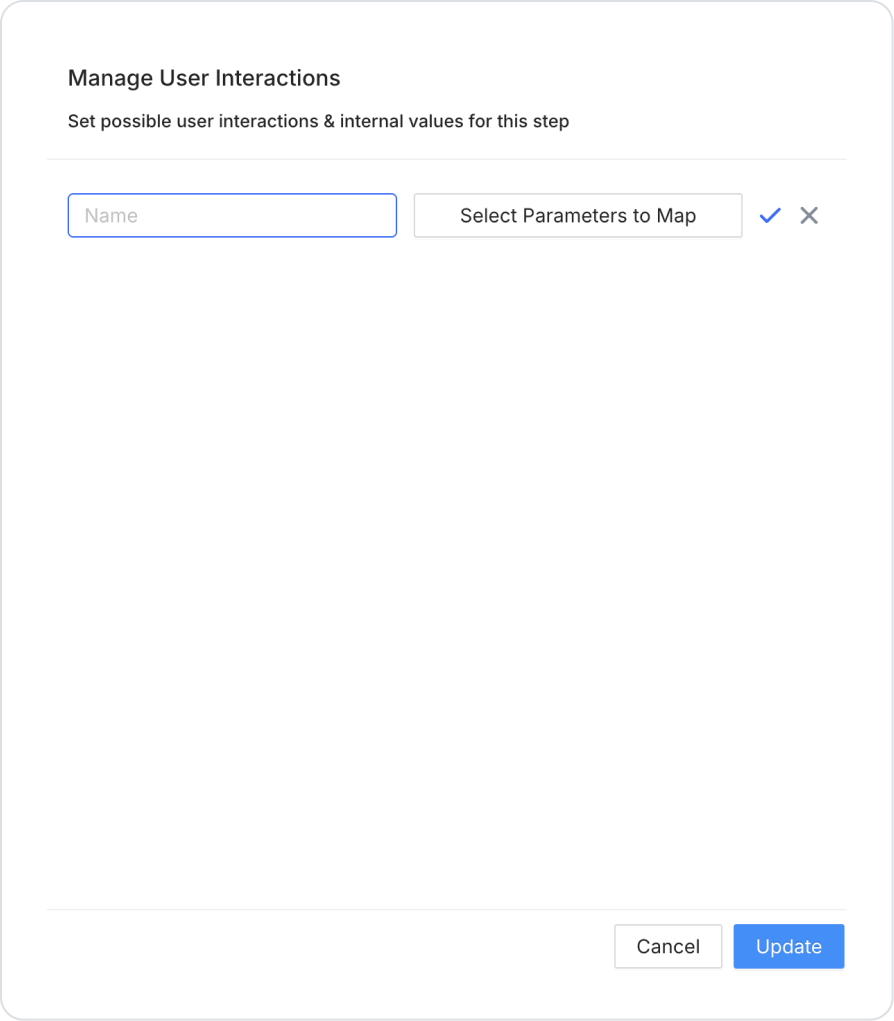
The User Interaction element is used to define steps in a workflow that require human interaction, such as direct feedback from the user, form filling, decision making, or entering specific data. This step separates the business process from system actions and makes user input mandatory.
Usage Scenarios
Technical Specifications
Interaction Flow
Monitoring and Reporting
Tips and Best Practices
Advanced Use: Form Integration
The form linked to the User Interaction step supports the following features:
Advanced Panel:
Multi-Instance Configuration (PMI / SMI)
Multi-Instance settings are configured in the Multi-Instance Configuration panel under the Advanced tab when the step is selected. This structure applies to both Parallel Multi-Instance (PMI) and Sequential Multi-Instance (SMI).
Instance Generation
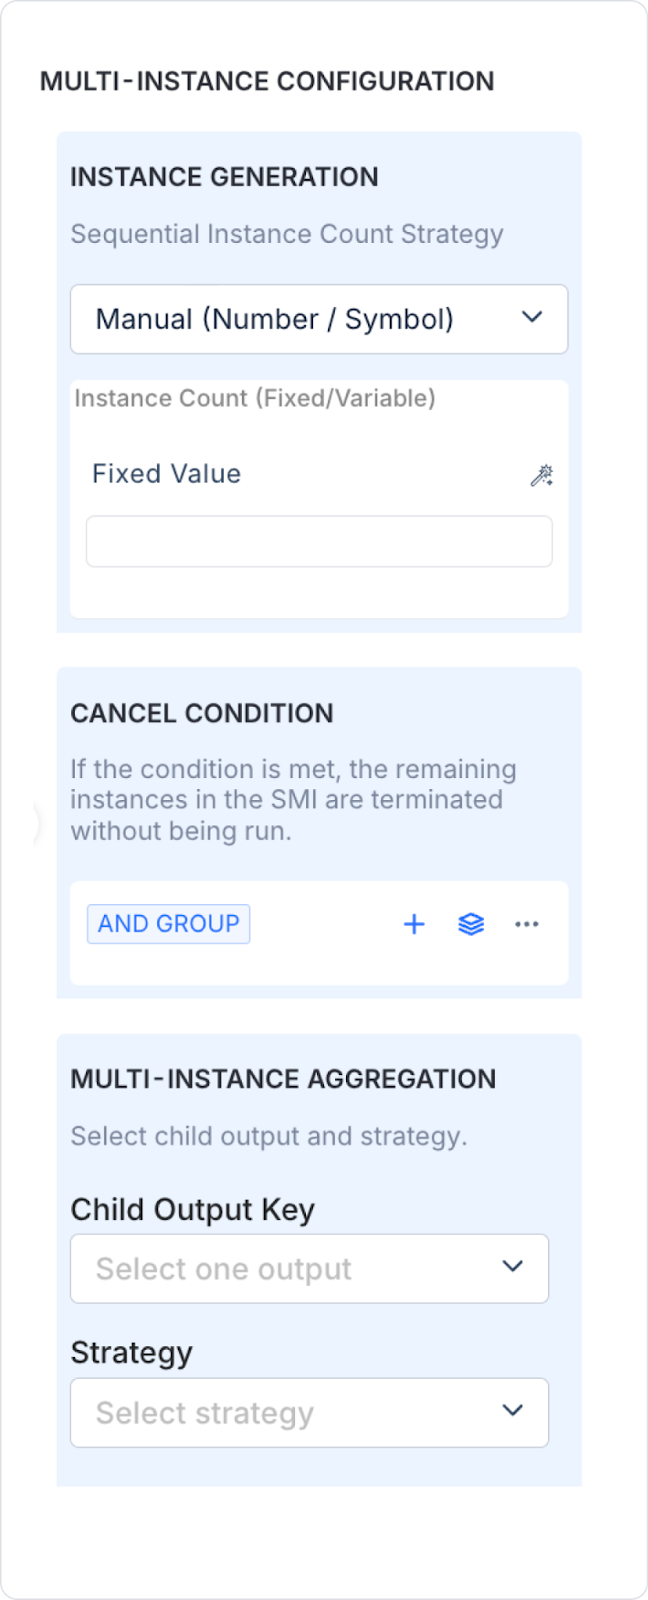
Sequential Instance Count Strategy (SMI)
When the Sequential structure is selected, the instance generation method is determined in the Instance Generation field.
Manual (Number / Symbol)
The instance count is determined manually.
Located in the subfield:
Instance Count (Fixed/Variable)
The number of instances entered is created and run sequentially.
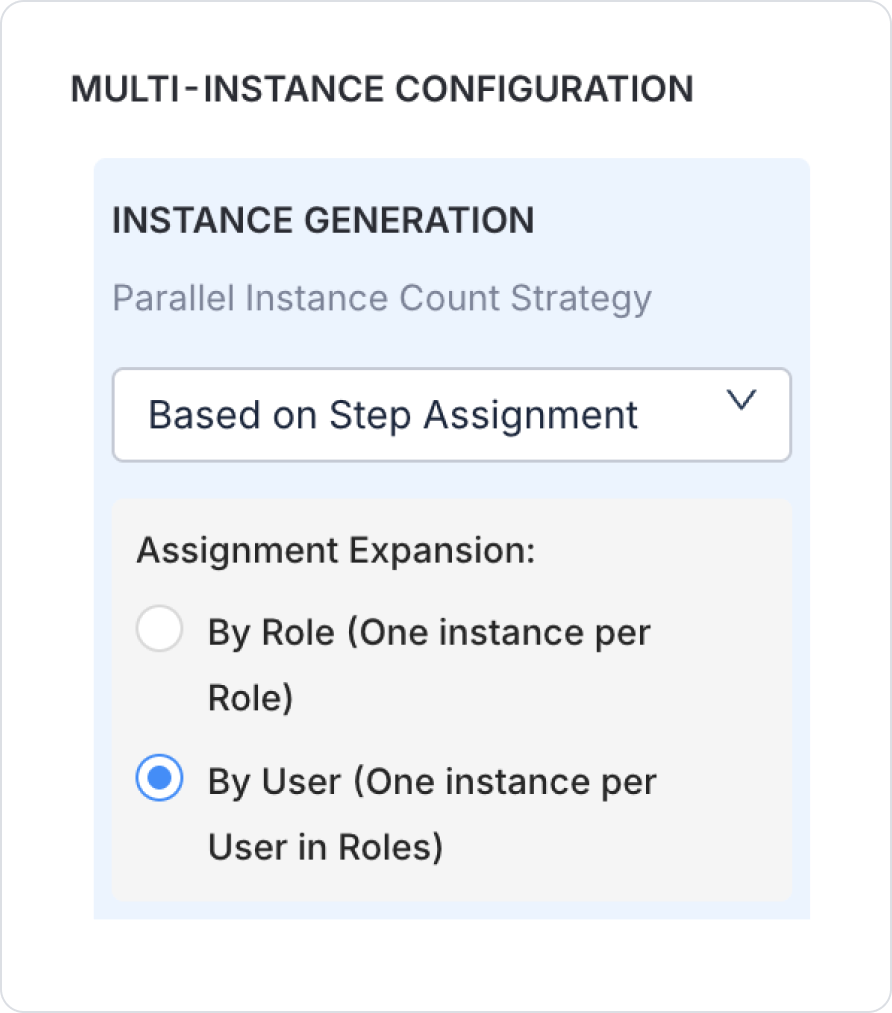
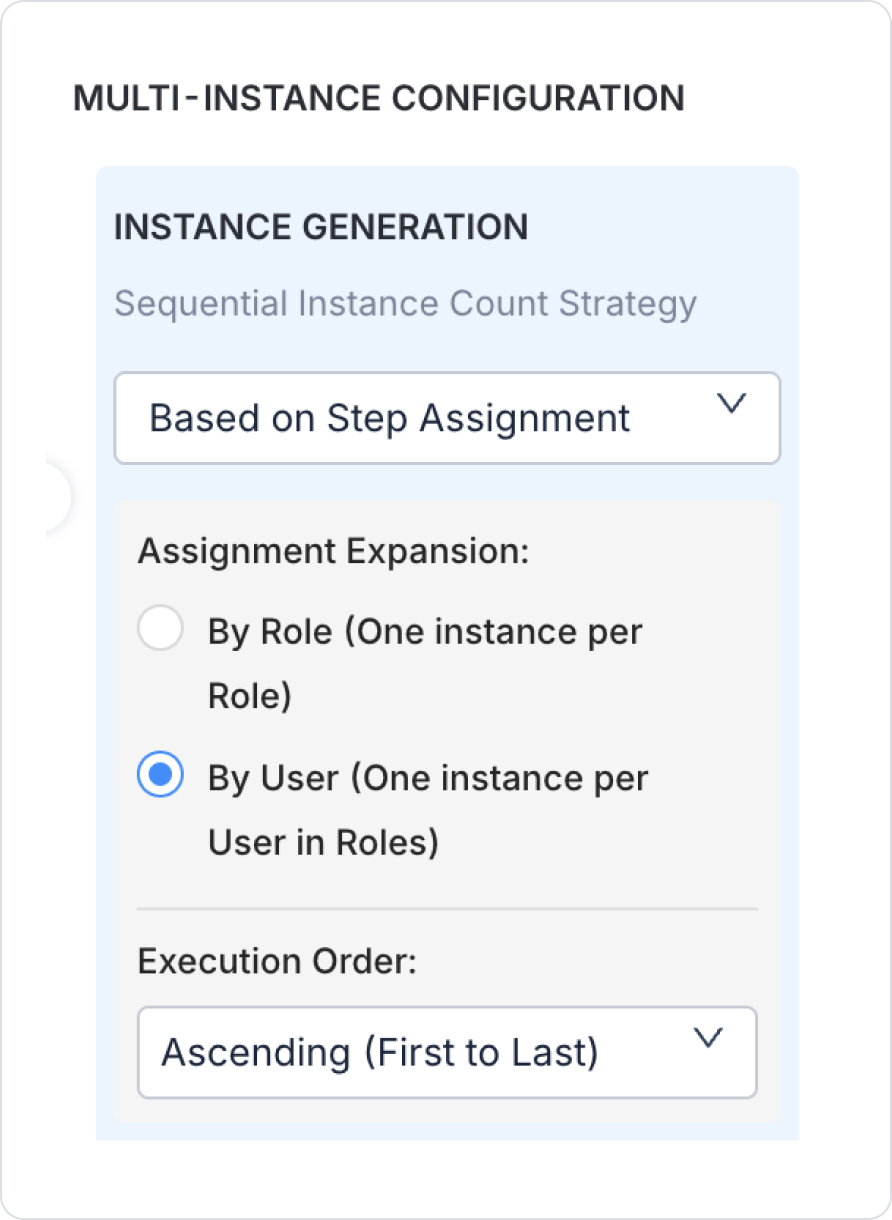
Based on Step Assignment
The number of instances is determined according to the Assignment type of the step.
If the Assignment type is Role or Dynamic, instance generation is performed according to this configuration.
Instance generation logic:
If Dynamic Assignment is used:
Execution Order (SMI)
In a Sequential structure, the processing order of instances can be determined:
Instances are created and executed sequentially according to the selected order.
Cancel Condition (SMI)
Can be used in Sequential Multi-Instance steps.
When the defined condition is met, any remaining instances that have not yet been executed are not created, and the process is terminated.
Conditions are defined using the AND GROUP structure.
Multi-Instance Aggregation
The method for combining the results returned from Child Instances is defined in this section.
Child Output Key
The child output field to be included in the aggregation is selected.
Strategy
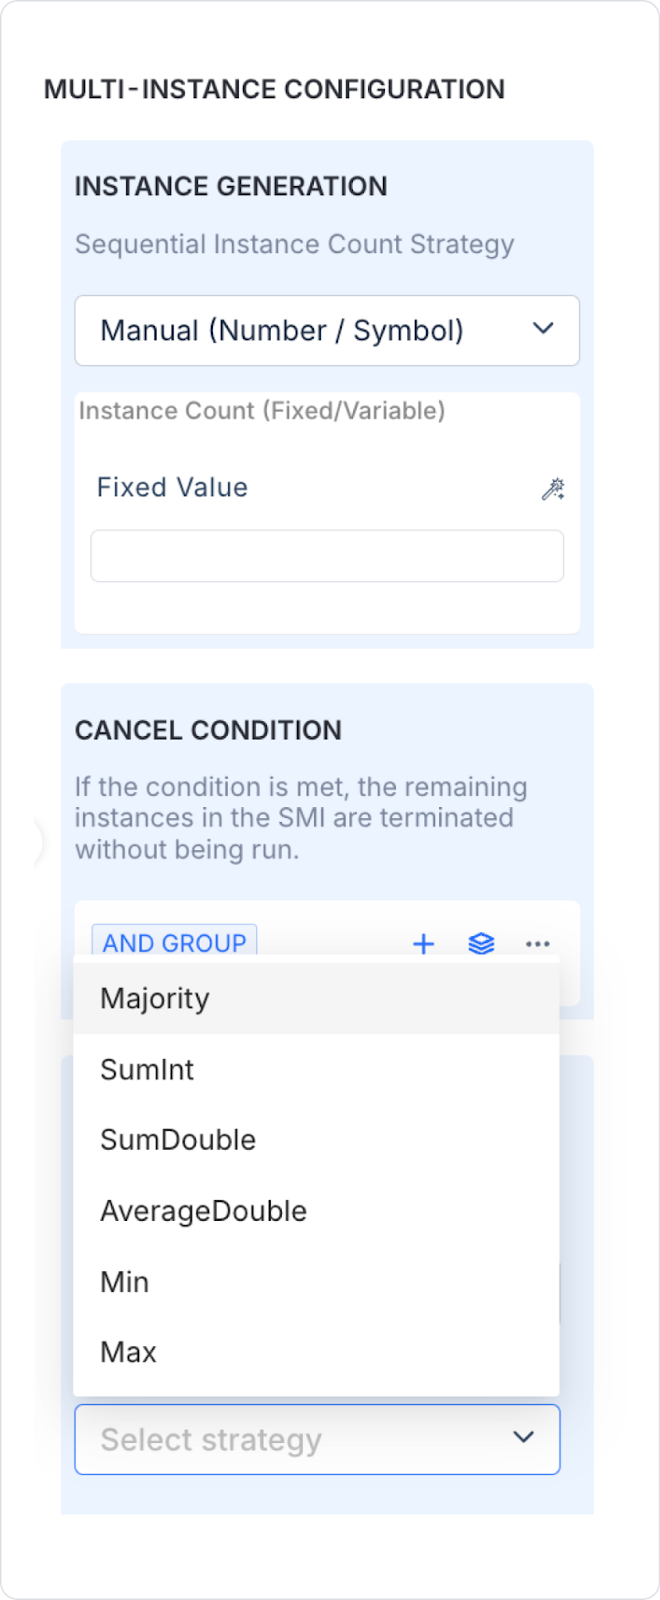
Supported strategies:
Depending on the selected strategy, child results are combined into a single output and transferred to the parent flow.
Parallel Multi-Instance (PMI)
When the Parallel structure is selected: