The remaining area contains 1 Row and 1 Table element.
There are two columns in Row.
The first column contains Bar Chart and Donut Chart chart elements, and the second column contains a table.
Card and List
There is a ready Header structure.
The remaining area contains 1 Row and 1 Table element.
The Row element has the structure of a single column.
Two Col
There is a ready-made Header structure.
The remaining field consists of two columns.
The first column contains a Table element, while the second column contains two Rows.
The first Row contains a Bar Chart.
The Donut Chart is located on the second row.
Three Columns
There is a ready Header structure.
The remaining area contains 1 Row and 1 Table element.
There are three columns in Row.
Marketing Dashboard
There is a ready-made Header structure.
The remaining area contains various graphical and tabular elements to visualize marketing data. Components such as Bar Charts, Line Charts and KPI Cards are often used.
Marketing Dashboard with Left Menu
There is a ready-made Header structure and a menu on the left side.
The menu provides quick access to different marketing metrics. The main area includes a layout suitable for analyzing marketing performance with graphs, metric cards and tables.
Sales Dashboard
There is a ready-made Header structure.
The remaining area consists of components such as Bar Chart, Line Chart, Donut Chart and sales charts to analyze sales data. Includes indicators such as sales performance, product trends and revenue tracking.
Sales Dashboard with Left Menu
There is a ready-made Header structure and a menu on the left side.
The menu provides access to different sales metrics and reports. The main area is enriched with tables, graphs and KPI cards for sales analysis.
Screen Creation
Specify a Screen Name for the screen to be created.
After making all the settings, you can create the screen by clicking the CREATE button.
These templates are ideal for user-friendly and organized data visualization, allowing you to easily create flexible screen structures for various needs.
Form Templates
Single Column
The form structure is a single column.
Two Columns
The form structure consists of two columns.
Image Gallery
The form structure consists of two columns.
The second column contains the Image element.
Location Picker
The form structure consists of two columns.
The second column contains the Maps element.
Screen Creation
Specify a Screen Name for the screen to be created.
After making all settings, create the screen by clicking the CREATE button.
List Templates
Two Columns
The form structure consists of two columns.
The first column contains the table element.
Detailed
Form structure consists of Table and Select Box elements.
Detailed and Search
Form structure consists of Table and Select Box elements.
Detailed with Location Picker
The form structure consists of table and Maps elements.
Screen Creation
Specify a Screen Name for the screen to be created.
After making all the settings, click the CREATE button to create the screen.
These templates help you quickly create functionality such as listings and searches and offer different layout options.
Authentication Templates
Kuika offers various Authentication screen templates to speed up the application development process. These templates facilitate common authentication processes such as user login, registration, password reset and verification processes. You can use and edit these templates according to the needs of the application you are developing.Adding a Template Authentication ScreenYou can follow the steps below to add and edit the Authentication screen template in your app:
Open the Screens panel.
In the Screens panel, click the +New Screen icon.
In the pop-up window that opens, click Authentication in the left menu.
Authentication Screen Templates Authentication screen templates are available in different types. You can choose the one that suits your application's needs and make the necessary edits. Each template comes with default text contents, but these contents can be updated specifically for your application.
1. Progressive User
Provides a ready-made template with a list of users.
2. Reset Password
Provides ready-made templates to enable users to reset their passwords.
3. Sign In
Provides a ready-made Sign In screen template for users to log in.
4. Sign Up
Provides a ready-made Sign Up screen template where users can register.
5. User Template
Provides a template from which the required information can be extracted from the user.
6. Verification Code
Allows to receive a verification code in Reset Password operation.
Screen Creation
Screen Name: Set a name for the screen you are creating.
After making all settings, create the screen by clicking the CREATE button.
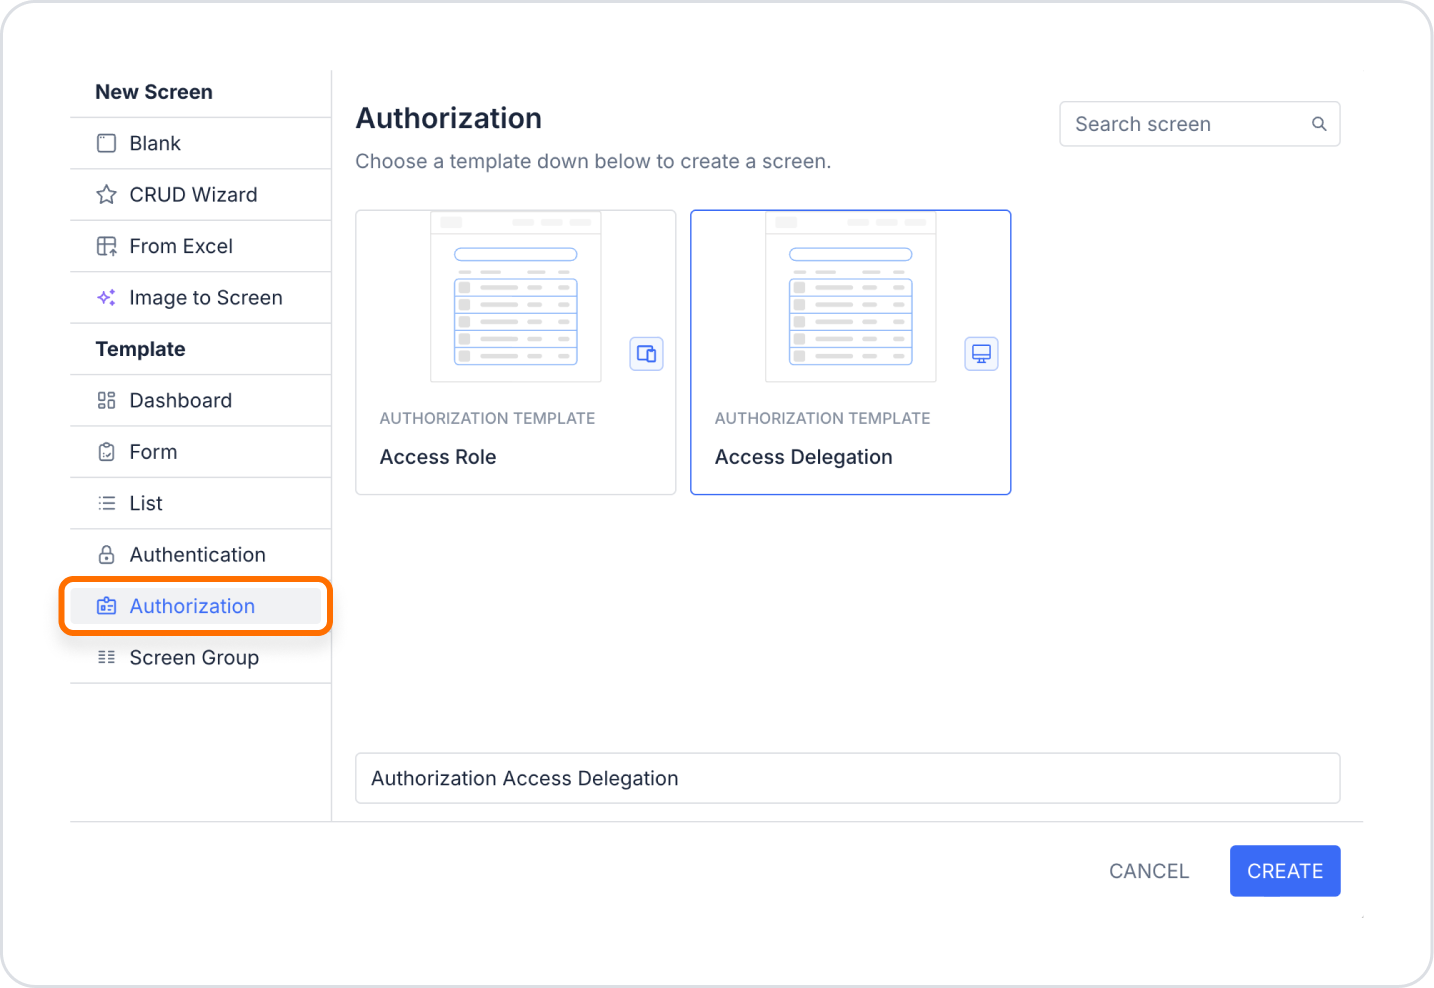
Authorization Templates
Access Role: Used to define specific access permissions for users. You can define different access roles in accordance with the security requirements of your application.
Access Delegation: Allows a user's roles to be temporarily delegated to another user within a defined time range. This template enables the automatic generation of screens related to the delegation system, such as listing, adding, editing delegations, and logging in with delegated access.
Screen Group Templates
Grid Card with Search
It is a template with grid card structure and search function.
Personal Grid Card with Search
It is a template with Personal Grid Card structure and search function.
Screen Creation
Screen Name: Set a name for the screen you are creating.
After making all the settings, click the CREATE button to create the screen.