Configure Your Application Using the Platform Tabs
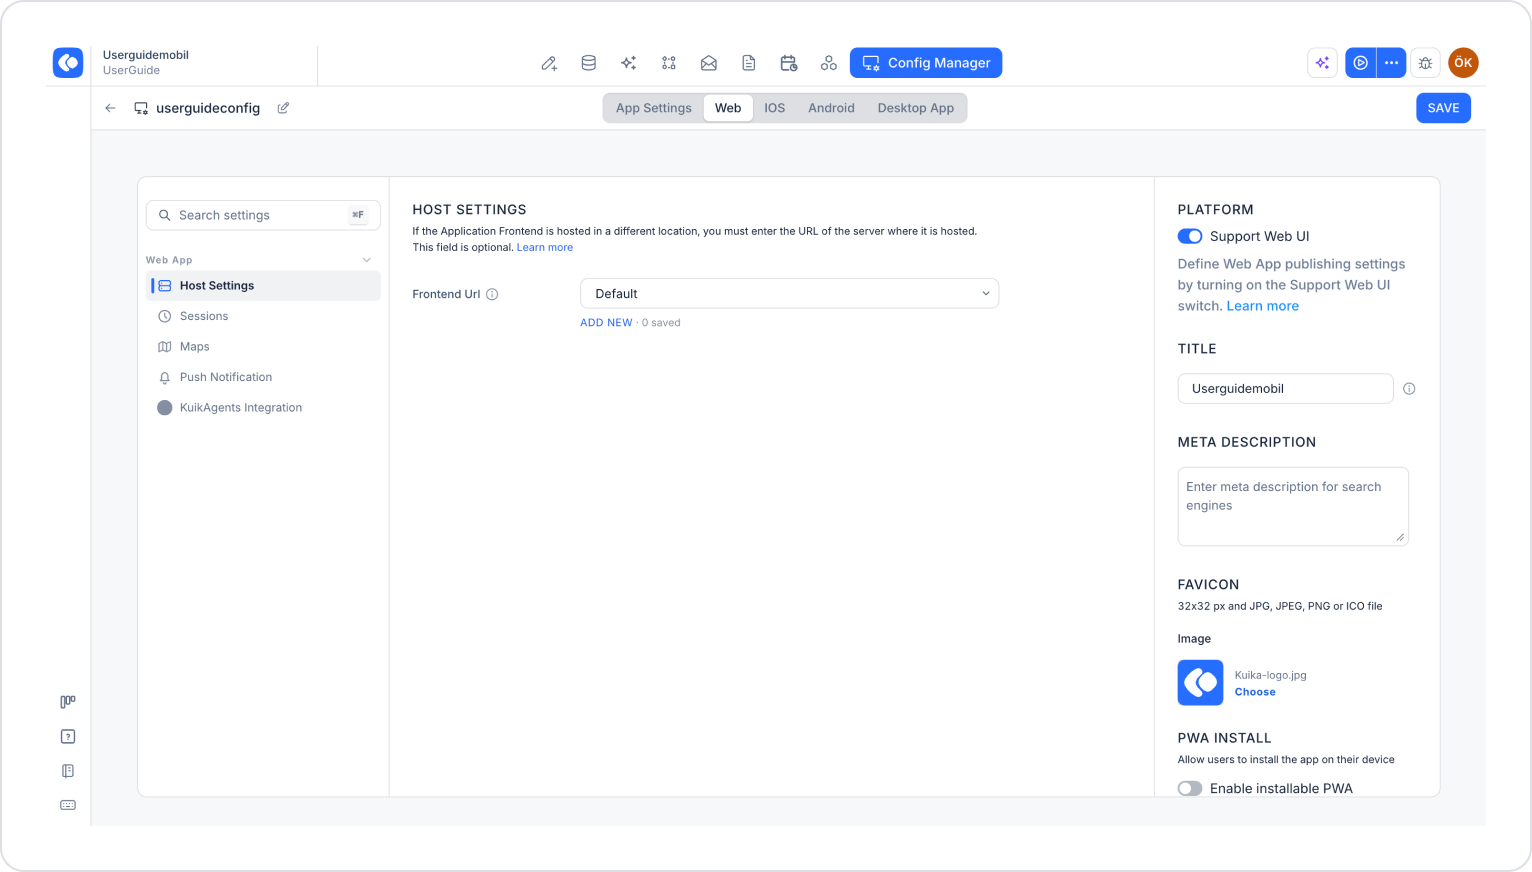
Configure Your Web Applications
Create a configuration in the Config Manager module or open an existing configuration.
Click the Web tab at the top.
In the Platform section of the right panel, make sure the Support Web UI option is enabled.
Configure the settings under the WEB APP heading in the left menu:
Host Settings: If the application’s frontend is hosted at a different location, you can enter the URL of the hosting server in the Frontend URL field. This field is optional.
Sessions: Allows you to set the session timeout duration for your application’s end users.
Maps: If your web app uses maps, you can configure the map settings and enter the necessary information for the map.
Push Notifications: Contains the settings required to use push notifications in your web app.
KuikAgents Integration: Contains the integration settings for your web app with KuikAgents.
Configure the following fields in the right panel:
Title: The title displayed in the browser tab for the app.
Meta Description: The description used in SEO and social media previews.
Favicon: The app icon displayed in the browser tab and bookmarks. You can upload a JPG, JPEG, PNG, or ICO file with a size of 32x32 px.
PWA Install: When the Enable installable PWA option is enabled, users can install the app on their devices as a Progressive Web App.
Click the Save button to save your settings.
Configure Your iOS Apps
Create a configuration or open an existing one in the Config Manager module.
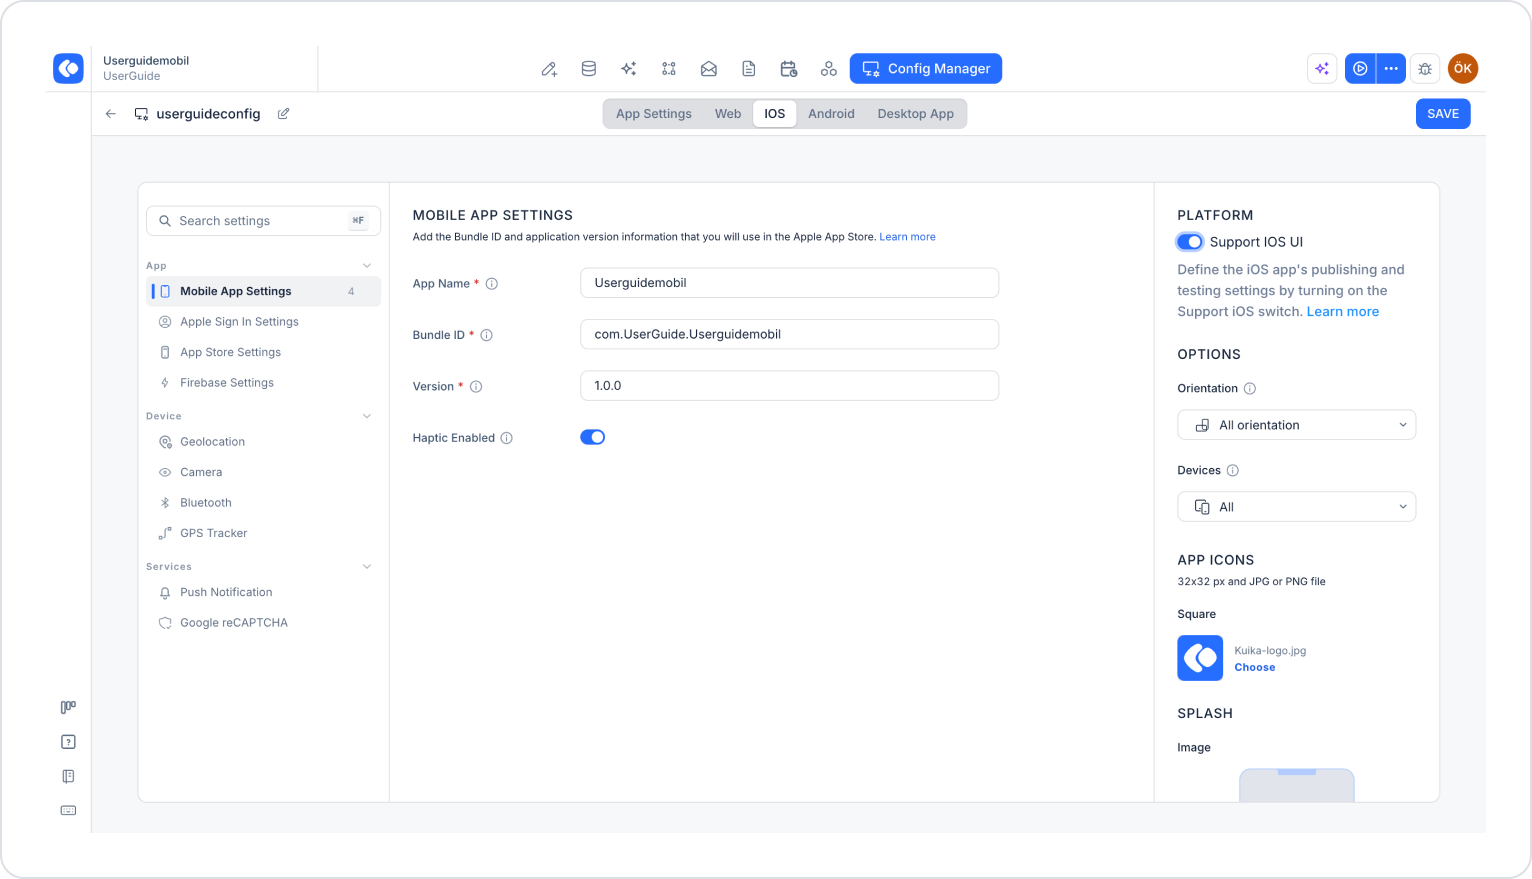
Click the iOS tab at the top.
In the Platform section of the right panel, enable the Support iOS UI option.
Configure the settings in the left menu:
APP
Mobile App Settings: This is where you enter the app name (App Name), Bundle ID, and app version (Version) you’ll use in the Apple App Store. You can enable haptic feedback in the app using the Haptic Enabled option.
Apple Sign In Settings: Contains the settings required to allow users to sign in with Apple accounts in your app.
App Store Settings: Contains the settings required to connect your app to the App Store.
Firebase Settings: Allows you to integrate the services and features offered by the Firebase platform into your app.
DEVICE
Geolocation: You can define the location permission to be used in your app.
Camera: You can define the camera permission text to be displayed to end users.
Bluetooth: You can define the Bluetooth permission text to be displayed to end users.
GPS Tracker: You can configure the settings for the GPS tracking feature used in your app.
SERVICES
Push Notification: You can define the permission text to be displayed to end users for sending push notifications.
Google reCAPTCHA: Contains the reCAPTCHA settings to be used in your iOS app.
Edit the following fields in the right panel:
Options
Orientation: Sets the app’s screen orientation. The options “All orientations,” “Landscape,” and “Portrait” are available.
Devices: Specifies the device types on which the app will run. The options “All,” “Phones,” and “Tablets” are available.
App Icons: This is the app’s main icon image. You can upload a JPG or PNG file that is 32x32 px in size.
Splash
Image: This is the image that will be displayed when the app opens.
Fitting: Determines how the image used on the splash screen will be adjusted to fit the screen size. The “Default” and “Stretch” options are available.
Color: This is the background color to be used on the splash screen.
Click the Save button to save your settings.
Configure Your Android Apps
The Kuika platform has been made compatible with Android 16. Additionally, Android apps must now meet the 16 KB page size requirement.
Create a configuration or open an existing one in the Config Manager module.
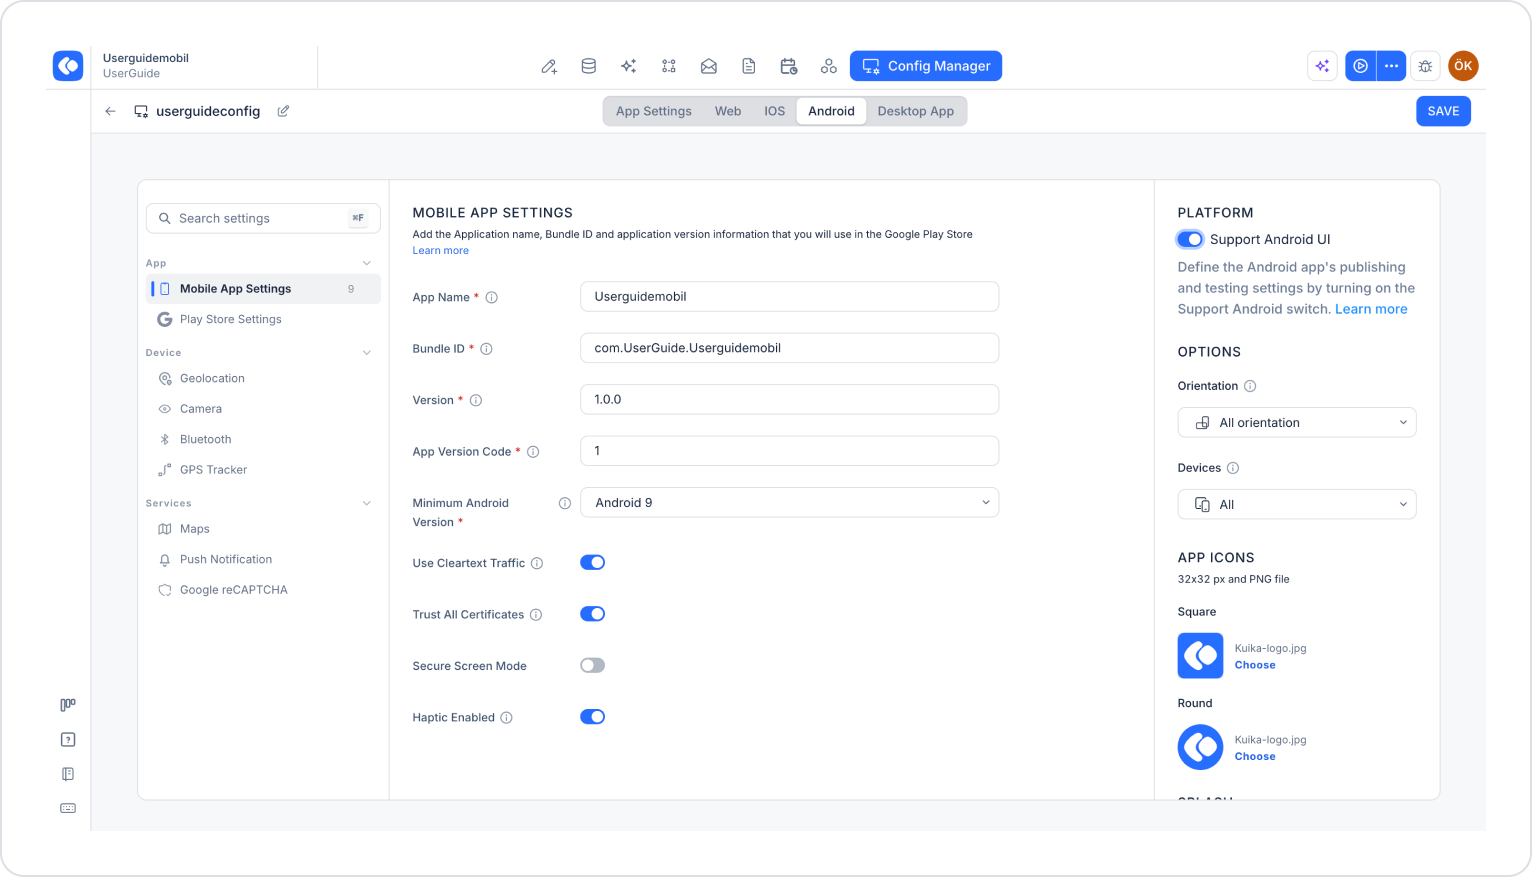
Click the Android tab at the top.
In the Platform section of the right panel, enable the Support Android UI option.
Configure the settings in the left menu:
APP
Mobile App Settings: This is where you enter the information about the app you’ll use on the Google Play Store:
App Name: The name of the app.
Bundle ID: The app’s unique bundle ID.
Version: The app’s version number (e.g., 1.0.0).
App Version Code: The numerical version code that must be incremented with each new release.
Minimum Android Version: The lowest Android version supported by the app.
Use Cleartext Traffic: Determines whether the app allows unencrypted (HTTP) traffic.
Trust All Certificates: Determines whether the app trusts all SSL certificates.
Secure Screen Mode: When enabled, prevents screenshots from being taken and saved of the app’s screens.
Haptic Enabled: Enables haptic feedback in the app.
Play Store Settings: Contains the settings required to connect your app to the Play Store.
DEVICE
Geolocation: You can define the location permission to be used in your app.
Camera: You can define the camera permission text to be displayed to end users.
Bluetooth: You can define the Bluetooth permission text to be displayed to end users.
GPS Tracker: You can configure the settings for the GPS tracking feature used in your app.
SERVICES
Maps: If your Android app uses maps, you can configure the map settings and enter the necessary information.
Push Notification: You can define the permission text to be displayed to end users for sending push notifications.
Google reCAPTCHA: Contains the reCAPTCHA settings to be used in your Android app.
Edit the following fields in the right panel:
Options
Orientation: Determines the app’s screen orientation. The options “All orientations,” “Landscape,” and “Portrait” are available.
Devices: Determines the device types on which the app will run. The options “All,” “Phones,” and “Tablets” are available.
App Icons: Uploaded as a 32x32 px PNG file. You can define two icons: Square and Round.
Splash
Image: The image displayed when the app launches.
Fitting: Determines how the image used on the splash screen will be scaled to fit the screen size. The “Default” and “Stretch” options are available.
Color: This is the background color to be used on the splash screen.
Click the Save button to save your settings.
Configure Your Desktop Apps
Create a configuration or open an existing one in the Config Manager module.
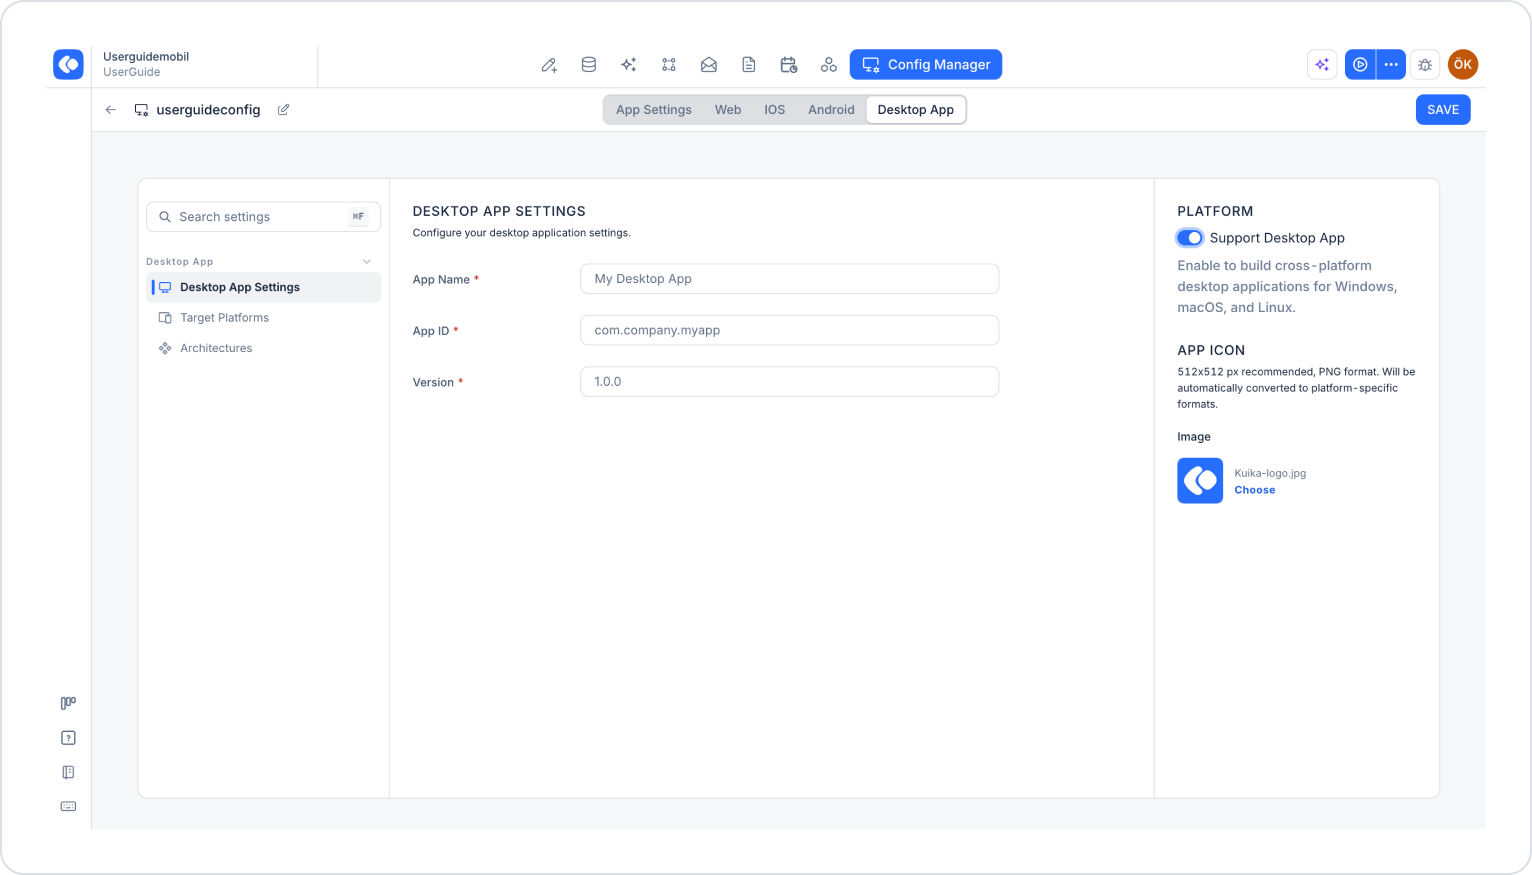
Click the Desktop App tab at the top.
In the Platform section of the right panel, enable the Support Desktop App option. This option allows you to build cross-platform desktop applications for Windows, macOS, and Linux.
Configure the settings under the DESKTOP APP heading in the left menu:
Desktop App Settings: This is where you enter the application name (App Name), application ID (App ID, e.g., com.company.myapp), and version (Version) for your desktop application.
Target Platforms: This allows you to specify which operating systems the app will be compiled for. Windows, macOS, and Linux options are available.
Architectures: This allows you to specify the processor architecture on which the app will run. x64 (Intel/AMD 64-bit) and arm64 (ARM 64-bit) options are available.
Upload the main icon image to be used in your desktop application from the App Icon field in the right panel. It is recommended to upload an image that is 512x512 px in size and in PNG format. The uploaded icon is automatically converted to formats suitable for the target platforms.