You can test Android applications developed in Kuika with AndroidStudio. Android Studio must be installed on your computer for the testing process. You can review the guide provided by Android to install Android Studio on your computer.
For a successful test process, you can test your Android application by following the steps below and publish it on Google Play Store.
Kuika Config Manager (Configuration) Settings.
Exporting the Android Application Developed in Kuika.
Opening and Testing the Android Application Developed in Kuika with Android Studio.
You can make the configuration settings required for testing and publishing the application you are developing in Kuika to Google Play Store with Config Manager view mode.
You can create a new configuration and/or edit an existing configuration to test it in Android Studio. Open the Android configuration settings from the configuration settings you just created and/or the configuration settings you want to edit.
You can review our related content on how to make configuration settings.
To perform the test with Android Studio, click on the drop-down menu opposite Configuration under the Play Store Settings section in the Android configuration settings.
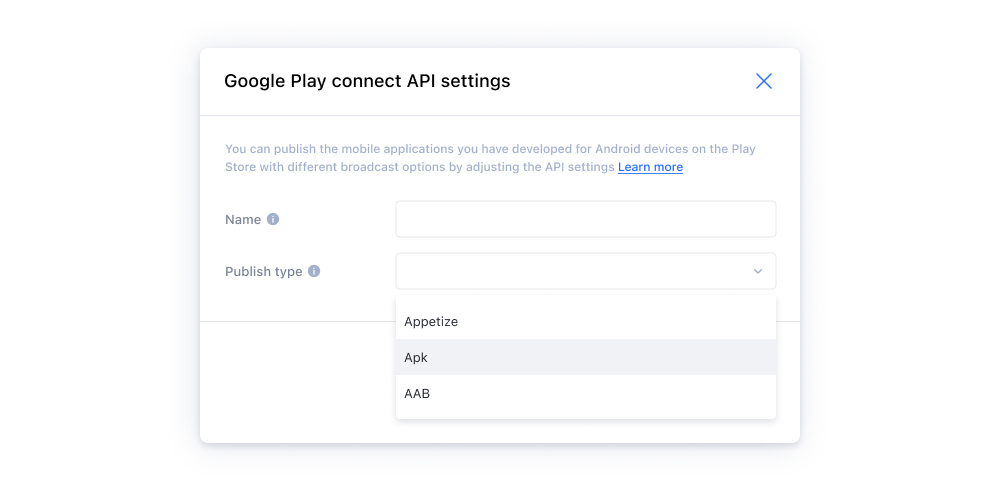
Open the modal screen where information entry is provided by clicking ADDNEW in the menu that opens.
On the modal screen, first enter the Play Store Connect API configuration setting name.
Then select APK from the drop-down menu opposite the Publish Type heading.
Then click the CREATE button to return to the previous screen. To save the configuration, click the SAVE/UPDATE button in the upper right corner.
Completed the relevant settings in Config Manager view mode.
2. Exporting the Android Application Developed in Kuika.
The next step to test the Android application you developed with Kuika through Android Studio is to export the project.
To export the project, first click on the Rocket icon in the Header in the platform interface.
Select the configuration setting you want to use in the application via the drop-down menu in the Content Menu. Then select Android via the Radio Button next to the Android option.
Finally, export your application by clicking the Download Source Code button.
3.Opening and Testing the Android Application Developed in Kuika with Android Studio.
Export the compressed (.rar) file titled AndroidProjectTemplate that you exported in the previous step to an external folder.
Then open AndroidStudio.
On the screen that opens in Android Studio, you can see and open the related project in the Projects tab.
If you cannot see it, you can open the related project by clicking the Open button.
While in the project you have opened, start the test process in the Emulator by clicking the green play button on the top bar.
You can also test your application using a physical Android device through Android Studio.
You can use the Running Devices menu on the top bar for this process.
If you want to test with your own mobile device, connect your device to the computer via USB cable.
The relevant device will be listed in the Running Devices menu. At this point, you can select the test device and start the test process.
You can run the same process for the device connected to the computer via WI-FI.
Make sure that the device with Android Studio and the test device are on the same WI-FI network.
Click Pair Devices Using WI-FI in the Running Devices menu.
Then you can use one of the QR or Pairing Code options on the screen that opens.
To ensure the connection with QR, follow Settings → Developer Options → Wireless Debugging → Pairing Using QR Code on the Android test device. Complete the process using the notifications received on the physi
In some cases (device-related), the QR Code connection option may not work.
At this point, to ensure the connection with Pairing Code, go to Settings -> Developer Options -> Wireless Debugging -> Pair Device with Pairing Code on the Android test device.
Complete the process using the notifications received on the physical device with these operations.