Correct Image Perspective is an action that automatically detects an object in a blister pack or product photo (using ML Kit Subject Segmentation), identifies the corners of the rectangle through contour analysis, and applies perspective correction (warp) to transform it into a flat, top-down view.
This action, packaged on the Android side based on a PoC, works as follows: the user takes a single photo with the camera; the captured image is sent to the action in Base64 format; and the action returns the perspective-corrected image, again in Base64 format. Since the returned value is a raw Base64 string, the user decides how to use this output. For example, they can bind it to an Image element, save it, or pass it to another processing step.
Technical Specifications
Automatic Object Detection: The object within the image is automatically identified using ML Kit Subject Segmentation.
Contour Analysis: The corners of the detected object’s bounding box are determined via contour analysis.
Perspective Correction (Warp): The image is flattened using the corner coordinates to obtain a bird’s-eye view.
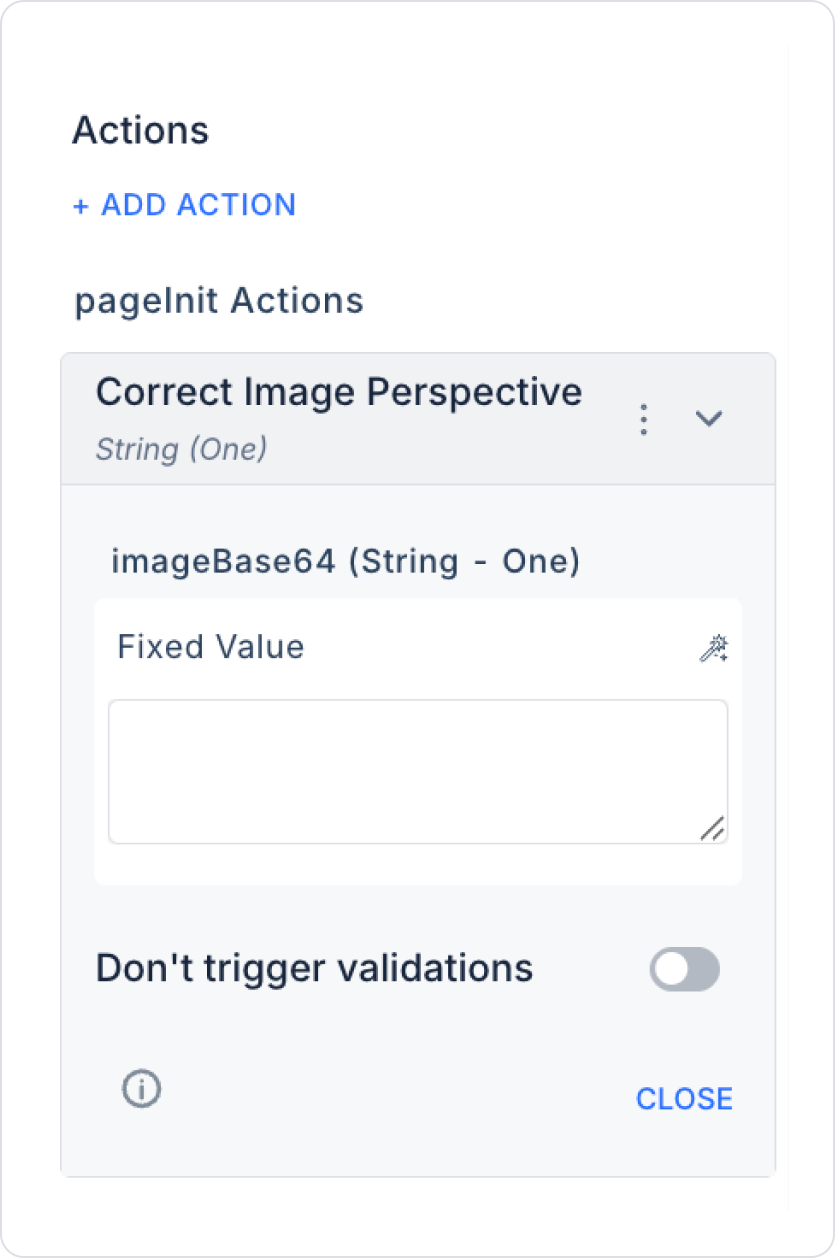
Base64 Input: The action receives the image via the `imageBase64 (String)` parameter.
String Return: The perspective-corrected bitmap is returned as a Base64-encoded String (One) and can be displayed in an ImageBox component.
Mobile Compatibility: Since it requires ML Kit and camera access, it works only in mobile apps.
Steps to Implement the Correct Image Perspective Action
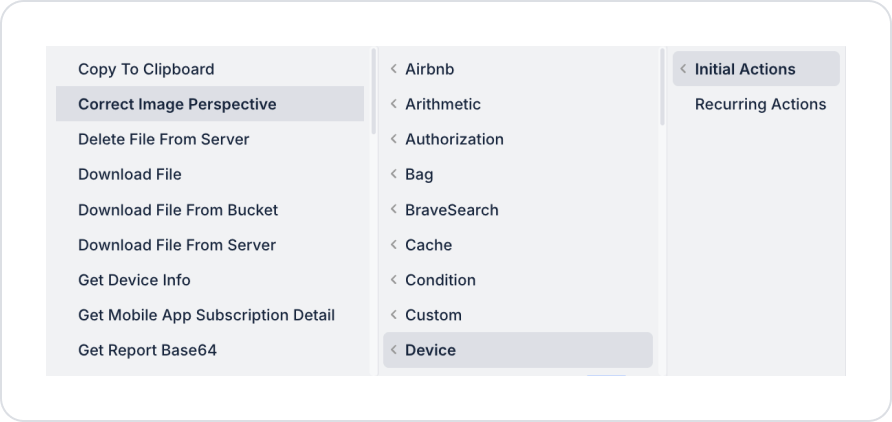
Log in to the Kuika platform and open your project.
Switch to the UI Design module.
Select the element where you want to initiate the perspective correction process.
Click the + ADD ACTION menu in the Properties panel.
Select the trigger event from the dropdown menu (Initial Actions or Recurring Actions).
Select the Device category from the middle column.
Click the Correct Image Perspective option from the action list.
Action Parameters
imageBase64 (String): The Base64-encoded data of the image to which perspective correction will be applied. Typically, a photo taken by the camera is linked to this parameter. Data can primarily be transferred to this field from data sources such as Action Result. Additionally, different sources such as Method Input, Current, Screen Input, Fixed, or Component can be used. These categories can be defined by selecting them via the Symbol Picker.
Advanced Settings
Don't Trigger Validations: When enabled, validation rules on the page are not triggered while the action is running. This is used in scenarios where the perspective correction process must operate independently of the validation process.
Return Value
The Correct Image Perspective action returns a Base64-encoded image of type String (One) upon completion. What to do with the returned value is left to the user; for example, it can be bound to an Image element via the Action Result source or passed to a different processing step.
Usage Scenario: Obtaining a Corrected Image from a Blister Photo
Scenario: The user takes a photo of a blister package in a medication tracking app; the action automatically detects the object, corrects the perspective, and displays the flat, top-view image on the screen.
An image source action must be triggered before the Correct Image Perspective action is called. The image must be obtained via the Photo Take or Photos From Gallery action and passed to the imageBase64 parameter.
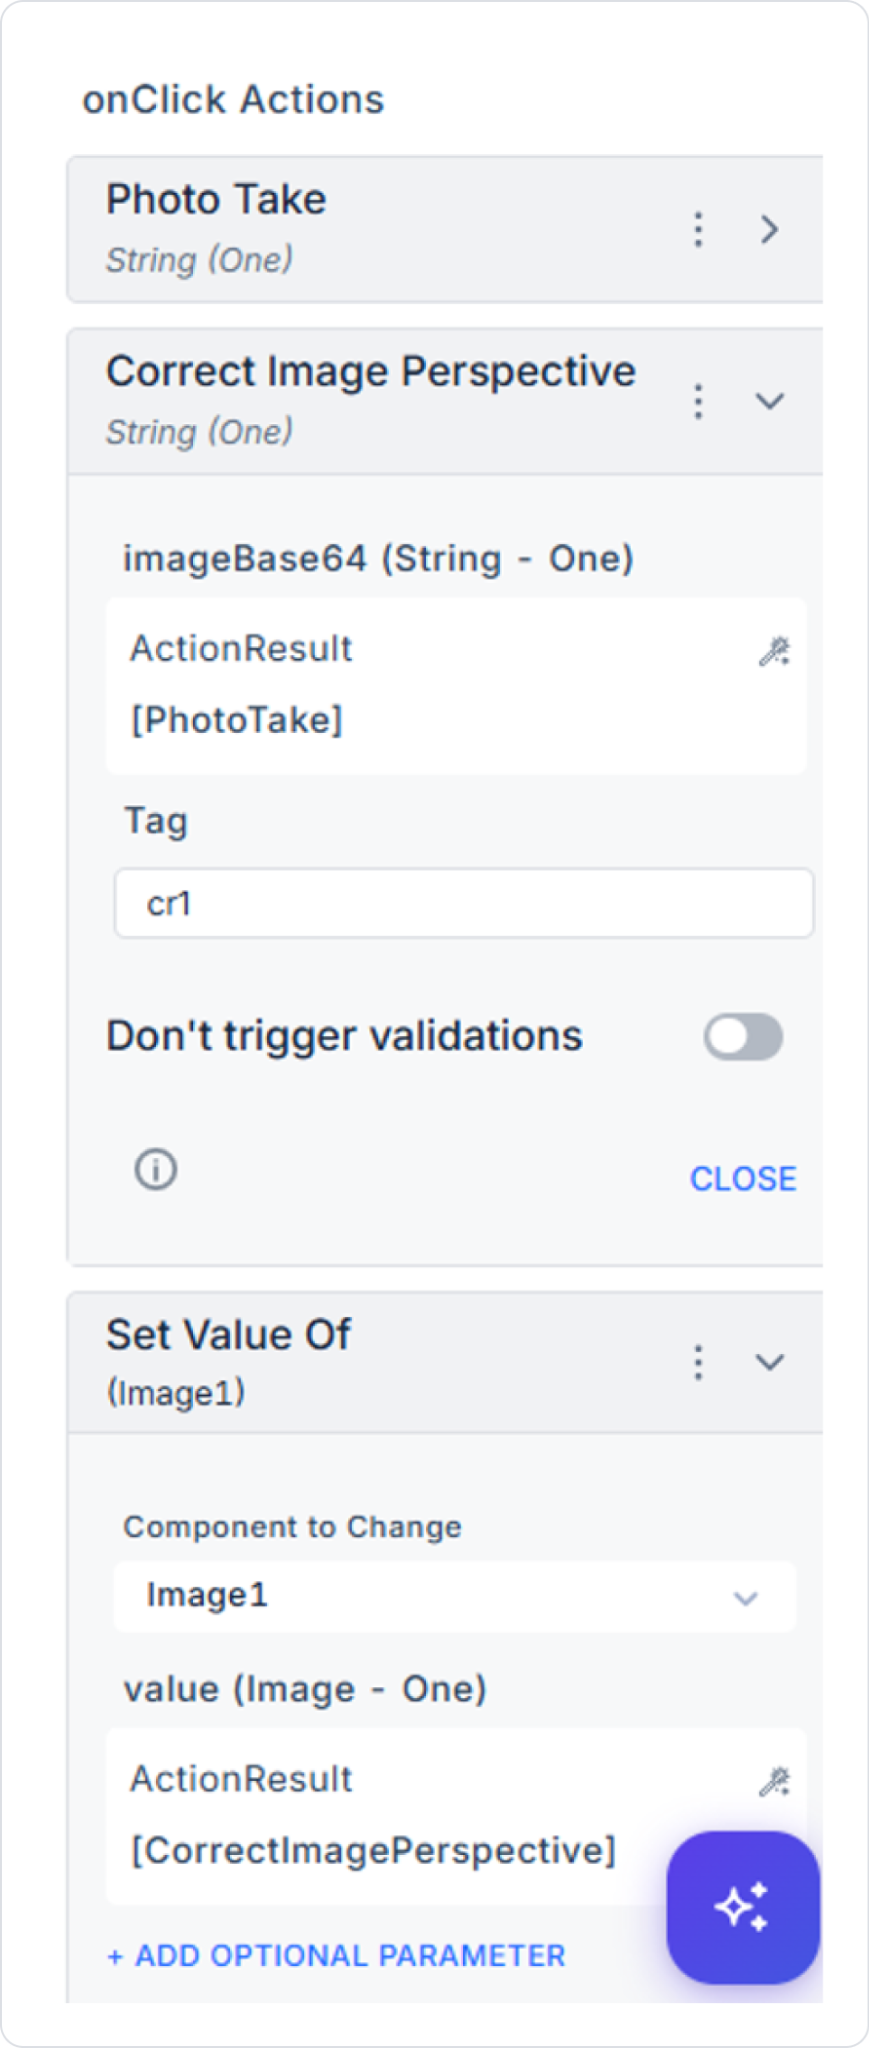
Scenario 1 — Capturing an Image with the Camera (Photo Take)
Flow:
The user takes a photo of the blister pack using the camera. (The Photo Take action is triggered)
The Base64 value returned by the Photo Take action is passed to the imageBase64 parameter of the Correct Image Perspective action via Action Result.
The action detects the object using ML Kit, finds the corners of the rectangle via contour analysis, and applies perspective correction (warp).
The corrected image returns as a Base64 string (type `String (One)`).
The returned Action Result value is bound to the `Image1` element via the `Set Value Of` action, and the corrected image is displayed on the screen.
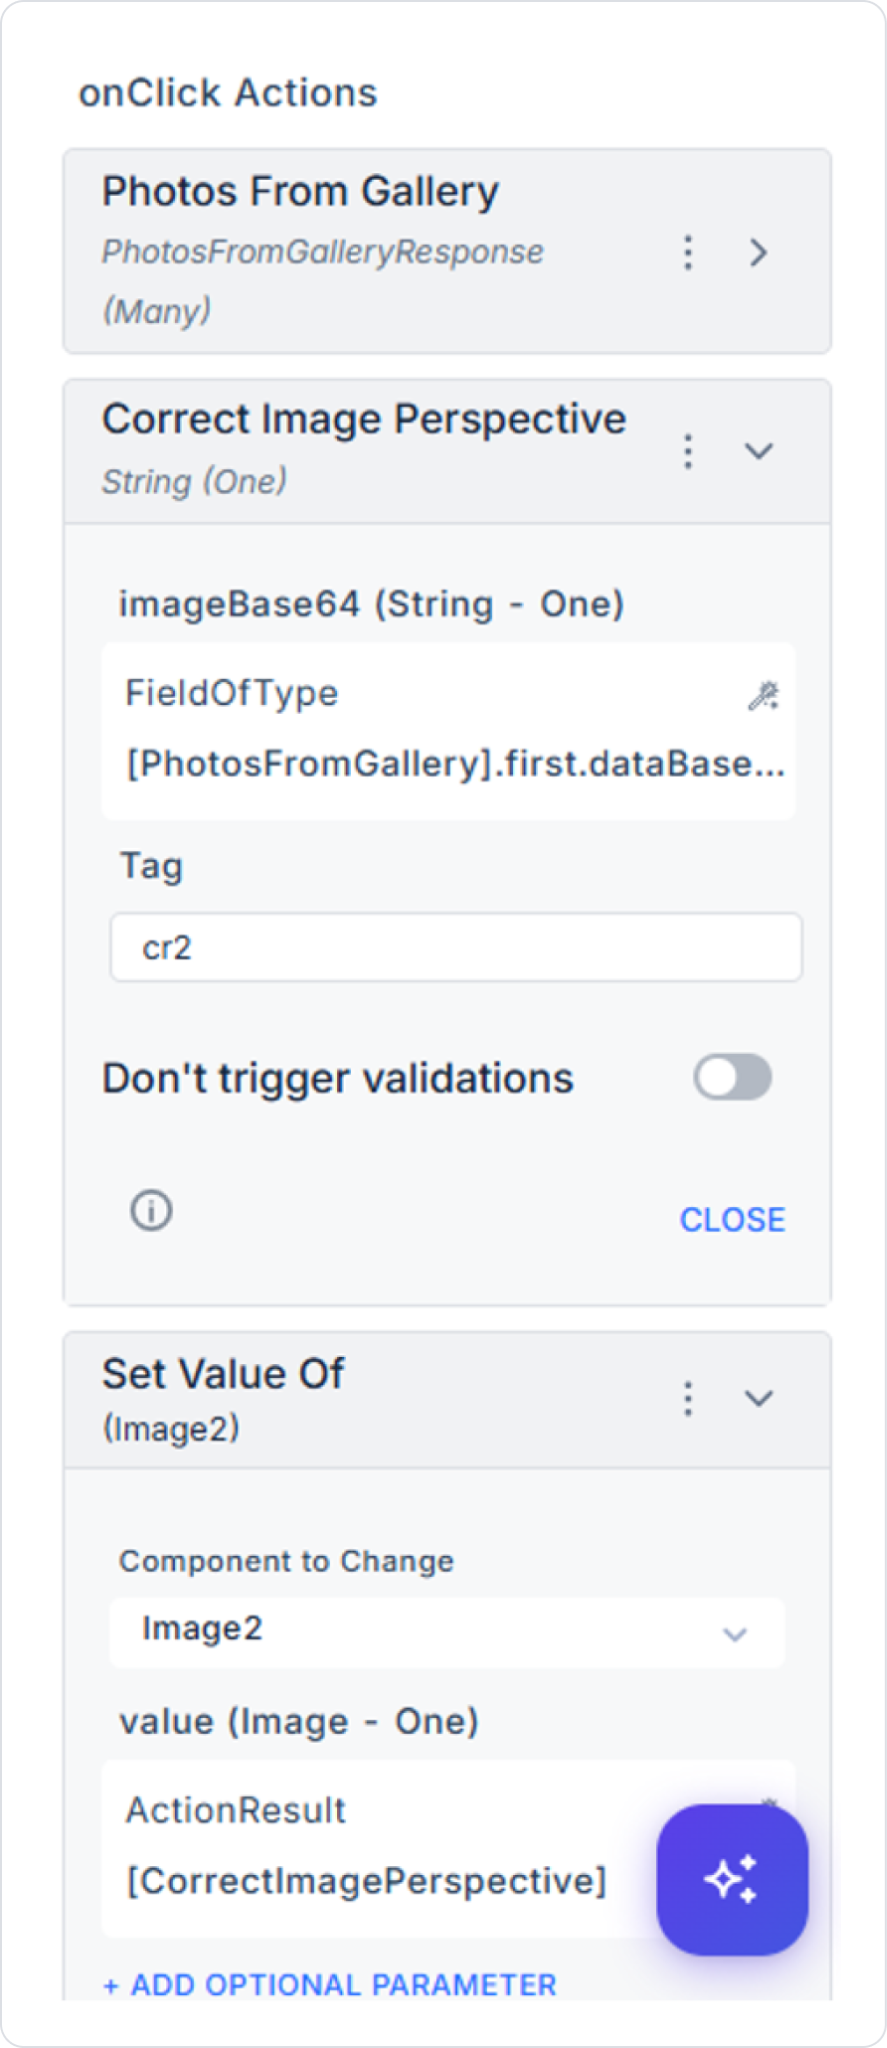
Scenario 2 — Selecting an Image from the Gallery (Photos From Gallery)
Flow:
The user selects an image of a blister pack from their gallery. (The “Photos From Gallery” action is triggered)
The Base64 data of the first image from the collection returned by the “Photos From Gallery” action is passed to the `imageBase64` parameter of the “Correct Image Perspective” action.
The action detects the object using ML Kit, finds the corners of the rectangle via contour analysis, and applies perspective correction (warp).
The corrected image returns as a Base64 string (Type 1).
The returned Action Result value is bound to the Image2 element via the “Set Value Of” action, and the corrected image is displayed on the screen.
Advanced Customizations
Chained Actions: The output of the corrected image can be connected as input to an OCR or another image processing action.
Camera Integration: When used with the Photo Take action, an image captured by the camera can be directly passed to this action.
Conditional Flow: If the return value is empty (when an object cannot be detected), a warning can be displayed to the user using the Condition action.
Technical Risks
Object Detection Failure: If the contrast between the background and the object is low, ML Kit may not be able to perform accurate segmentation. Sufficient lighting and a clear background are recommended.
Failure to Detect Rectangular Corners: Contour analysis may not be able to detect accurate rectangular corners on objects with rounded or irregular edges.
Low-Resolution Input: When a low-resolution image is passed to the `imageBase64` parameter, the quality of perspective correction may decrease.
Skip Validation: `Don't Trigger Validations` should only be used when necessary.
The “Correct Image Perspective” action can be used in scenarios such as medication tracking, inventory management, and document scanning to automatically correct distorted or angled images, making them usable. By combining ML Kit-based object detection, contour analysis, and perspective correction steps into a single action, it simplifies image processing workflows and enhances application quality.