AI Chatbot — Credit, Limit, and Analytics Management
12/8/26
1. Overview
The Kuika platform provides a management screen where you can control credit consumption, usage limits, and detailed usage analytics for the AI Chatbot feature used in your workspace. You can reach this screen after logging into the platform by clicking the gear (Settings) icon in the left sidebar and selecting the AI Chatbot tab from the menu that opens.
The AI Chatbot management screen consists of three tabs:
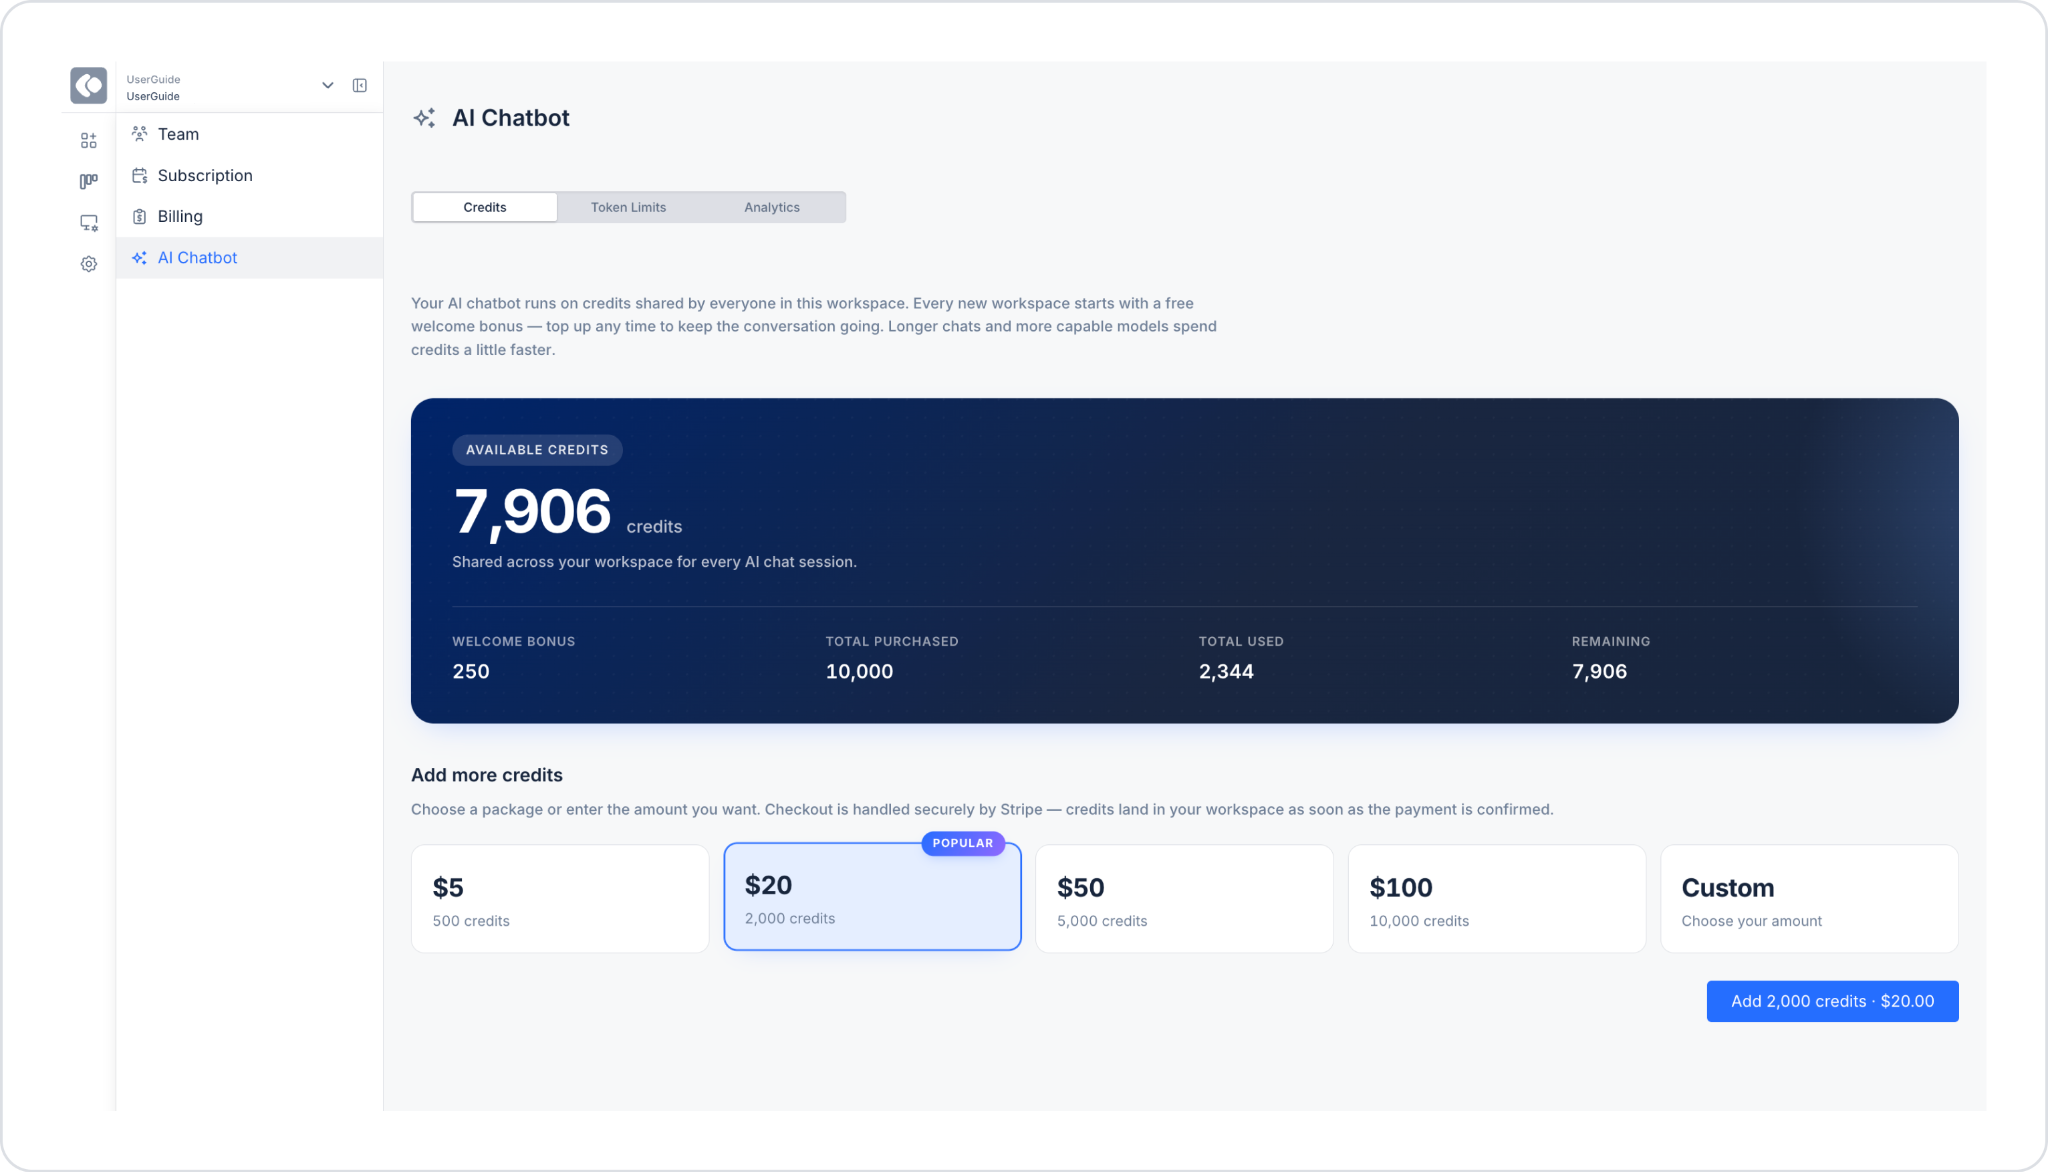
Credits: View your workspace's credit balance and purchase additional credits.
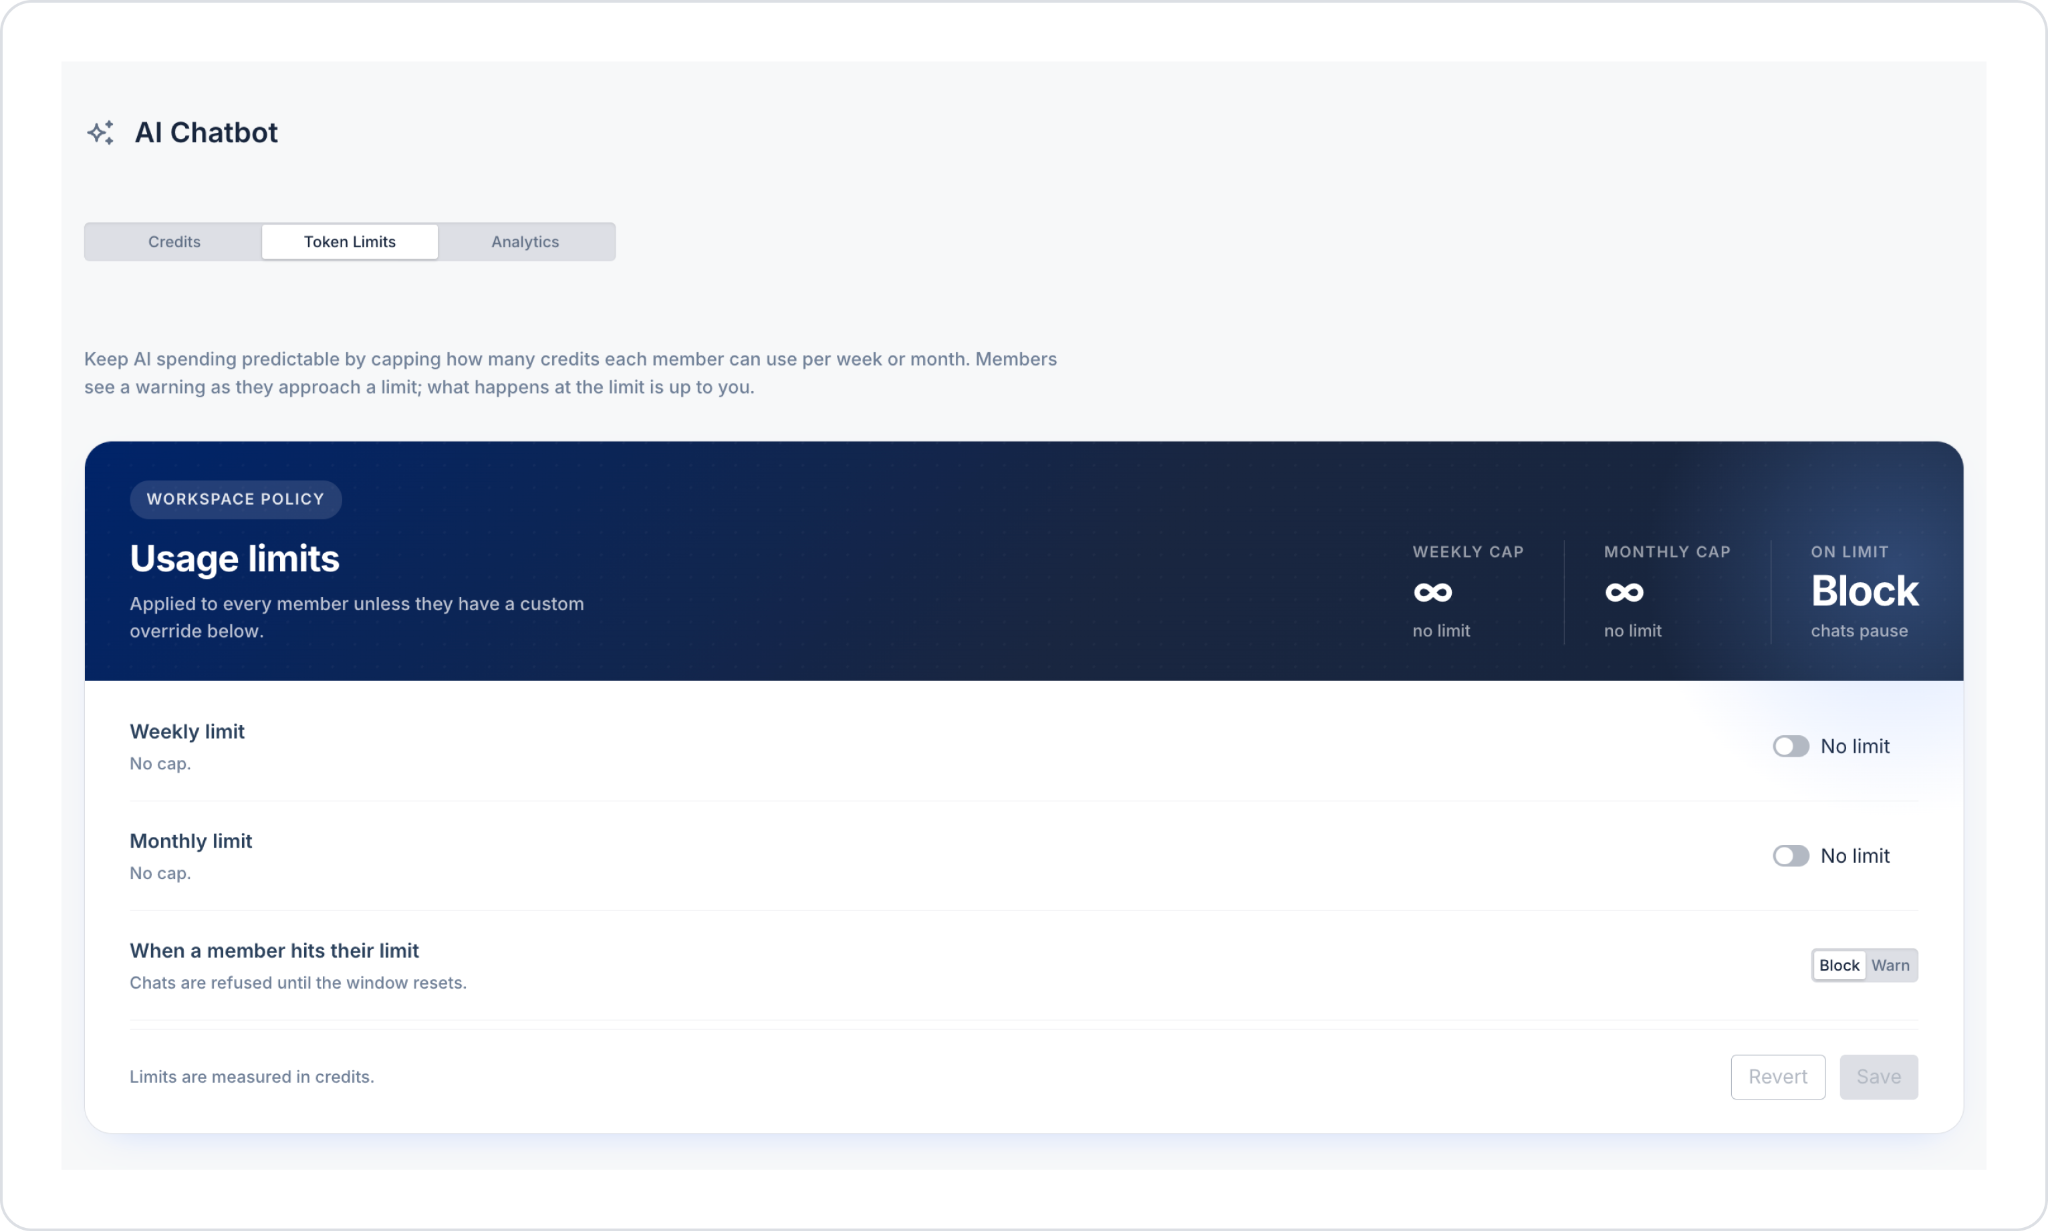
Token Limits: Restrict members' AI usage on a weekly/monthly credit basis.
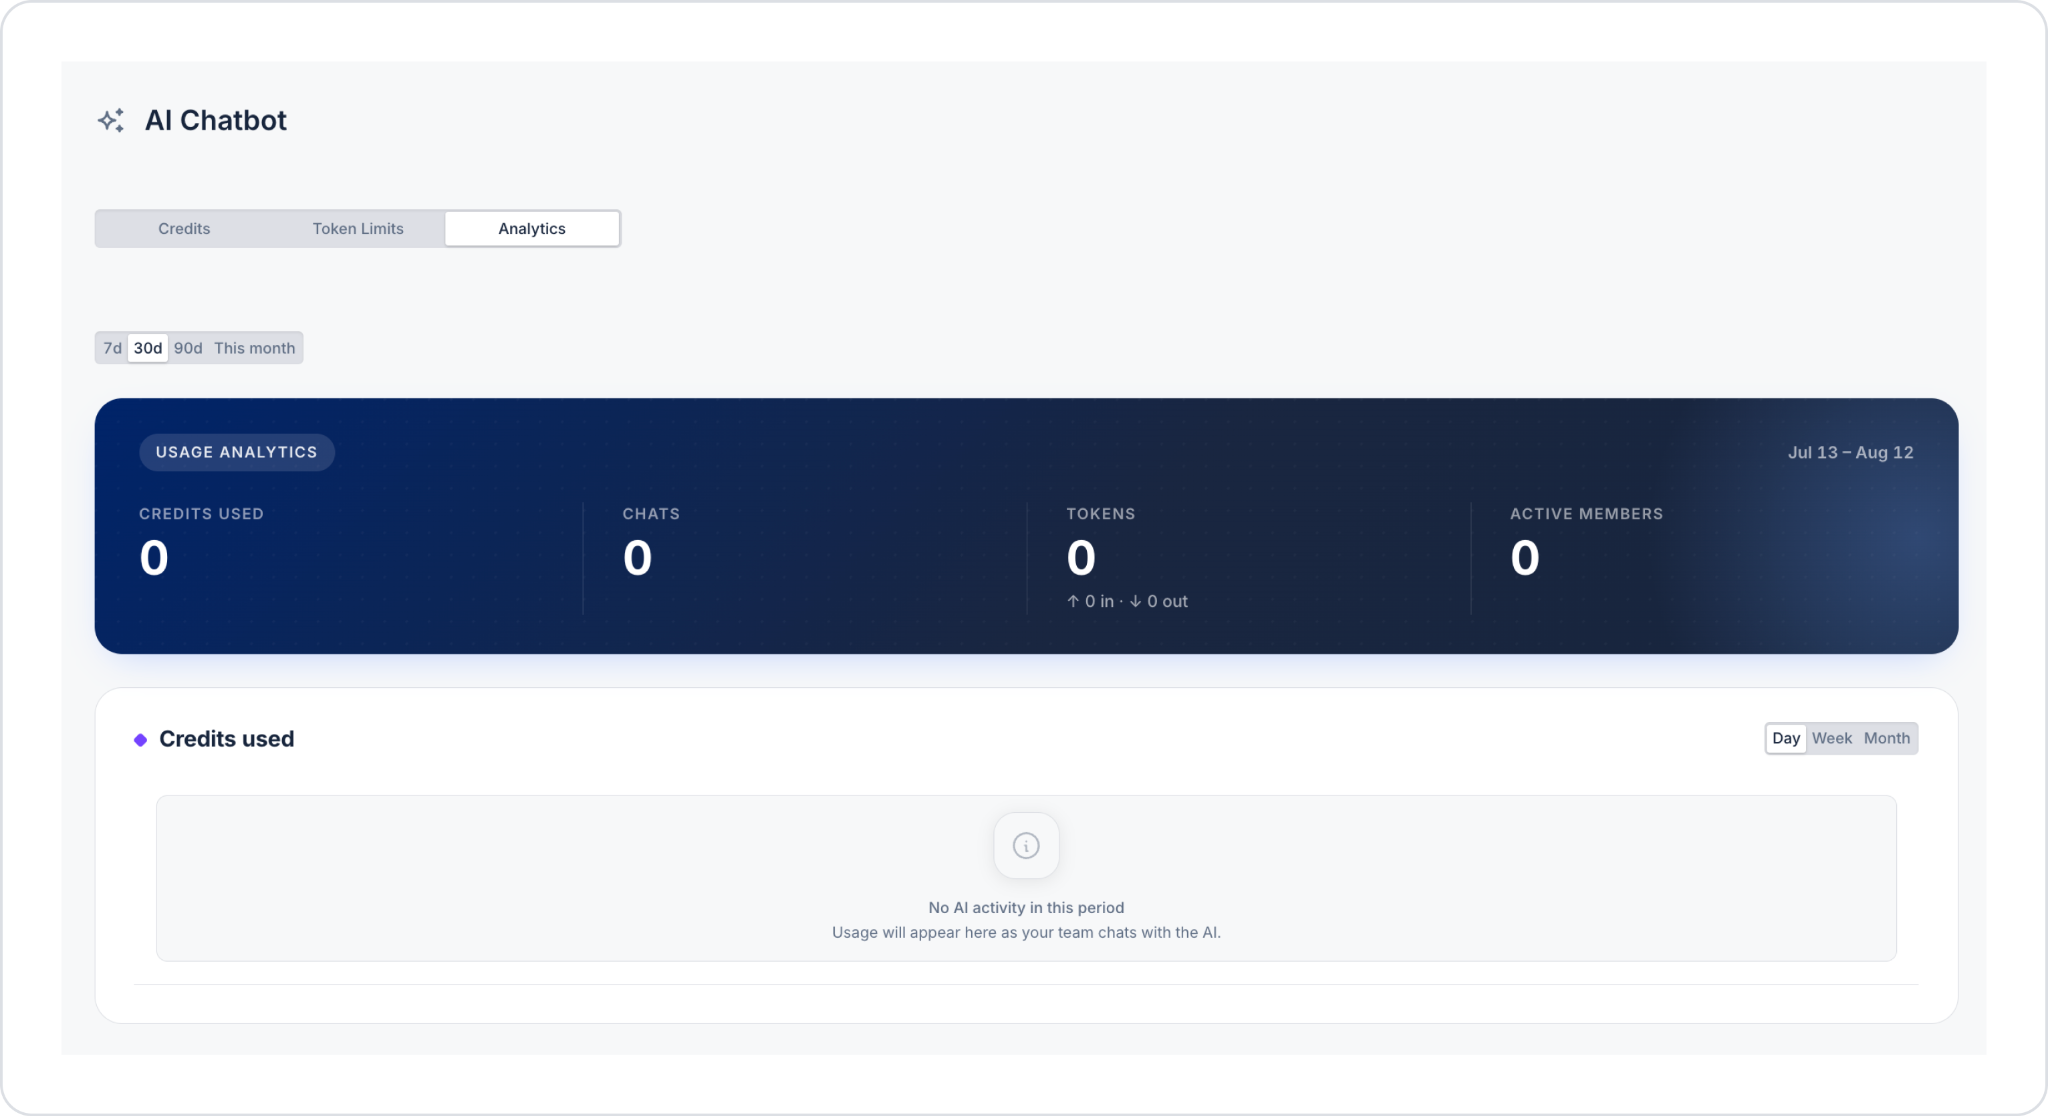
Analytics: Analyze credit and token consumption, chat counts, and active member information over time.
1.1. Access and Visibility
The visibility of these three tabs depends on the user's role in the workspace:
Owner (workspace owner): Sees and can manage all three tabs — Credits, Token Limits, and Analytics — at the top of the screen.
Member (non-owner user): The tab bar is not displayed; only the Credits tab content is shown. Even if a member attempts to access the Token Limits or Analytics tab directly via URL (e.g., ?tab=limits), these tabs will not open, and the Credits content is shown instead.
When a tab is selected and the page is refreshed, the selected tab is preserved and the corresponding URL parameter remains unchanged.
2. Credits Tab
This tab lets you manage the credit system your workspace uses for the AI Chatbot. It can be viewed by both the Owner and members.
The AI Chatbot operates on a shared credit pool used by all members of your workspace. Every new workspace starts with a free welcome bonus; additional credits can be purchased at any time once the balance runs low. Longer chats and more capable models consume credits faster.
2.1. Available Credits
The summary card at the top of the screen displays the following information:
Available Credits: The total amount of credit currently available in the workspace.
Welcome Bonus: The free starting credit granted when the workspace was created.
Total Purchased: The total amount of credit purchased to date.
Total Used: The total amount of credit consumed to date.
Remaining: The remaining available credit amount (shows the same value as Available Credits).
2.2. Add More Credits
When your credit balance runs low, you can purchase additional credits by selecting one of the package options at the bottom of the screen:
Use the Custom option to create a credit package of any desired amount (via a slider).
The most popular package is highlighted with a "POPULAR" badge.
Payments are processed securely via the Stripe infrastructure; purchases can also be tested using Stripe test cards in a test environment. Once the payment is confirmed, the purchased credits are immediately reflected in the workspace, and the user is redirected to the Credits tab.
2.3. Buying Credits from the Chat Panel
Credit purchases can also be initiated directly from the AI Chat panel, without navigating to the Settings screen:
When credits run low, clicking the Buy credits option shown in the chat panel opens a purchase modal.
This modal offers the same package options as the Credits tab, but the tab bar for the other tabs (Token Limits/Analytics) is not shown within this modal.
3. Token Limits Tab
This tab is visible only to the Owner and lets you keep AI spending predictable by capping how much credit each member can use per week or month. Members see a warning as they approach a defined limit; what happens once the limit is reached is determined by the Owner.
3.1. Workspace Policy
This section defines the general (default) usage policy applied to all members who don't have a custom override:
Weekly Limit: Defines the maximum amount of credit a member can use within a week. When the toggle is off, it behaves as "No limit" (unlimited); when turned on, a numeric input field appears immediately to the left of the toggle for entering a credit value.
Monthly Limit: Defines the maximum amount of credit a member can use within a month. It's toggled and configured the same way as the weekly limit.
When a Member Hits Their Limit: Determines how the system behaves once a member reaches the defined limit:
Block: The member's chats are completely paused (refused) until the limit period (week/month) resets.
Warn: The member sees a warning, but usage is not blocked.
Limits are always measured in credits and cannot be set below 1 (a value of 0 or an empty value is not accepted).
Changes are saved with the Save button; Revert reverts any unsaved changes back to the last saved state.
3.2. Per Member
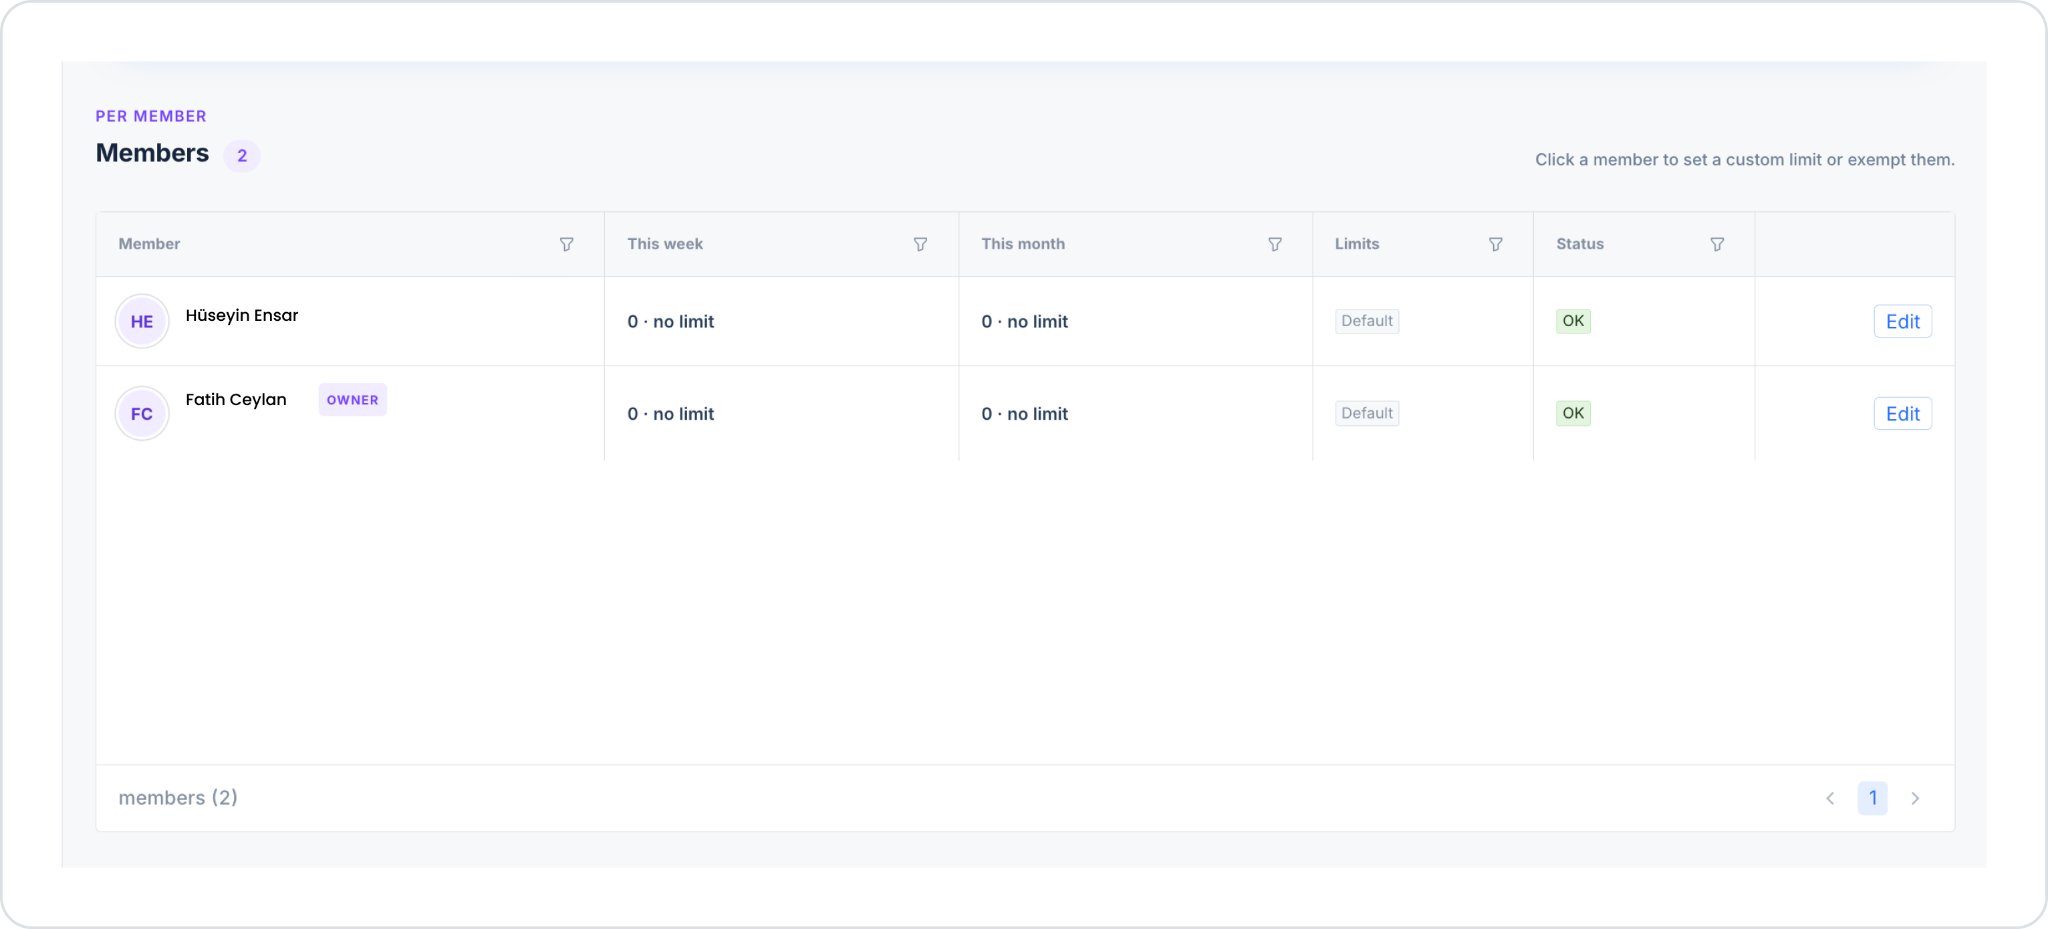
While the Workspace Policy applies as the default for all members, the Members table lets you define custom limits for specific members or exempt them from the general policy entirely.
The table lists the following information for each member:
Member: The member's name and email address.
This Week / This Month: The amount of credit the member has used in the given period along with their defined limit (e.g., "0 · no limit").
Limits: The limit policy applied to the member (defaults to "Default" — uses the Workspace Policy).
Status: The member's current limit status:
OK: No limit has been exceeded or approached.
Warning: Shown when the Warn action is configured and the limit is exceeded, or when usage reaches 80–99% of the limit.
Blocked: Shown when the Block action is configured and the limit is exceeded.
Edit: Clicking a member row or the "Edit" button opens a modal titled "Usage limit — [member name]".
Within this modal, three different limit modes can be applied to the member:
Default: The general limits defined in the Workspace Policy apply.
Custom limits: A custom weekly/monthly credit limit is entered and saved for the member; the Limits column then shows "Custom."
Unlimited: The member is exempted from all limits; the Limits column shows "Unlimited," and "no limit" is displayed next to their usage.
A custom limit or exemption defined for a member can be removed via Remove override, returning the member to the Default (Workspace Policy) limits.
The filter icons in the table headers allow filtering by the Member, This Week, This Month, Limits, and Status fields.
3.3. Effect of Limits on Chat
Once saved, defined limits take effect starting from the member's next AI request:
When the Block action is configured and the limit has been exceeded, the member cannot send messages in chat; a red limit error is displayed on screen.
When the Warn action is configured and the limit has been exceeded, messages can still be sent; a warning about the limit being exceeded is shown alongside the message.
When usage reaches 80–99% of the defined limit (even if not yet exceeded), messages can still be sent, but a warning indicating the approaching limit is displayed.
If a member is marked as Unlimited, usage continues normally without any blocking or warning.
Defined credit/token limits only affect chats in Designer and Builder modes; since Ask mode is read-only and free, questions can still be asked in Ask mode even when the limit has been reached.
4. Analytics Tab
The Analytics tab is visible only to the Owner and lets you track AI Chatbot usage across your workspace in detail. This tab makes it possible to see which member used which model, how often, and how much credit/token they spent.
4.1. Time Range Selection
At the top of the screen, the period to be analyzed can be selected from the following preset options:
7d (last 7 days)
30d (last 30 days)
90d (last 90 days)
This month
The selected range is displayed in date format in the top-right corner of the screen (e.g., "May 14 – Aug 12"), and all summary data and the chart update instantly according to the selected range.
4.2. Usage Analytics
A dark-colored summary card containing the following key metrics for the selected period is displayed:
Credits Used: The total amount of credit consumed during the period.
Chats: The total number of chats started/conducted during the period.
Tokens: The total number of tokens processed during the period; input (in) and output (out) token amounts are also shown separately (e.g., "793.7K in · 39.9K out").
Active Members: The number of members who used the AI Chatbot at least once during the period.
If no AI activity occurred during the selected period, all values are shown as "0," and the chart area displays the message "No AI activity in this period — Usage will appear here as your team chats with the AI."
4.3. Credits Used Chart
Below the Usage Analytics card, a line chart shows how credit consumption has changed over time.
The chart data can be grouped by Day / Week / Month.
Dates are shown on the horizontal axis, and the amount of credit consumed is shown on the vertical axis.
Periods of increased usage intensity appear as distinct peaks on the chart, making it easy to spot unusual or high-volume usage periods.
4.4. Where Credits Go
This section lets you see how credit consumption is distributed. The tab selector at the top lets you switch between three different breakdowns:
Members: Lists the members who consumed the most credit, along with the credit amount used and number of chats conducted (e.g., "Furkan Ceylan — 179 credits · 17 chats").
Projects: Lists the projects that consumed the most credit. (i) Some older records may not be linked to any project; such records are shown as "Unattributed."
Models: Lists the AI models that consumed the most credit (e.g., openai/gpt-5.4, openai/gpt-5.4-nano).
The list is sorted from highest to lowest consumption, and each row shows a rank number along with the relevant member/project/model name and a consumption summary.
4.5. Recent Requests
This table lists a detailed log of every individual AI request, row by row. It can be used for auditing, debugging, and evaluating usage quality.
Fields included in the table:
When: The date and time the request occurred.
Member: The email address of the member who sent the request.
Project: The project the request is associated with (requests not linked to a project are shown as "Unattributed").
Model: The AI model used for the request (e.g., openai/gpt-5.4, openai/gpt-5.4-nano).
Credits: The amount of credit spent on the request.
Tokens: The number of tokens processed for the request.
The filter icon in each column header allows filtering by that field. Additionally, the Search box above the table allows free-text search across records. The table is paginated using the pagination controls at the bottom of the page.
4.5.1. Request Detail Panel
Clicking any row in the table opens a detail panel for that request on the right side of the screen. This panel includes:
The request's date, member, project, and model information
The amount of credit and tokens spent
Prompt: The content of the message the member sent to the AI
Response: The content of the AI's reply
If the content of an older (archived) request is no longer stored, the panel displays the note "Message content isn't available."
The detail panel can be closed by pressing Esc or clicking outside the panel.
4.6. Error States
If a server-side issue occurs while the Token Limits or Analytics tab is loading (e.g., the backend is unreachable), the page does not crash — instead, a red error banner and a Retry button are displayed. Once the issue is resolved, clicking Retry reloads the content.
5. Usage Scenario: Credit and Usage Oversight
A workspace owner wants to audit their team's AI Chatbot usage and define limits where necessary.
Steps:
Click the gear icon in the left sidebar and go to the AI Chatbot tab.
Check the current credit balance from the Credits tab; if the balance is low, purchase additional credits by selecting a suitable package.
Go to the Analytics tab and select the desired time range (7d / 30d / 90d / This month).
Select the Members view under Where Credits Go to identify the members consuming the most credit.
If you find that a particular member's credit consumption is too high, go to the Token Limits tab, locate that member in the table, and use "Edit" to open the modal, then use the Custom limits option to define a custom weekly/monthly limit.
From the Recent Requests table, filter requests by a specific date or model, and click on a specific row to review its Prompt/Response details if needed.
Expected System Behavior:
All data in the Analytics tab updates instantly according to the selected time range.
Limits defined in the Token Limits tab take effect starting from the member's next AI request after saving.
A member who reaches their limit cannot send new requests in Designer/Builder mode if the "Block" policy is configured; if "Warn" is configured, they see a warning but can continue using the feature. Ask mode is not affected by these limits.